We (Flender GmbH) and certain third parties use cookies on this website. The details regarding the types of cookies, their purpose and the third parties involved are described below and in our Cookie Notice. Please click on “Allow all and continue” to consent to our usage of cookies as described in the Cookie Notice in order to have the best possible experience on our websites. You can also set your preferences or reject cookies (except for strictly necessary cookies).
Cookie Notice and further details
L'inscription pour les nouveaux utilisateurs comprend la vérification de l'adresse e-mail, la création d'un mot de passe, la configuration de l'authentification multifactorielle (MFA) et la saisie de toutes les données requises.
Vous trouverez des instructions étape par étape sous la rubrique Inscription.
La saisie répétée d'un mot de passe erroné est une cause fréquente de blocage d'un compte dans la Flender Mall. Le déblocage peut être effectué par l'équipe E-Business dans notre système d'administration.
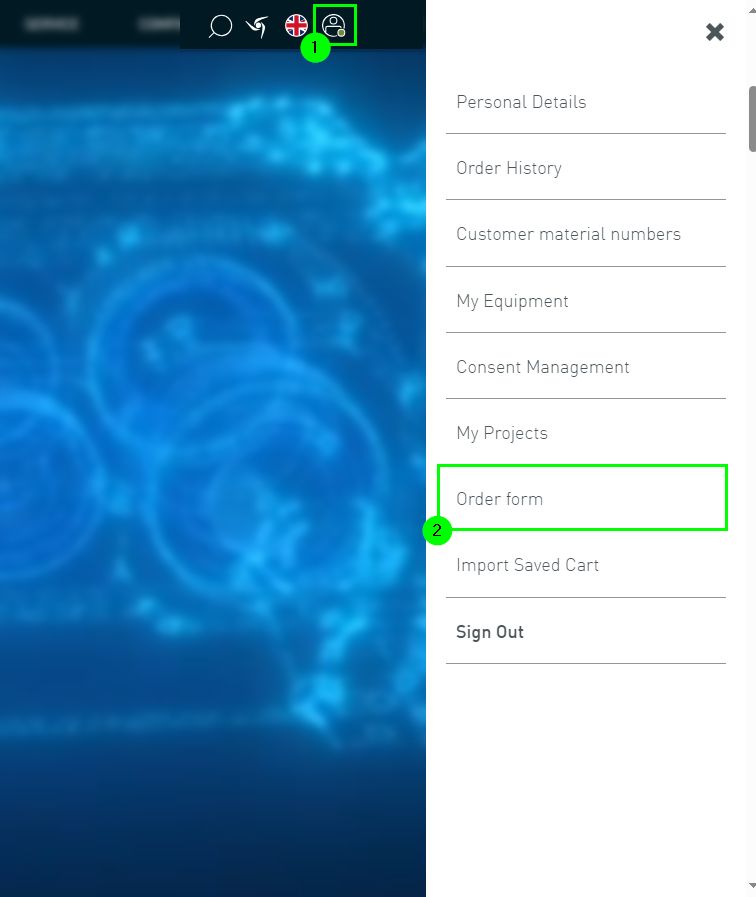
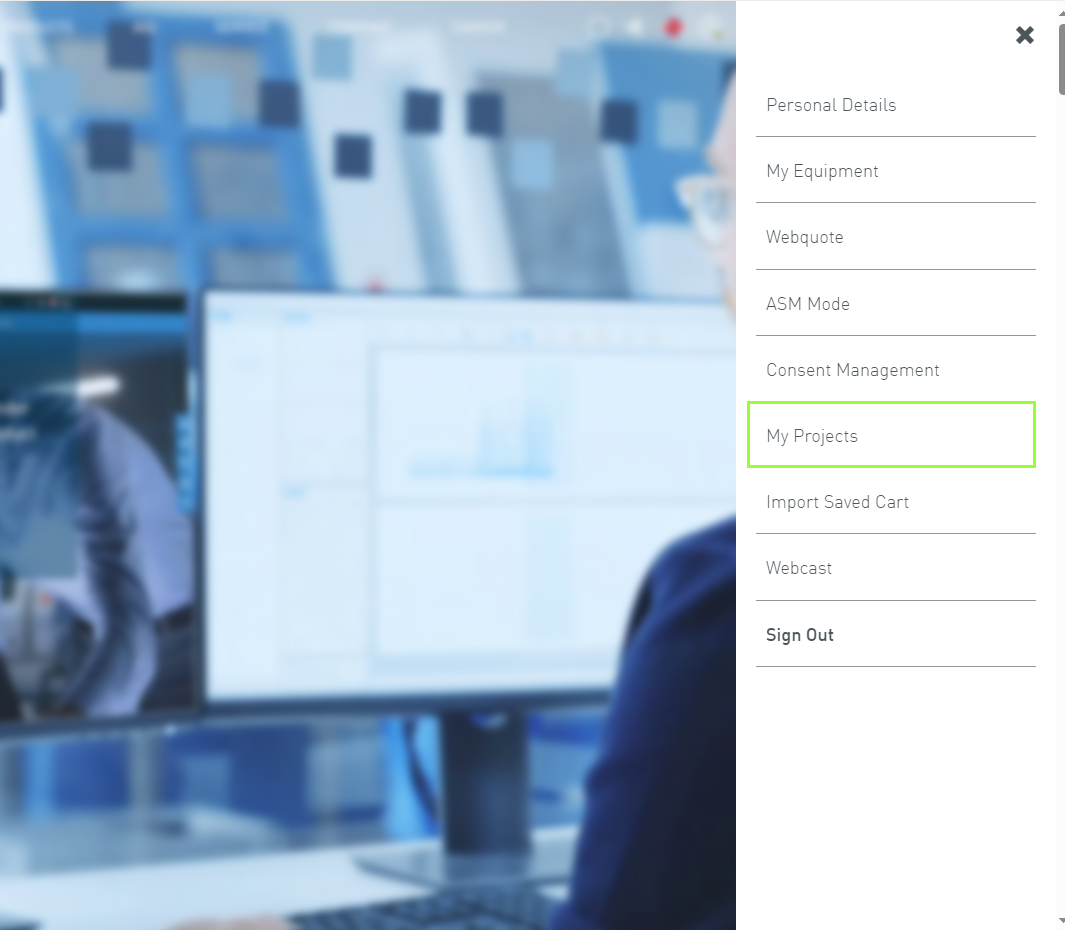
Une fois connecté, le menu utilisateur se trouve en haut à droite de la page web. Pour y accéder, cliquez sur l'icône « Personne ».
La couleur du point dans le coin inférieur droit indique le statut de connexion de l'utilisateur. Un point vert signale une connexion réussie, tandis qu'un point rouge indique qu'aucune connexion n'a encore été établie.
Selon les autorisations d'accès, différentes fonctions peuvent être appelées ici.
Dans le menu utilisateur, sous la rubrique « Données personnelles », vous avez la possibilité de consulter et de modifier vos données. Les données suivantes peuvent être modifiées ici :
Adresse de livraison (les adresses de livraison enregistrées ici peuvent être sélectionnées lors du paiement)
Les données suivantes ne peuvent pas être modifiées :
Adresse de facturation
Prénom et nom
Si ces données doivent être modifiées, veuillez contacter le service E-Business via le formulaire de contact Formulaire de contact
Vous ne savez pas encore quel produit Flender vous convient le mieux ? - En saisissant différentes exigences, vous pouvez afficher et comparer différentes solutions possibles à l'aide de la configuration.
Une solution sur mesure est conçue à partir des exigences, par exemple celles de la machine motrice (configuration des réducteurs) ou des données de performance et des dimensions (configurateur d'accouplements).
L’inscription à la Flender Mall se fait via une authentification à facteurs multiples (MFA). Il existe 3 méthodes différentes.
1. Processus d’auto-enregistrement
Les étapes suivantes sont nécessaires pour l’auto-enregistrement.
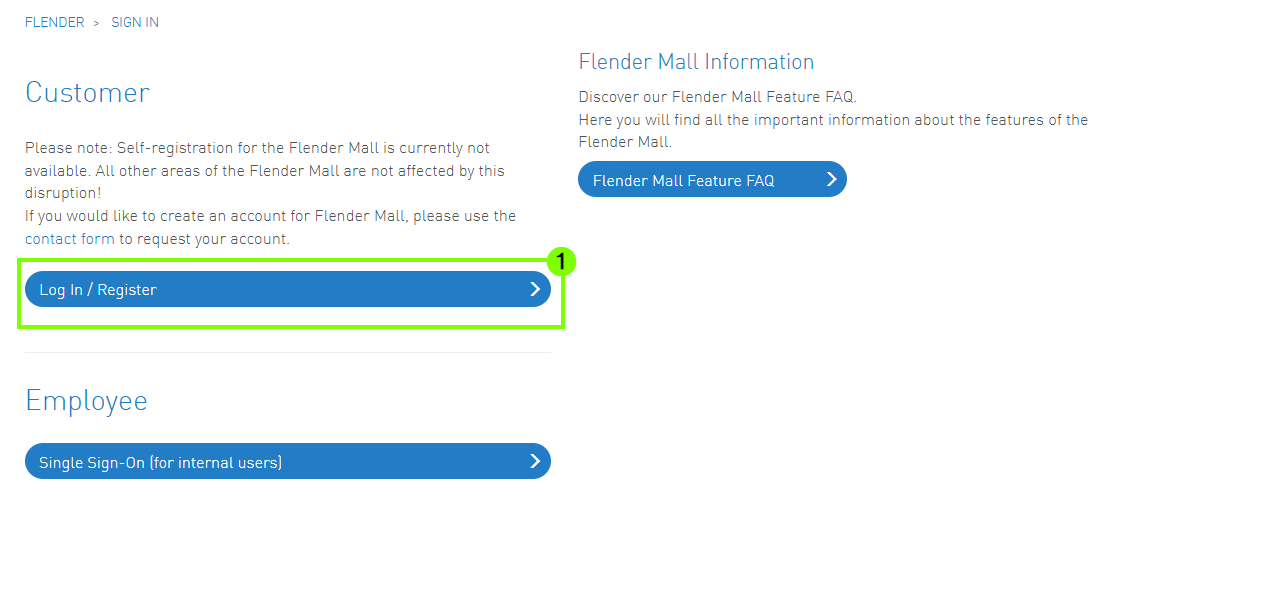
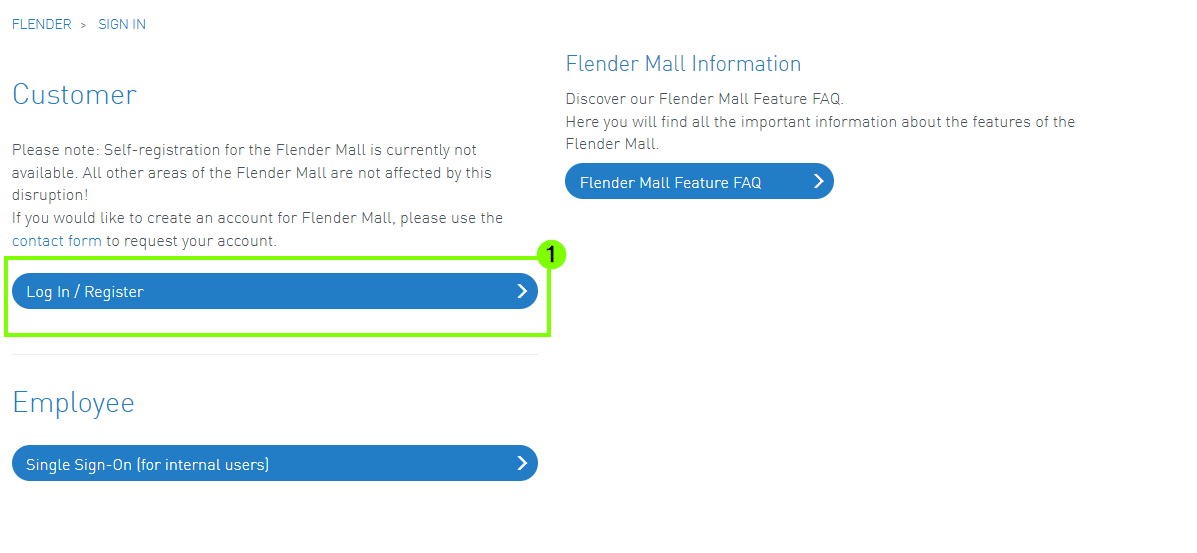
1. Accédez à la page de connexion Flender Mall - LogIn et sélectionnez l’option "Log In / Register" (1).
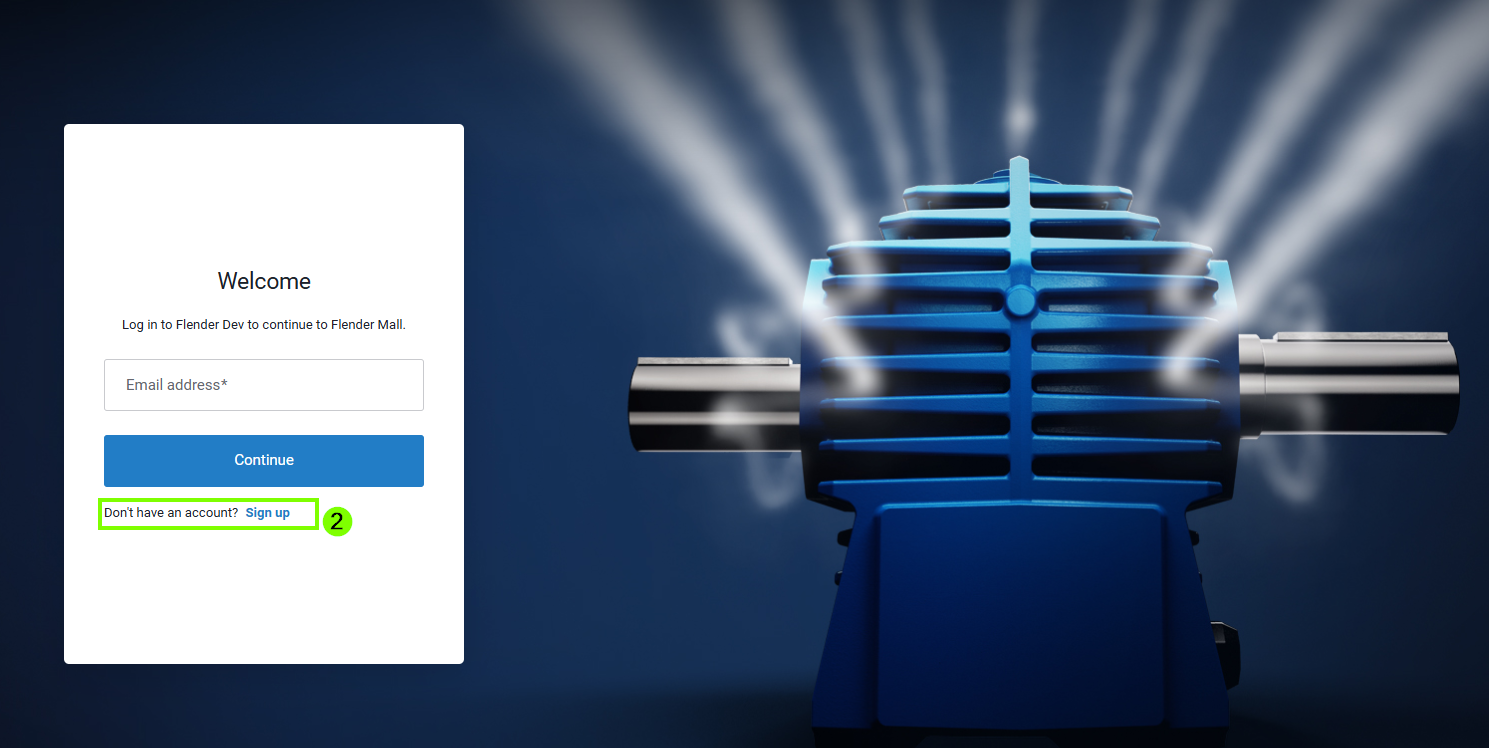
2. Ensuite, dans la fenêtre de connexion, cliquez sur “Sign Up” (2) pour vous enregistrer sur la FlenderMall.
3. À l’étape suivante, entrez votre adresse e-mail (3) et cliquez sur Continue (4).
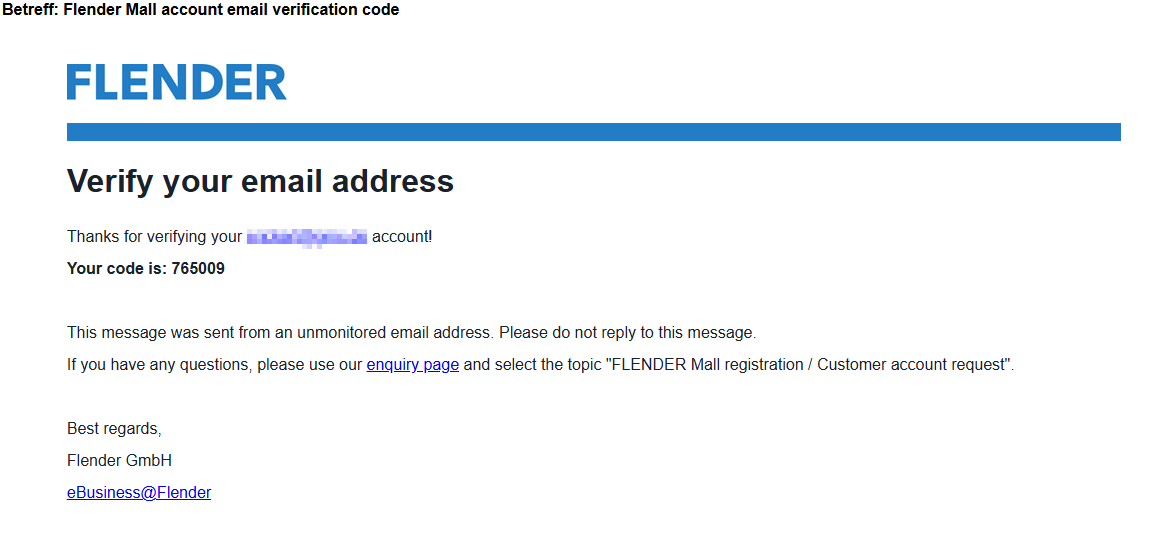
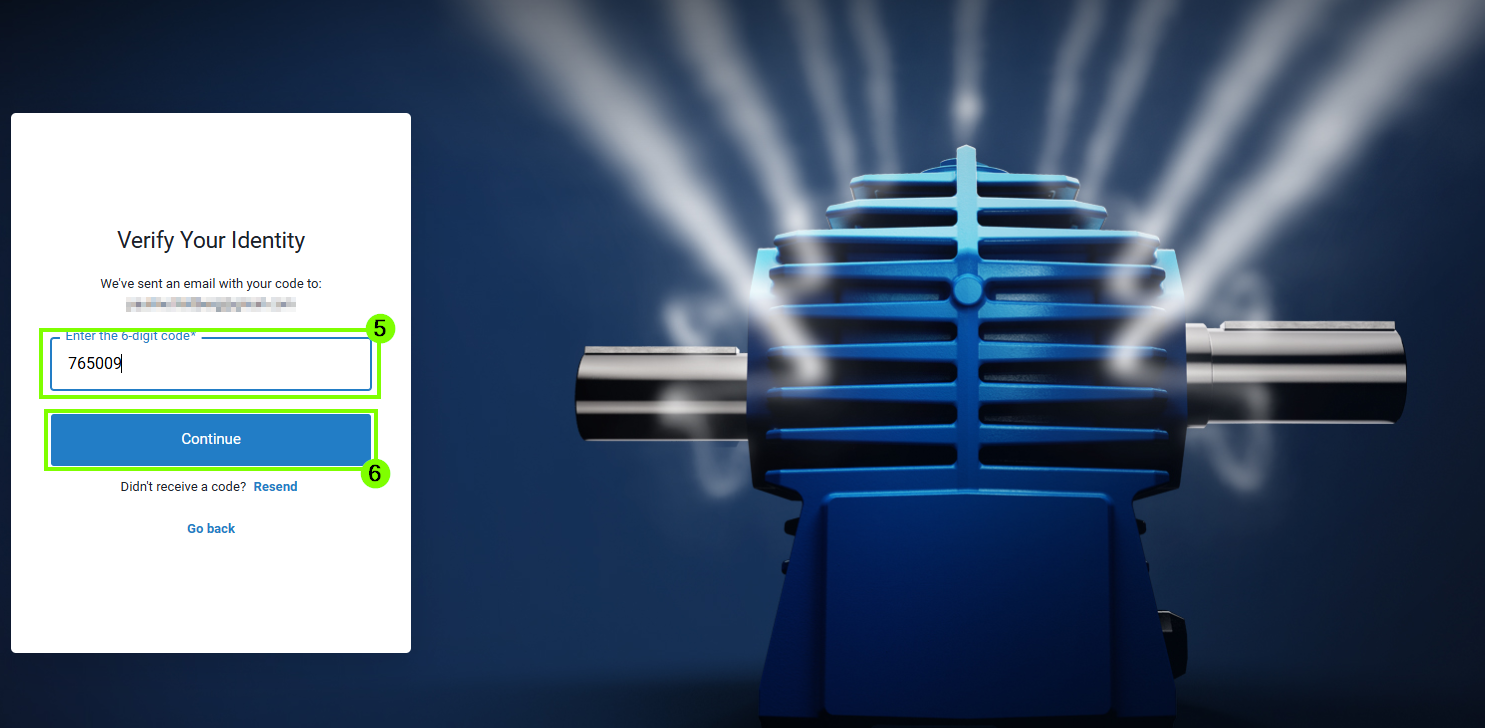
4. Vous recevrez ensuite un code d’authentification par e-mail, saisissez le code à 6 chiffres dans le champ prévu (5) puis sélectionnez Continue (6).
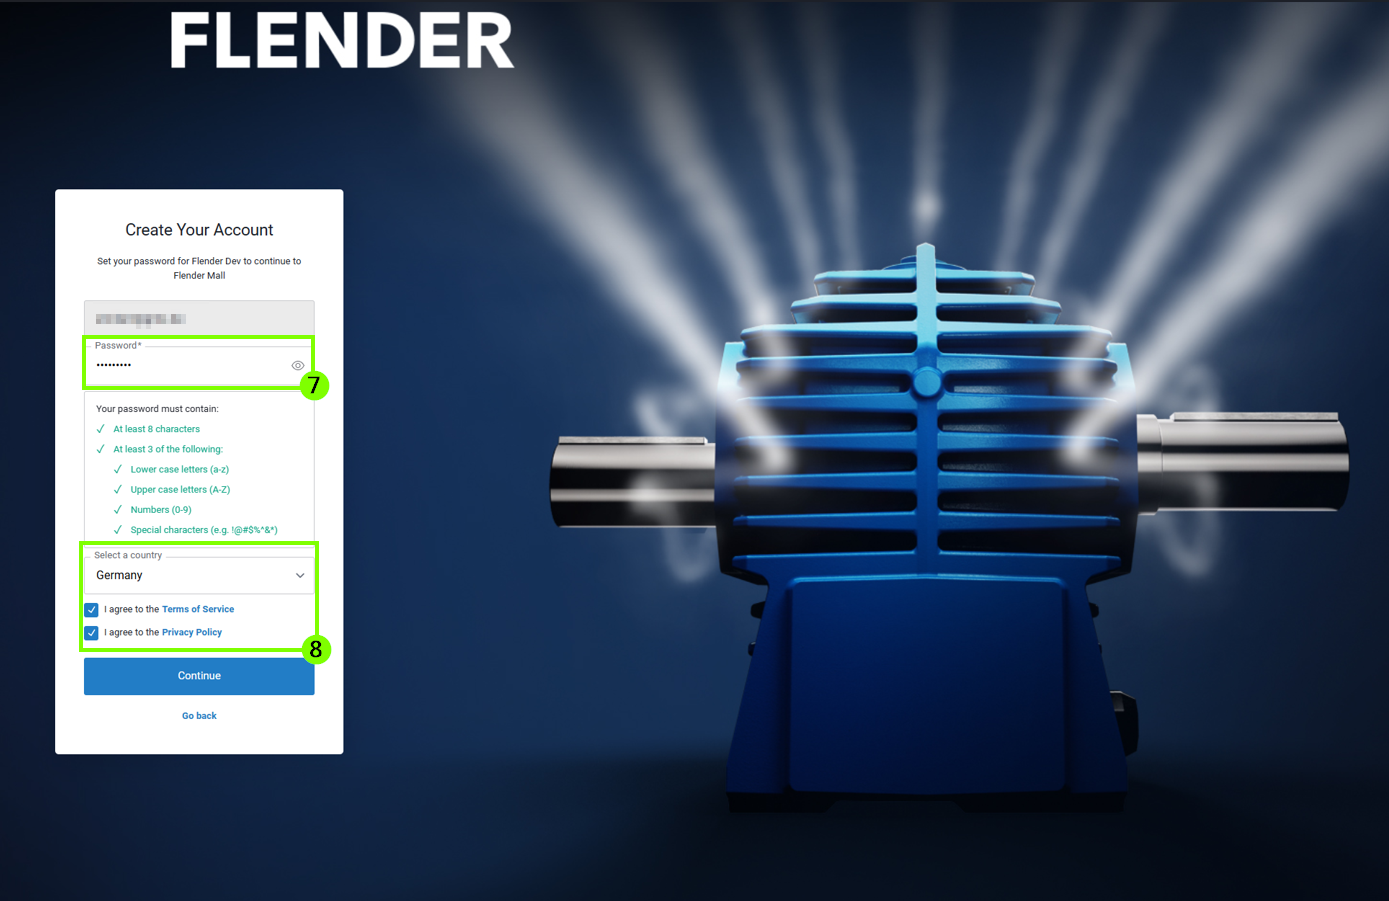
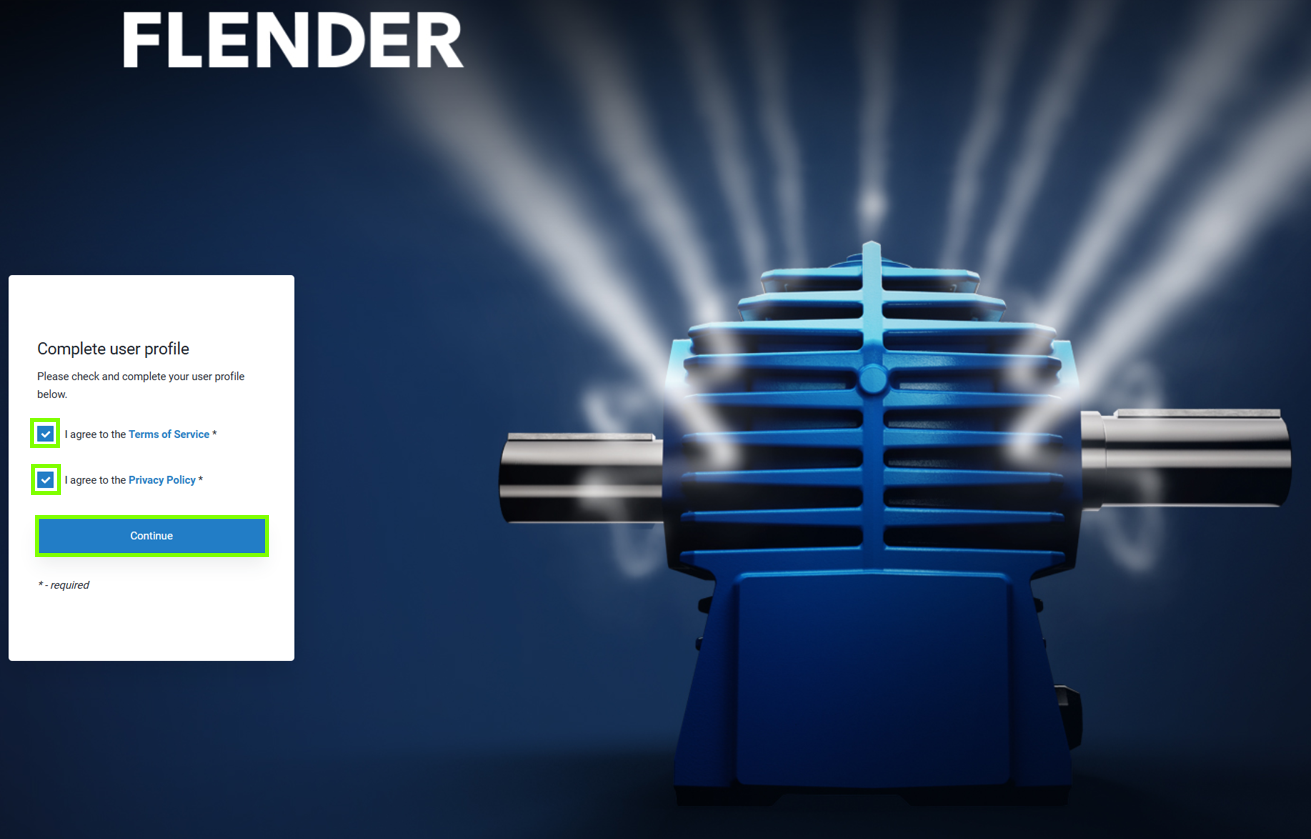
5. Créez ensuite un mot de passe personnel (7). Pour continuer, veuillez accepter les conditions d’utilisation (8).
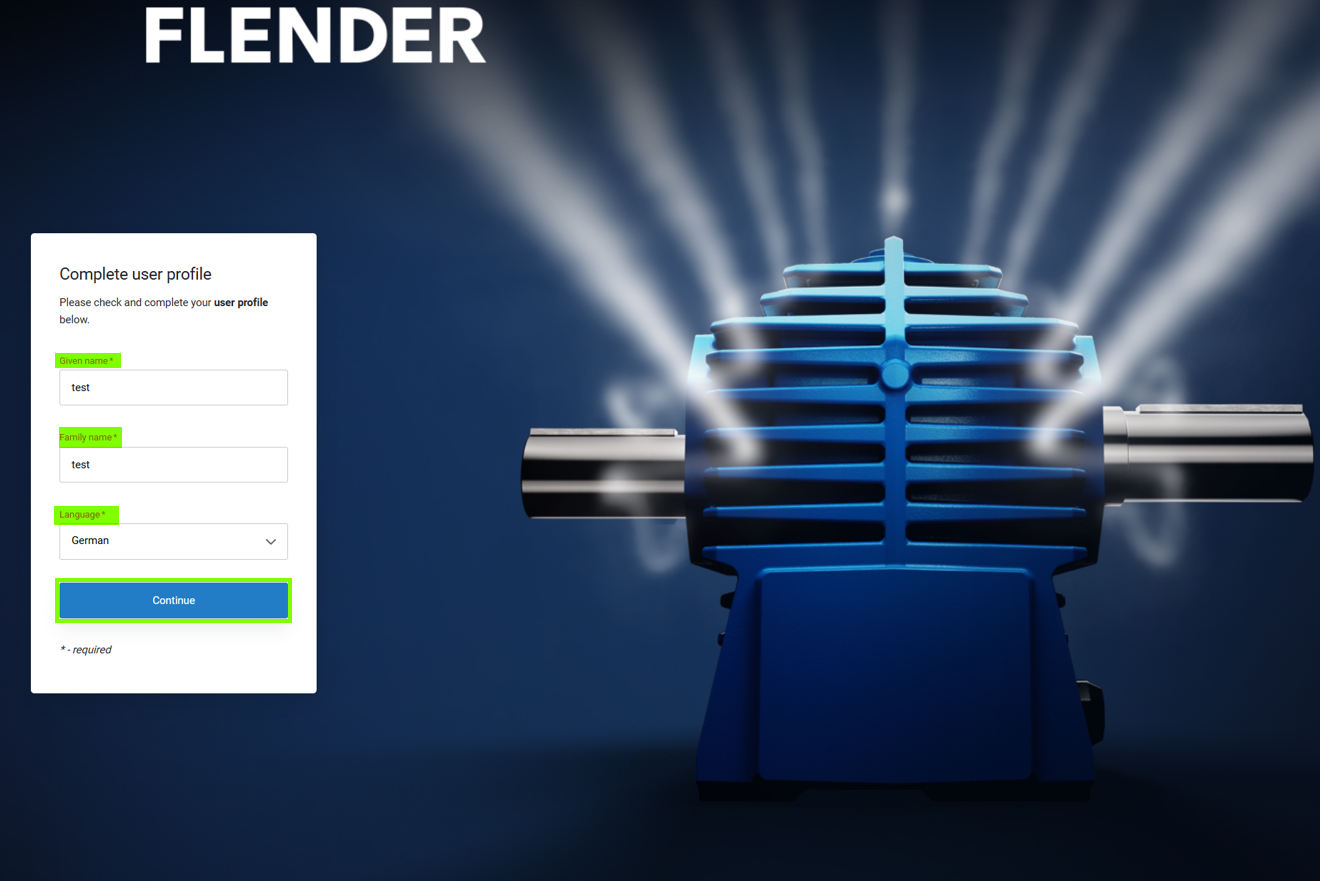
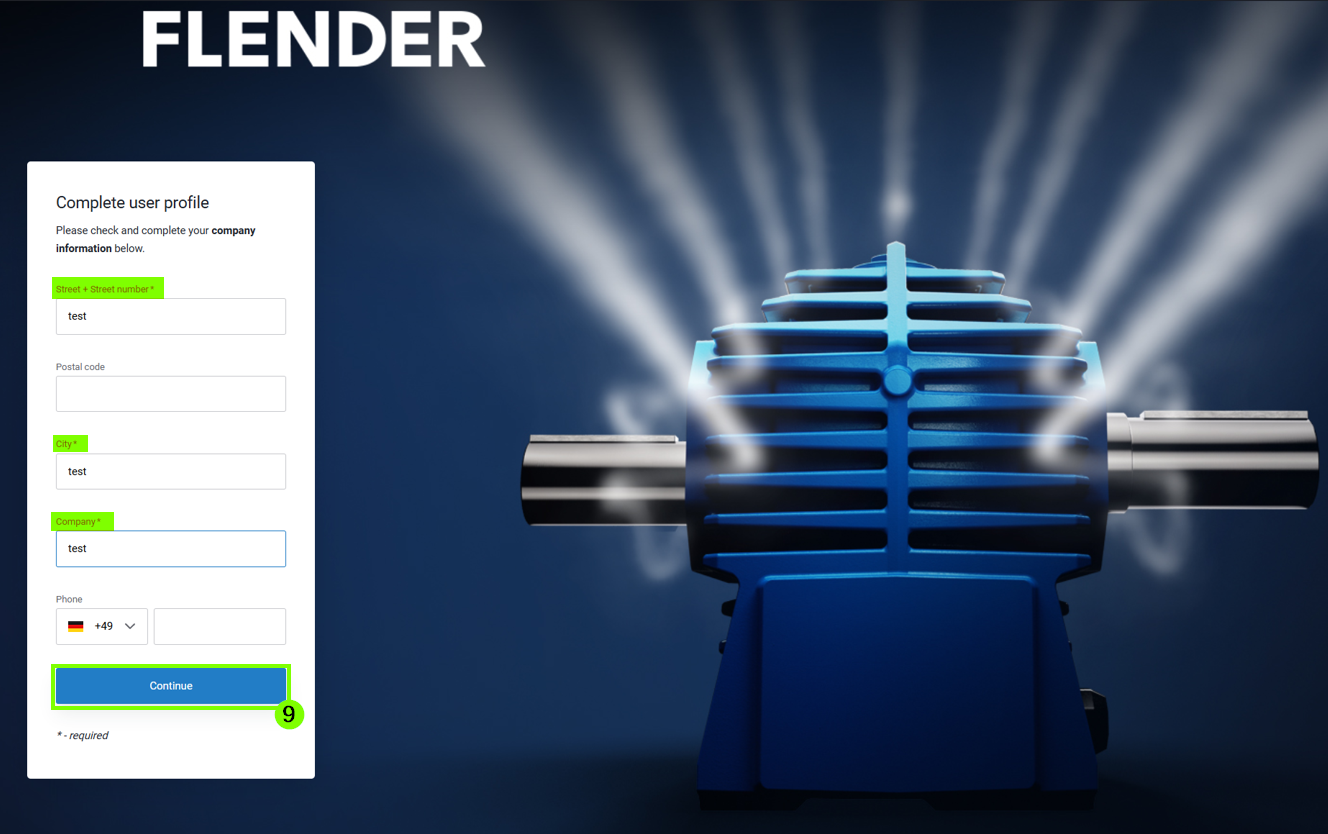
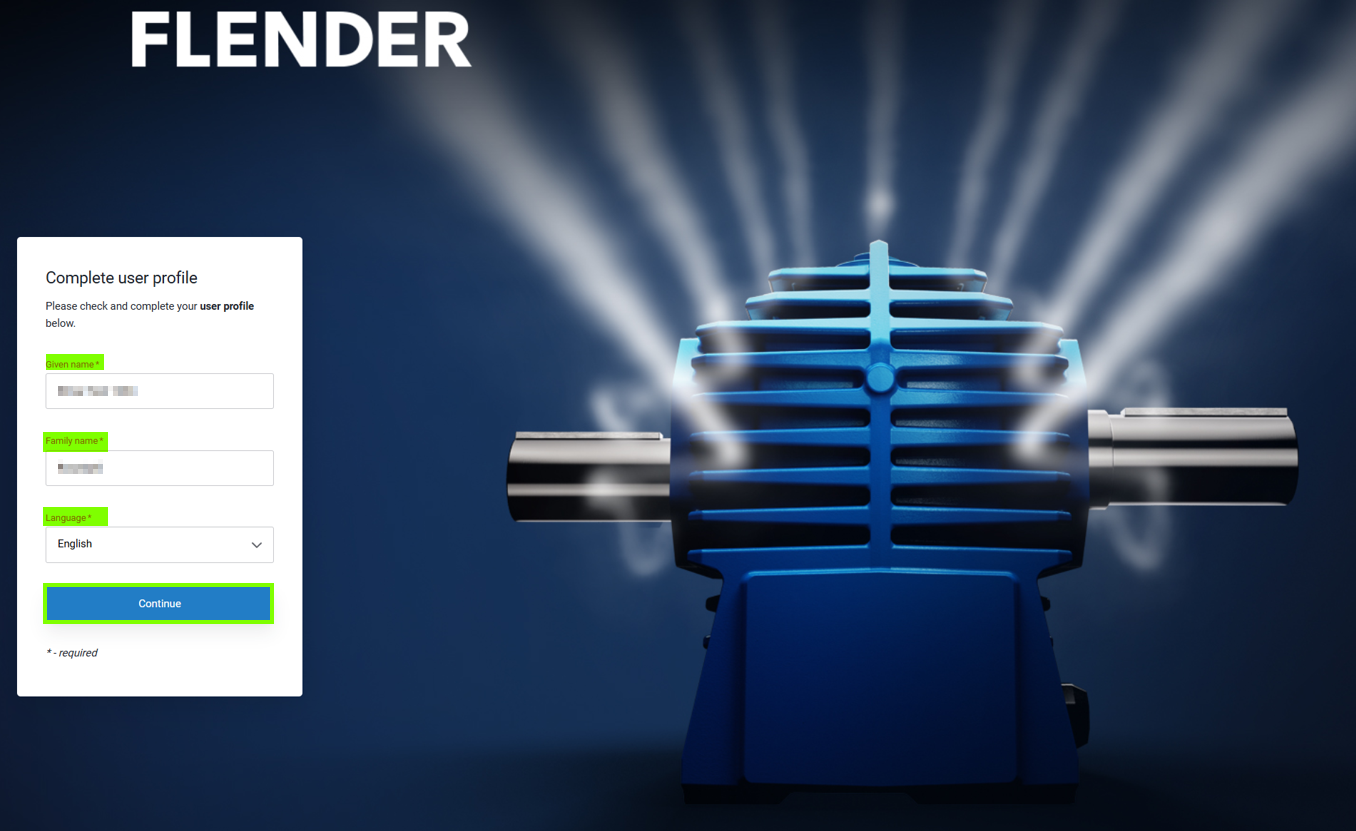
6. À l’étape suivante, complétez vos données personnelles. Tous les champs obligatoires marqués d’un astérisque (*) doivent être remplis pour poursuivre (9).
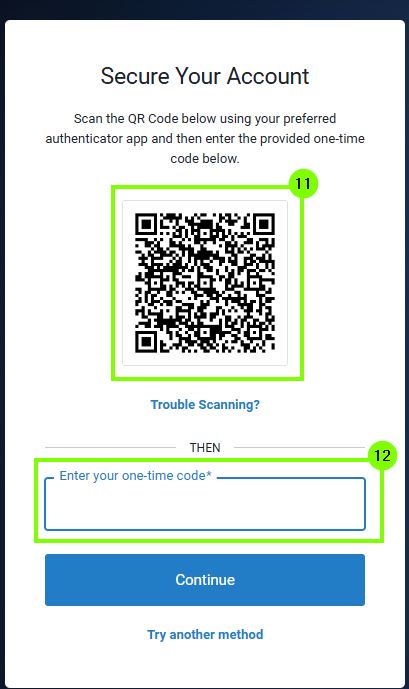
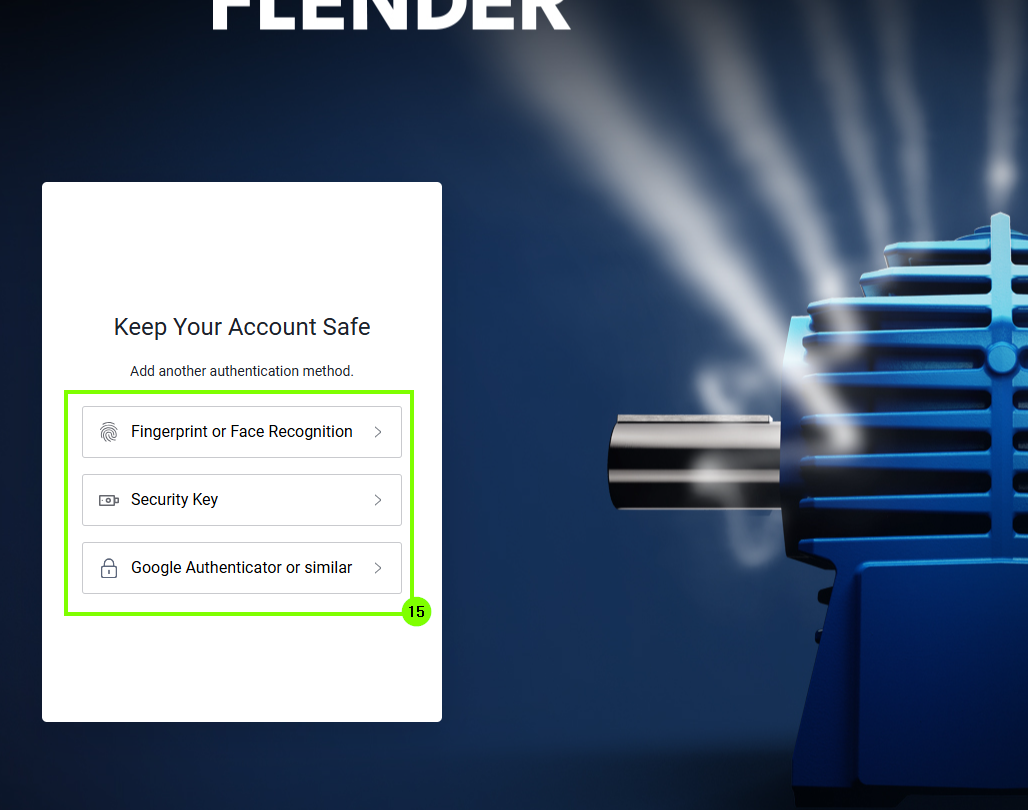
7. Il existe différentes options pour l’authentification (10). Par exemple, l’authentification peut se faire par empreinte digitale, reconnaissance faciale ou code PIN. L’utilisation d’une application d’authentification ou d’une clé de sécurité est également possible. Plus d’informations dans le chapitre 5 "Instructions pour l’application d’authentification". Dans l’exemple suivant, une application d’authentification a été utilisée.
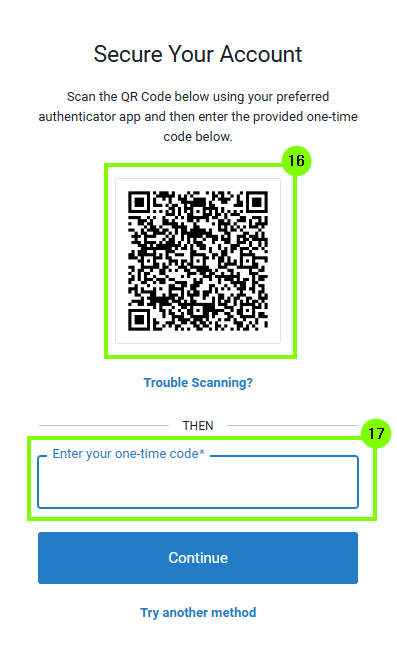
8.Après avoir choisi l’application d’authentification, un code QR (11) s’affiche, à scanner avec l’application. L’application génère ensuite un code à saisir dans le champ correspondant (12).
9. Après avoir saisi le code à usage unique (One-Time-Code), l’auto-enregistrement est terminé et la FlenderMall peut être utilisée. Notez que l’authentification restera enregistrée pour les prochaines connexions et que l’option ne doit pas être supprimée.
2. Connexion après inscription réussie
1. Accédez d’abord à la page de connexion Login | Flender et sélectionnez le Customer Log-In (1).
2. Ensuite, l’authentification a lieu. L’option d’authentification enregistrée est utilisée. Dans l’exemple affiché, une application d’authentification a été enregistrée (2). Saisissez maintenant le mot de passe à usage unique généré par l’application d’authentification dans le champ approprié.
Les données d’authentification peuvent, si on le souhaite, être enregistrées pendant 30 jours (3).
Pour finaliser la connexion, sélectionnez "Continue" et profitez de FlenderMall.
3. Connexion pour les clients Flender Mall existants
Après la modification du processus de connexion, les étapes suivantes sont nécessaires pour se connecter pour la première fois avec un compte Flender Mall existant :
Tout d’abord, accédez à la page de connexion de la Flender Mall. Cela peut se faire en cliquant sur l’icône de profil ou directement depuis la page Login | Flender.
1. Sur la page de connexion, sélectionnez “Log In / Register”(1)
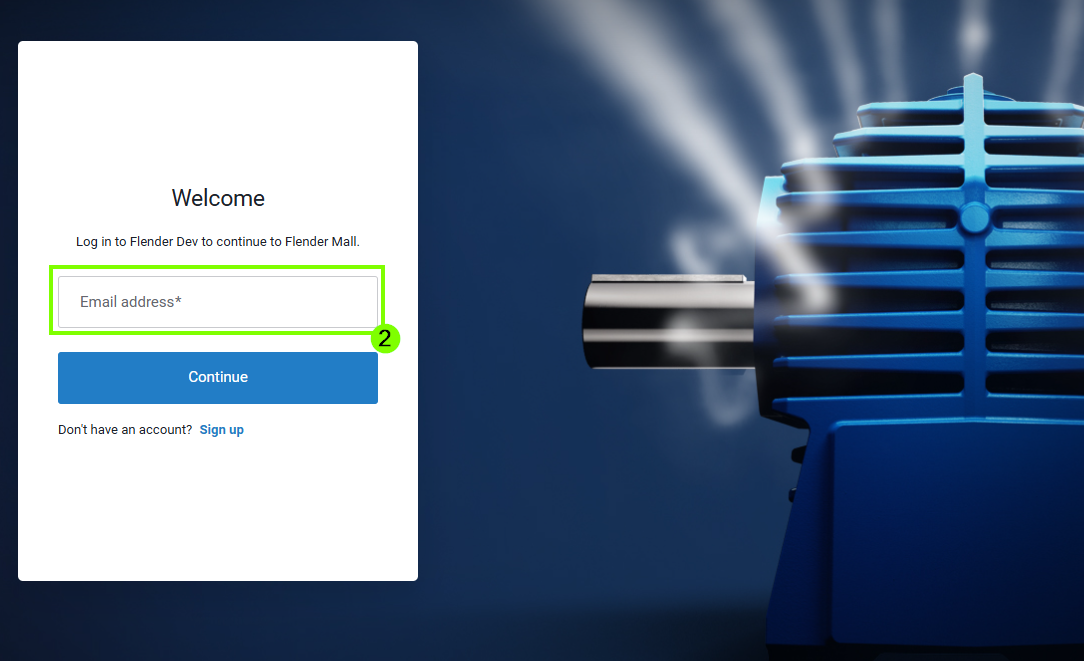
2. Dans la fenêtre de connexion, saisissez l’adresse e-mail enregistrée sur Flender Mall (2).
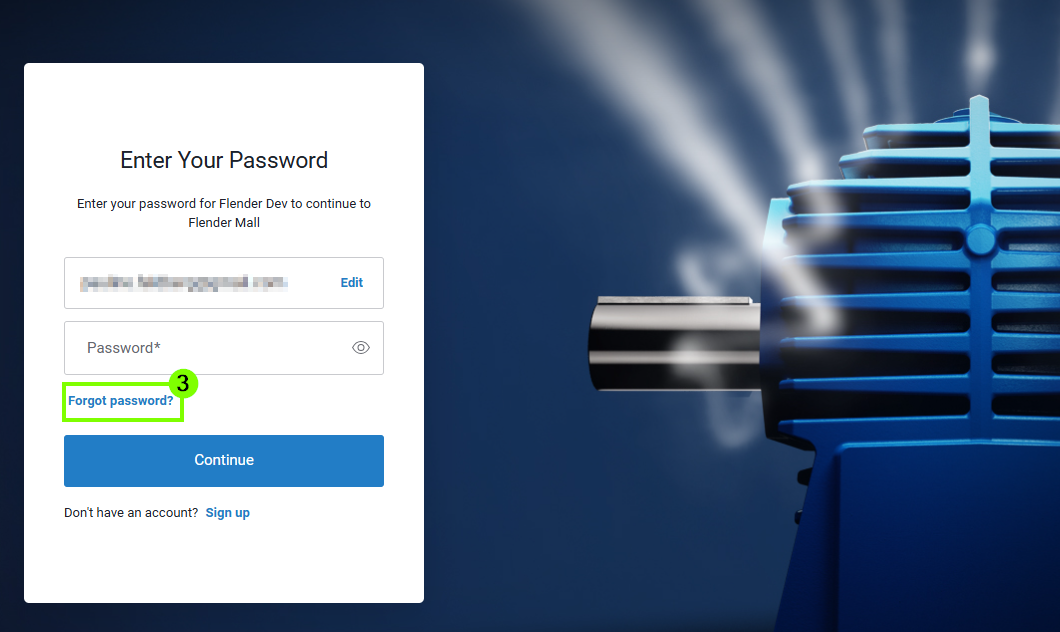
3. En raison de modifications techniques, il est nécessaire de réinitialiser le mot de passe lors de la première connexion. Pour cela, cliquez sur « Forgot password » (3).
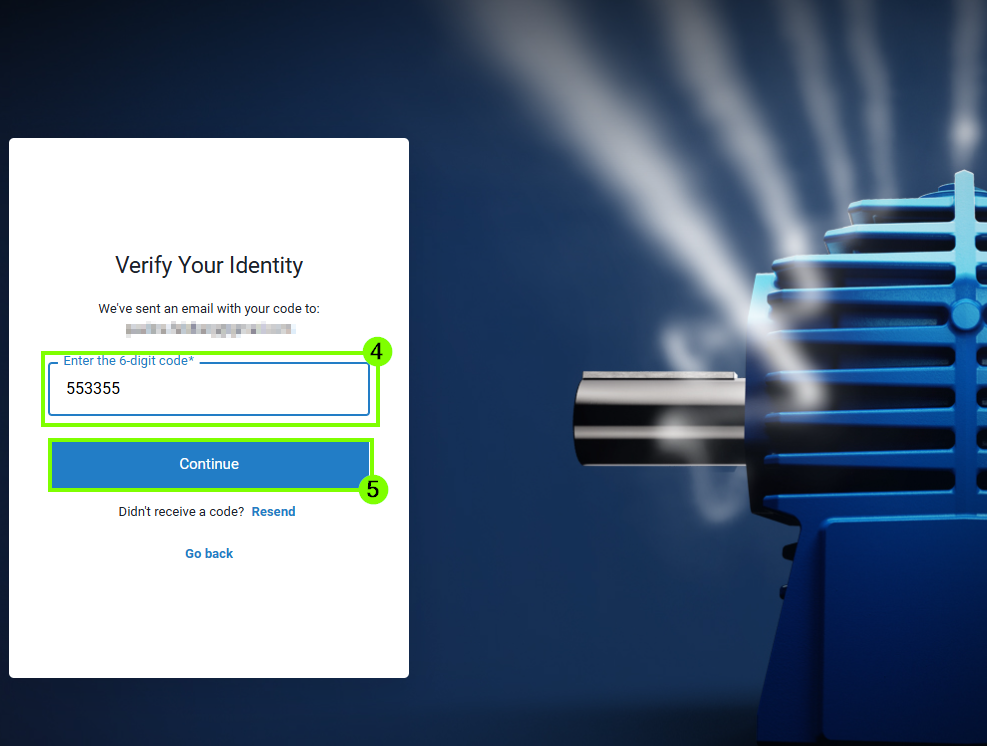
4. Un code de vérification est ensuite envoyé à l’adresse e-mail enregistrée. Saisissez ce code à 6 chiffres dans le champ prévu (4) puis cliquez sur « Continue » (5).
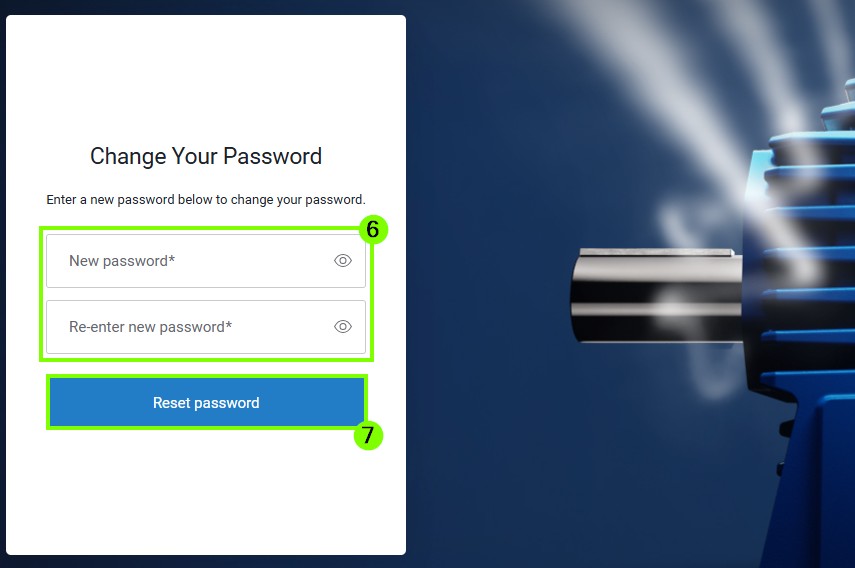
5. À l’étape suivante, créez un nouveau mot de passe et confirmez-le (6). Cliquez ensuite sur « Continue » (7) pour terminer l’opération. Veuillez respecter les règles de sécurité lors de la création du mot de passe.
6. Le mot de passe a été créé avec succès. Vous serez automatiquement redirigé vers la Flender Mall (8).
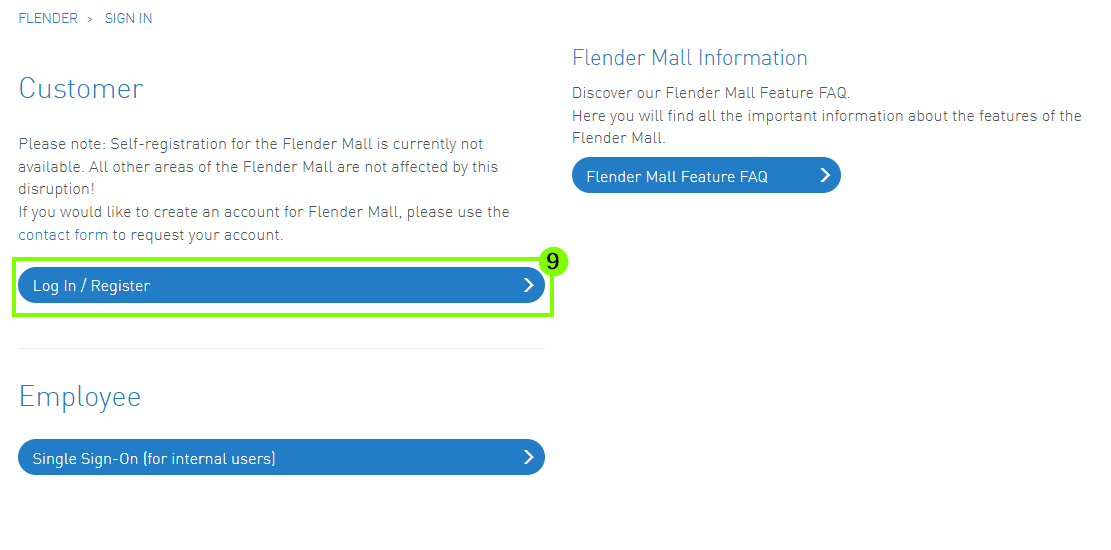
7. Pour utiliser les fonctionnalités de la FlenderMall et terminer la connexion, retournez sur la page de connexion et sélectionnez l’option « Log In / Register » (9).
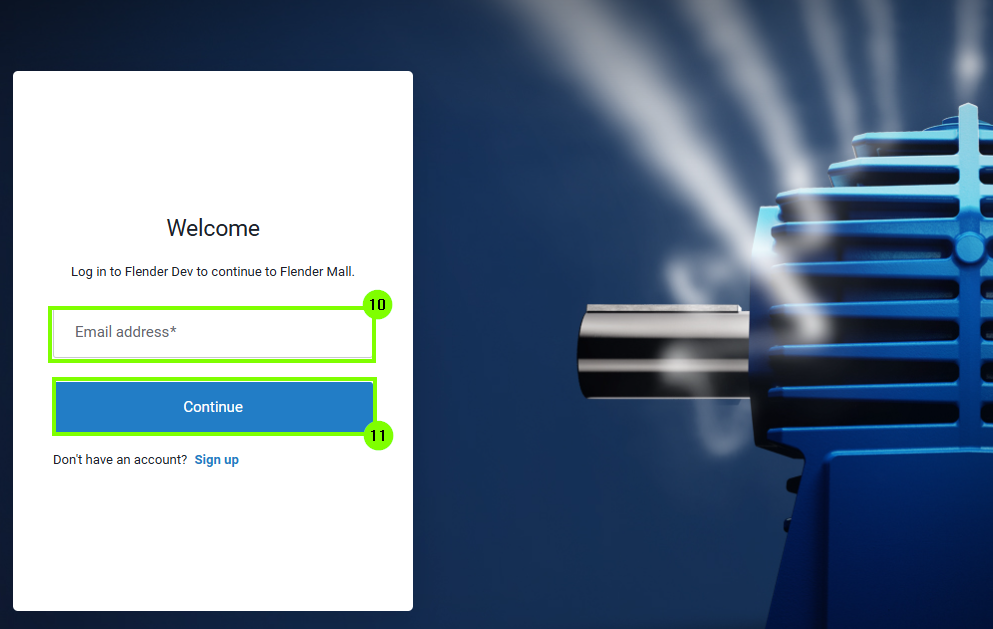
8. Saisissez votre adresse e-mail (10) et cliquez sur « Continue » (11).
9. Saisissez ensuite le mot de passe précédemment défini (12) et cliquez sur « Continue » (13) pour passer à l’étape suivante.
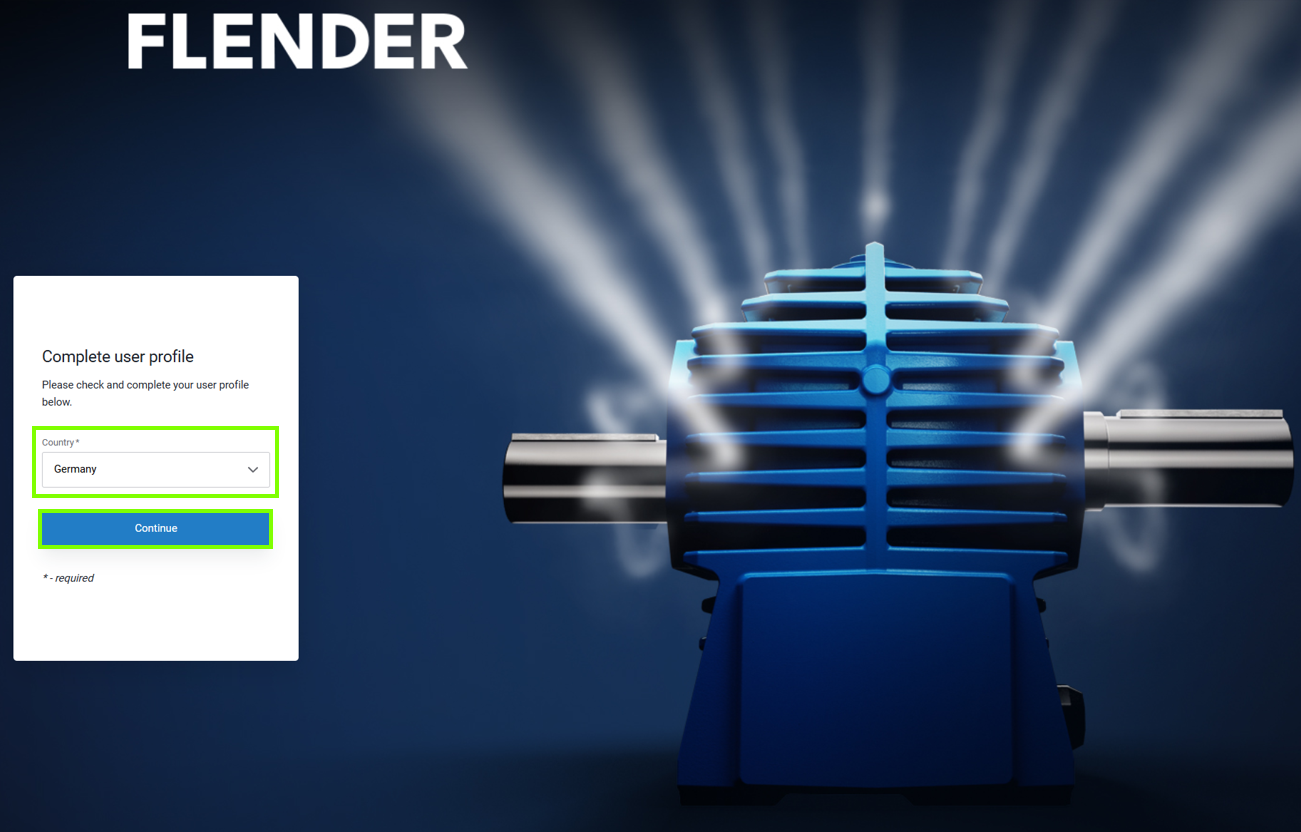
10. Ensuite, complétez vos données personnelles et acceptez les conditions d’utilisation. Tous les champs obligatoires marqués d’un astérisque (*) doivent être remplis, puis cliquez sur « Continue » (14).
11. Sélectionnez maintenant une option d’authentification (15). Dans l’exemple, l’authentification par application a été choisie. Plus d’informations dans le chapitre 5 "Instructions pour l’application d’authentification".
12. Si vous choisissez l’application d’authentification, un code QR (16) s’affiche, à scanner avec l’application. Saisissez le code généré par l’application dans le champ prévu (17).
13. Une fois le mot de passe à usage unique saisi, vous pouvez utiliser la FlenderMall avec vos autorisations habituelles.
4. Droits d’accès
Les utilisateurs de la Flender Mall peuvent se voir attribuer différents droits d’accès.
Administrateur : Gestion des droits d’accès des comptes existants de l’entreprise, gestion des adresses de livraison visibles lors du paiement pour l’ensemble de l’entreprise
Client : Passer des commandes, enregistrer et gérer des paniers, consulter l’historique des commandes avec suivi de livraison et téléchargement de documents liés à la commande
Consultant : Ajouter des produits au panier, consulter l’historique des commandes avec suivi de livraison et téléchargement de documents liés à la commande
Basique : Ajouter et enregistrer des produits dans le panier sans affichage des informations commerciales (ex. prix, délai de livraison), consulter l’historique des commandes avec suivi de livraison et téléchargement de documents liés à la commande
Prospect : Rôle général après l’auto-enregistrement sans autres droits
5. Instructions pour l’application d’authentification
Pour l’authentification, différentes applications d’authentification peuvent être utilisées. Un guide pour lier ces applications est disponible ici.
Accéder à la page détaillée du produit à l'aide de la fonction de recherche
Créer un nouveau projet depuis la page de détails du produit
Affichage des informations détaillées sur les produits dans MyProject
Les exportations MyProject contiennent des informations sur les produits
Les variantes de configuration peuvent être supprimées
Les documents téléchargés contiennent désormais le nom du produit dans le nom du fichier.
Optimisation des performances
Si vous souhaitez commander un produit, vous avez cinq possibilités différentes pour ajouter des produits à votre panier :
1. Formulaire de commande
Quand utiliser le formulaire de commande :
Si vous connaissez déjà le numéro MLFB/FFA du produit souhaité
Le formulaire de commande est accessible via le menu utilisateur (1) en sélectionnant le formulaire de commande (2).
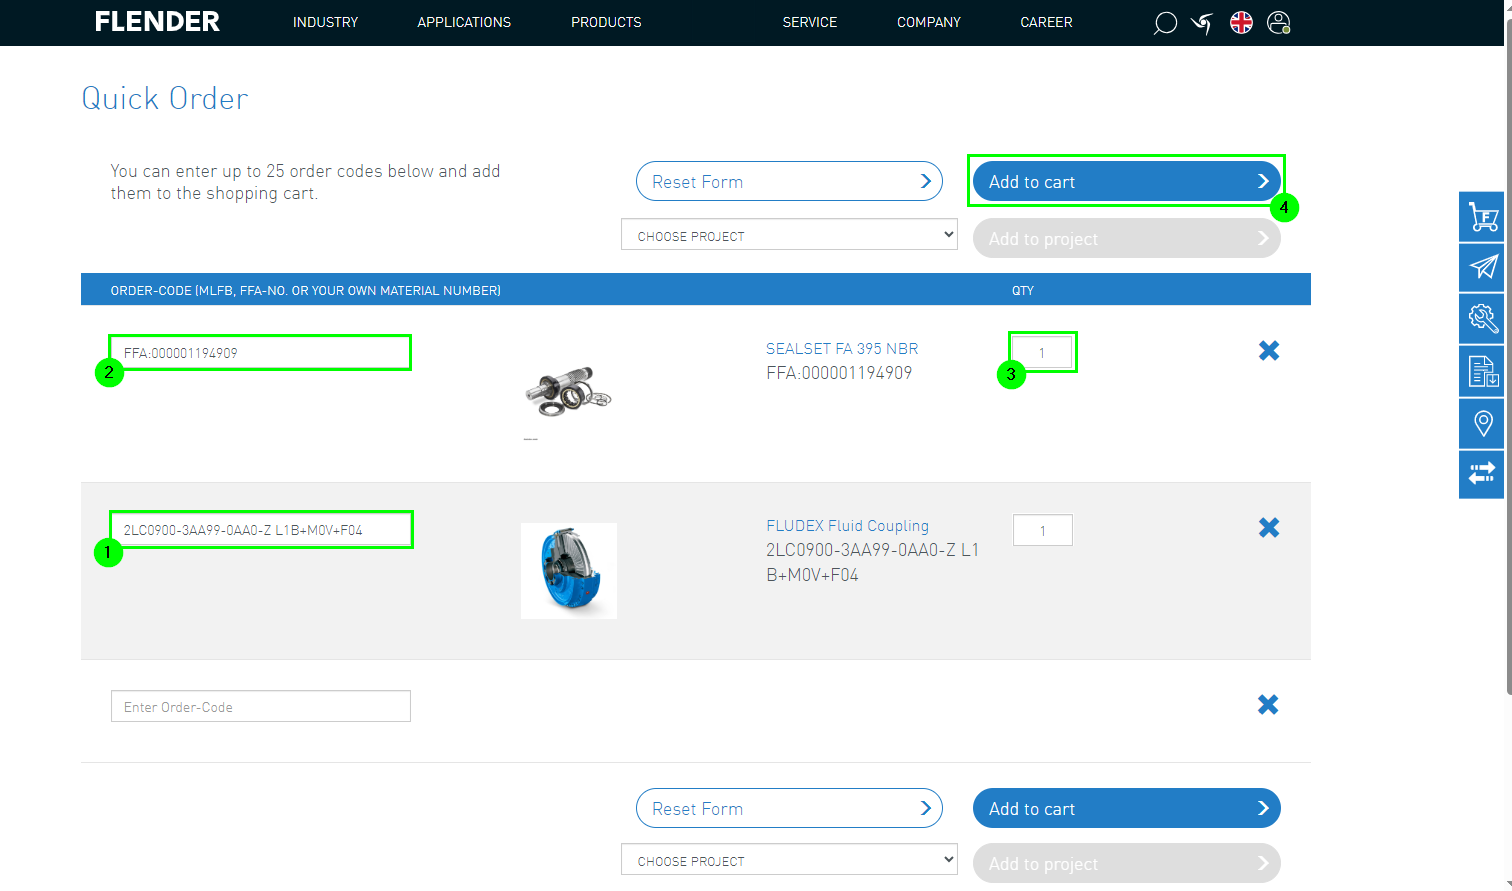
Les numéros correspondants peuvent ensuite être saisis dans le champ de saisie :
1. Vous pouvez saisir soit les numéros MLFB (1), soit les numéros FFA (2).
2. Indiquez la quantité correcte (3)
3. Le formulaire de commande peut être ajouté au panier (4)
2. Configuration des produits FLENDER
Quand utiliser la configuration :
Références ou désignations inconnues
Recherche d'un produit adapté à vos besoins
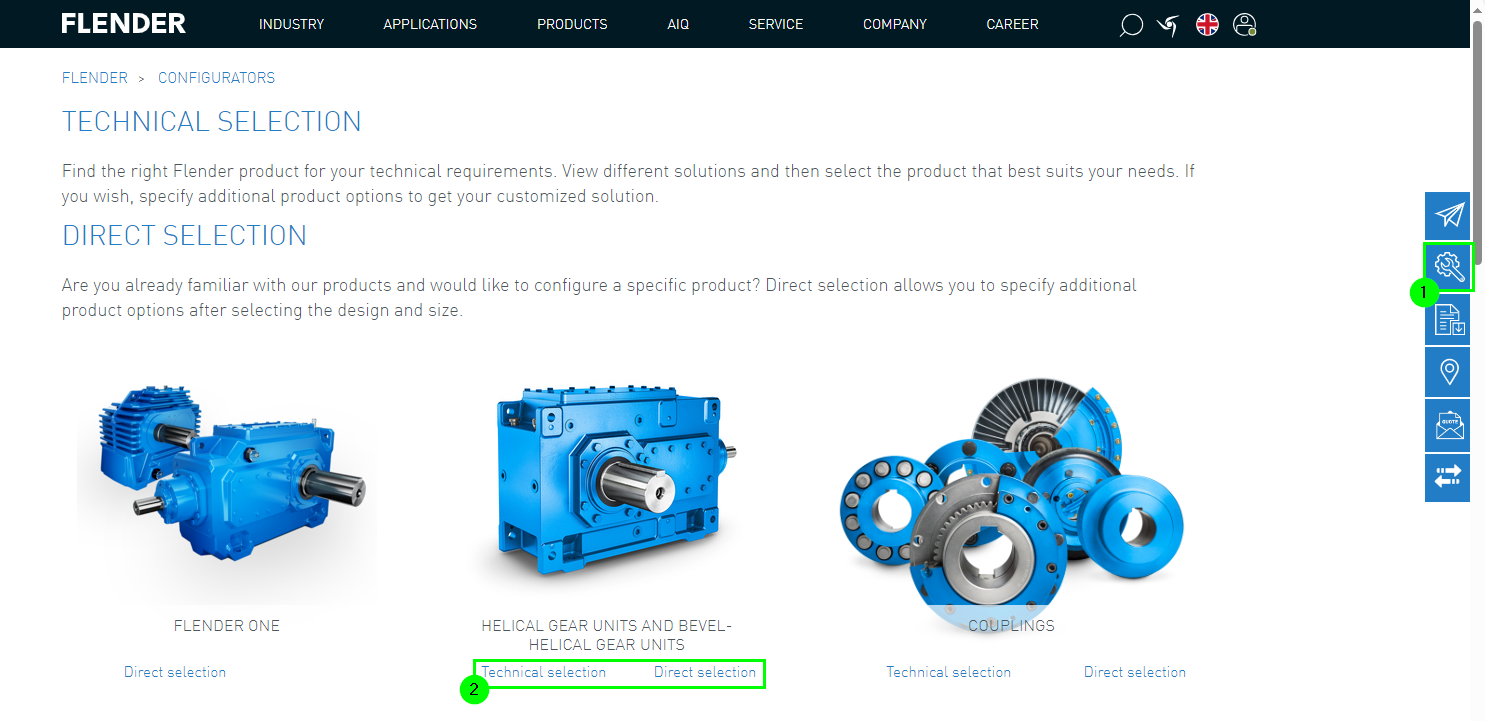
Les configurateurs sont accessibles via la barre latérale (1).
Vous pouvez alors choisir entre la sélection directe et la configuration (2).
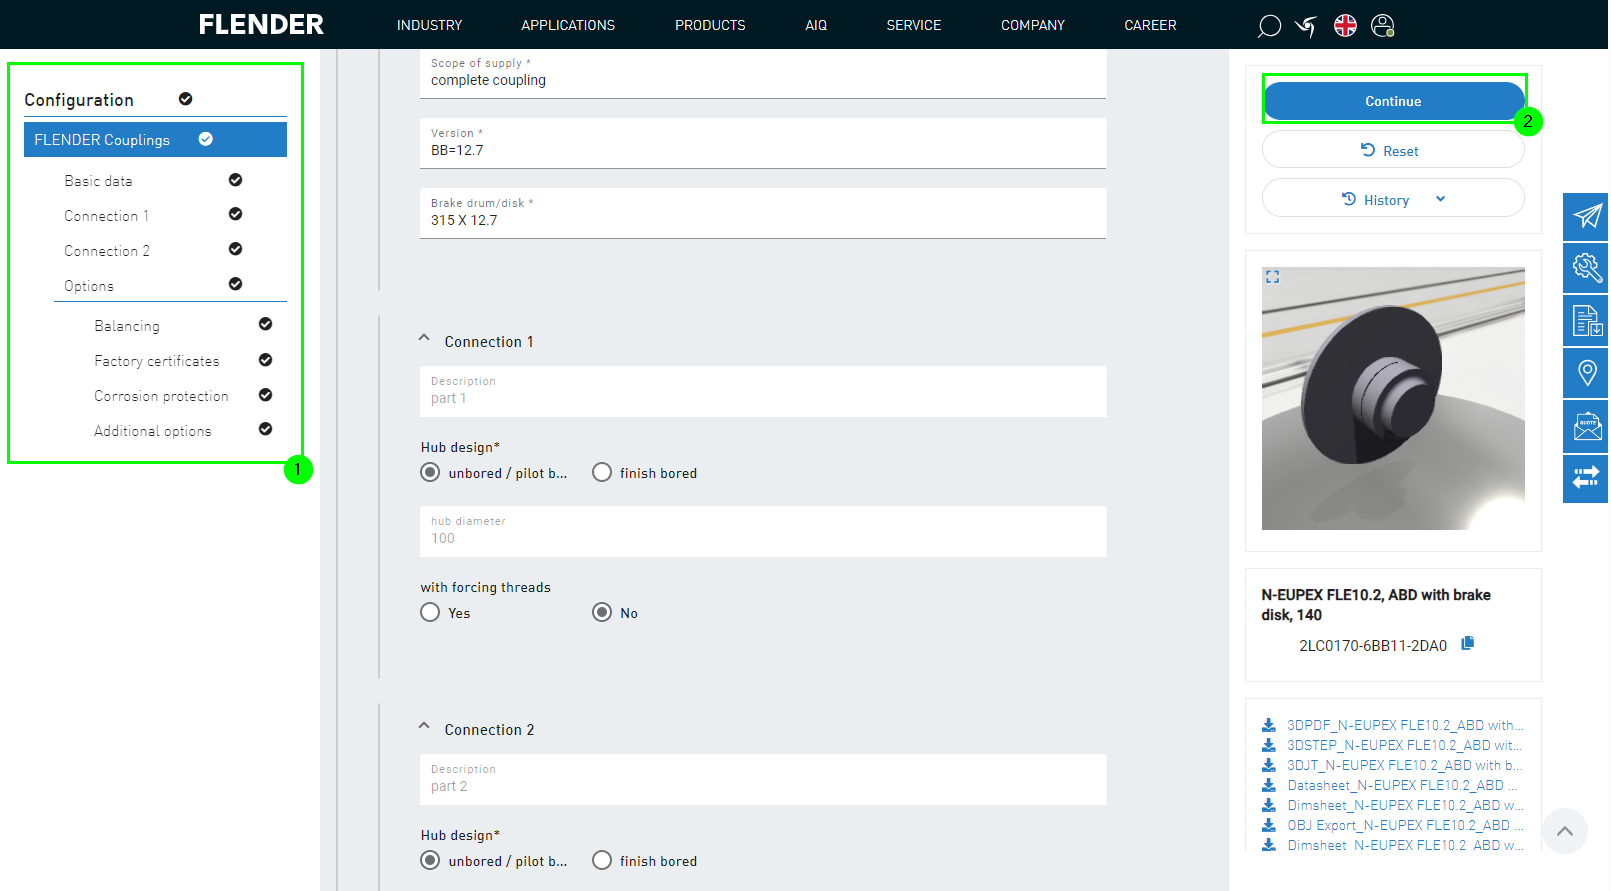
Tous les paramètres doivent ensuite être saisis (1) et la configuration peut être terminée (2).
Le produit configuré peut ensuite être ajouté au panier (3).
3. Commande à l'aide des numéros de référence client
Quand utiliser la commande à l'aide des numéros de référence client :
échange préalable des numéros de référence client avec Flender
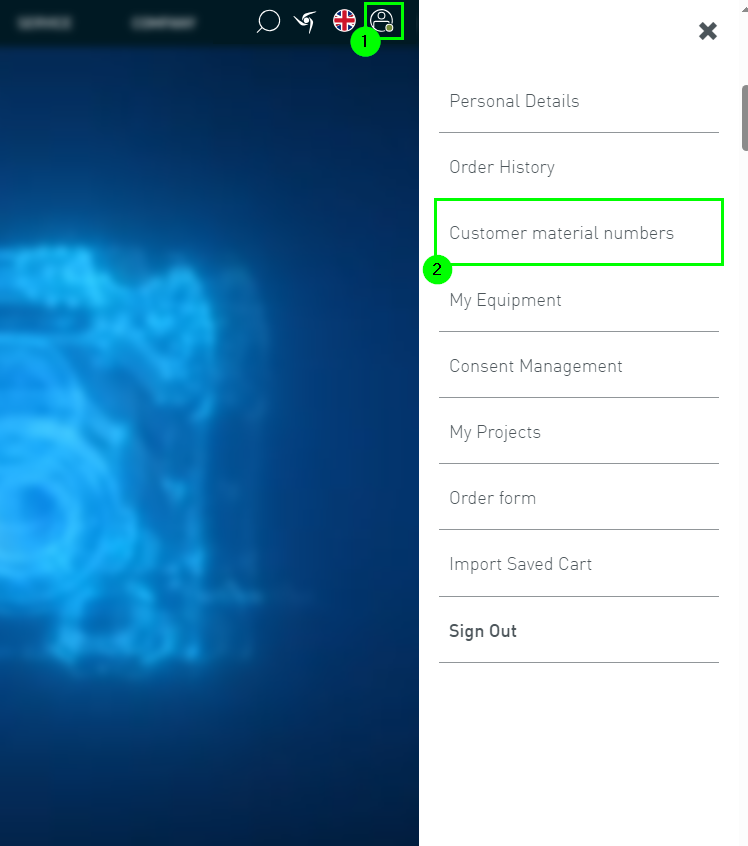
L'option de commande est accessible via le menu utilisateur (1) et la sélection des numéros de référence client (2).
Suite de la procédure :
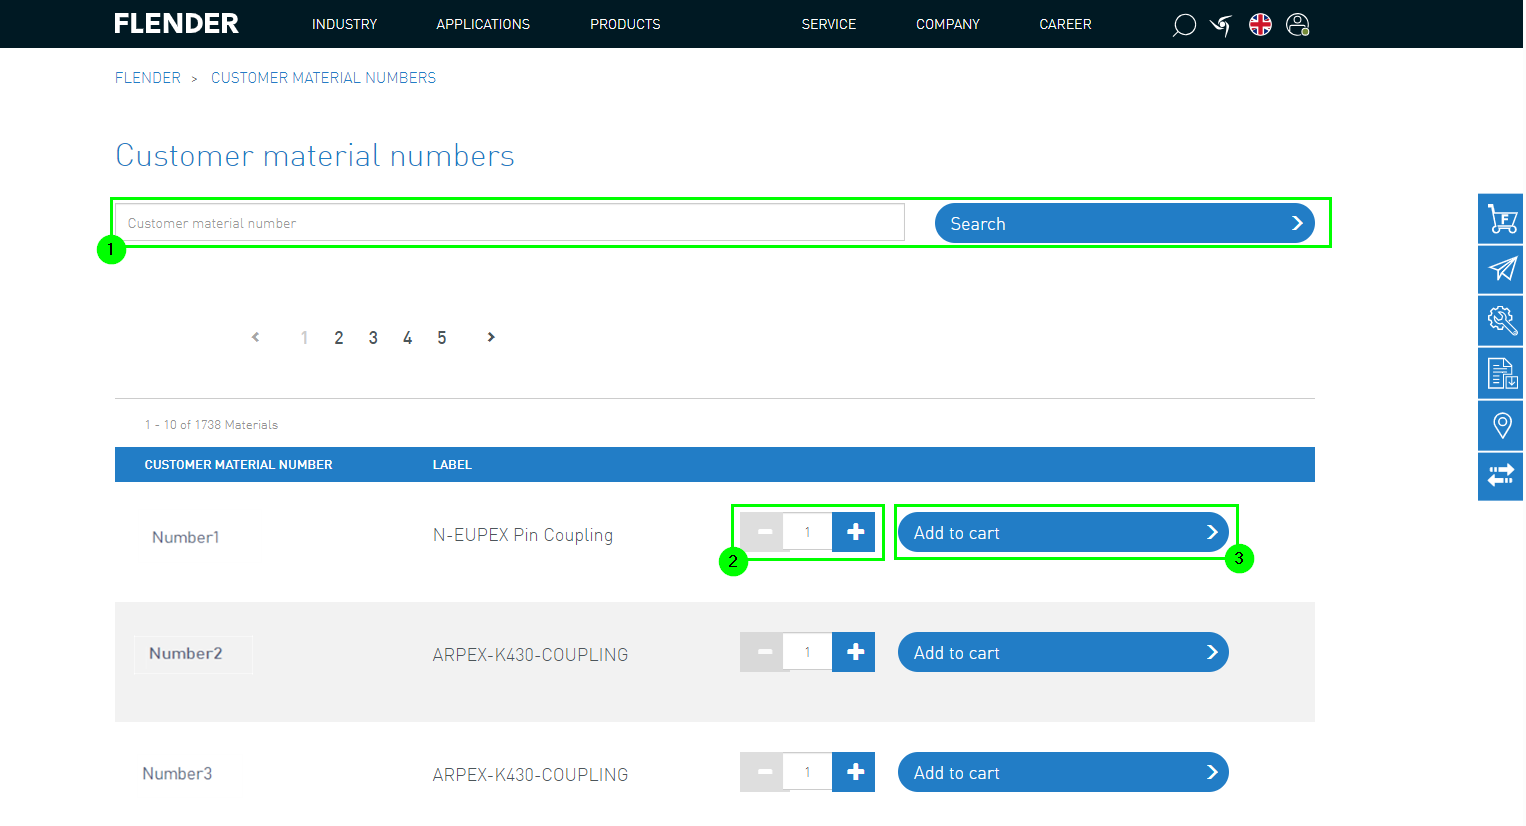
Recherchez le numéro de référence client convenu à l'aide de la fonction de recherche (1).
Les résultats de la recherche s'affichent dans la liste ci-dessous.
Sélectionnez le produit et indiquez la quantité souhaitée (2).
Ajoutez le produit au panier (3).
4. Commande Importation du panier enregistré
Quand utiliser la commande avec les paniers enregistrés :
Numéros d'article (numéros MLFB / FFA) connus
L'option de commande est accessible via le menu utilisateur sous « Importer le panier enregistré » (1).
Vous pouvez ensuite télécharger les produits souhaités dans le format spécifié. Pour ce faire, indiquez le numéro SKU correspondant et la quantité.
Le fichier peut maintenant être téléchargé. Pour ce faire, sélectionnez le fichier (2) et cliquez sur « Importer » (3).
Après l'importation, le panier enregistré peut être consulté ici (4).
Les paniers enregistrés offrent d'autres fonctions, telles que Restaurer (5), Modifier (6) ou Supprimer (7).
Après avoir sélectionné le bouton « Restaurer » (5), vous accédez au panier où vous pouvez finaliser votre commande (8).
5. Commande à l'aide de la fonction de recherche et du PDP
Quand utiliser la commande avec les paniers enregistrés :
Numéros de référence (MLFB/ ConfigID) déjà connus
Pour utiliser l'option de commande, vous devez d'abord ouvrir la fonction de recherche. Elle se trouve dans le menu d'en-tête (1).
Vous pouvez ensuite saisir le MLFB ou le ConfigID souhaité (2) et accéder à la page détaillant le produit (3).
Le produit peut ensuite être ajouté au panier (4) puis commandé.
1. Ajouter des produits au panier
Si vous disposez d'un droit d'accès, vous pouvez commander des produits Flender via la boutique Flender Mall.
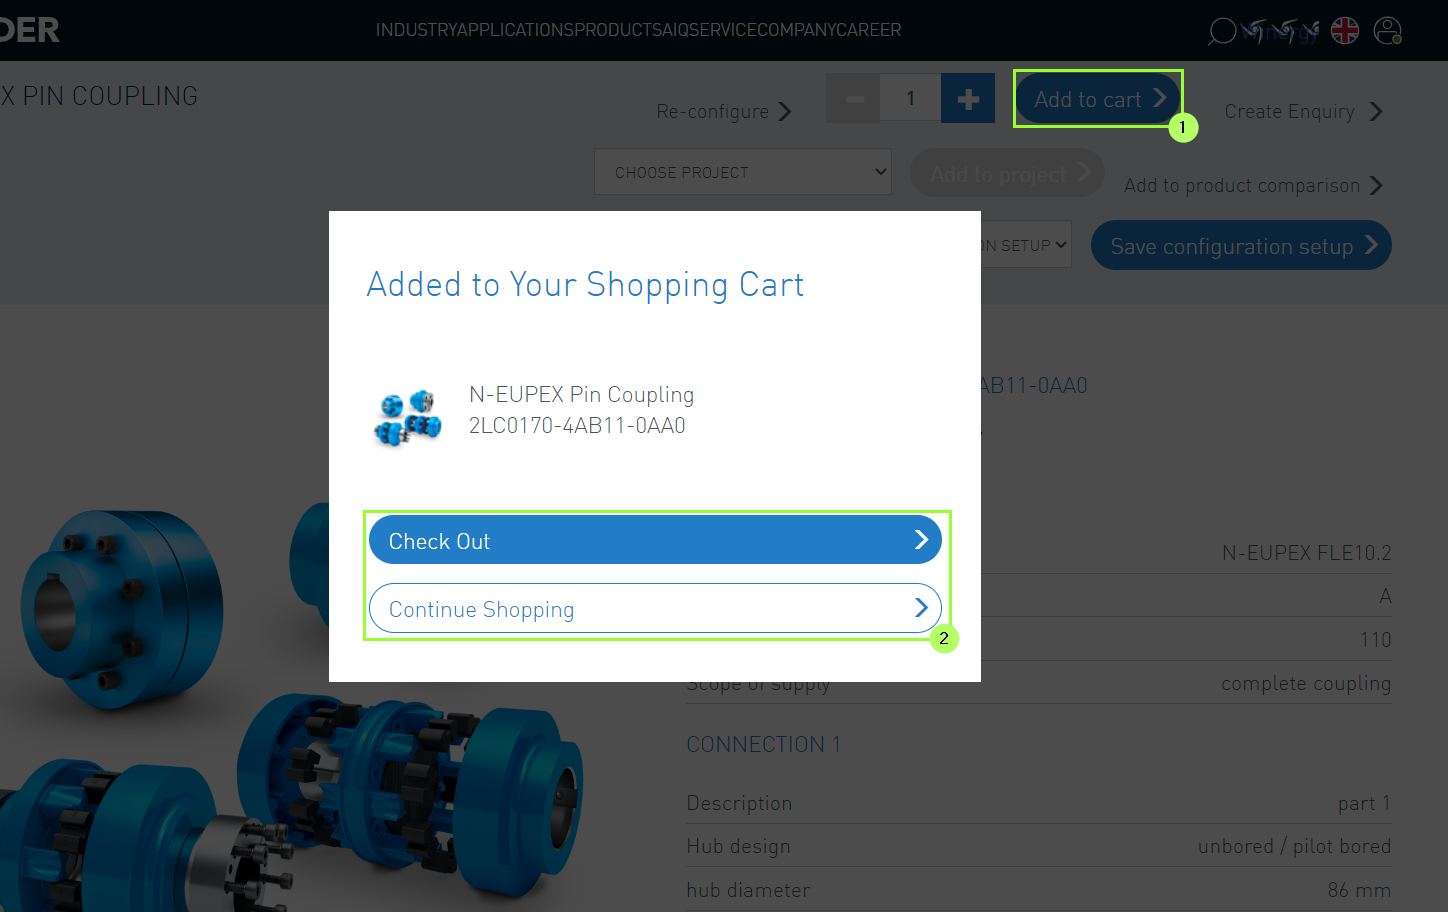
Une fois qu'un produit a été sélectionné ou configuré, il peut être ajouté au panier (1).
Vous avez ensuite le choix entre les options suivantes (2) :
Commander
Continuer mes achats
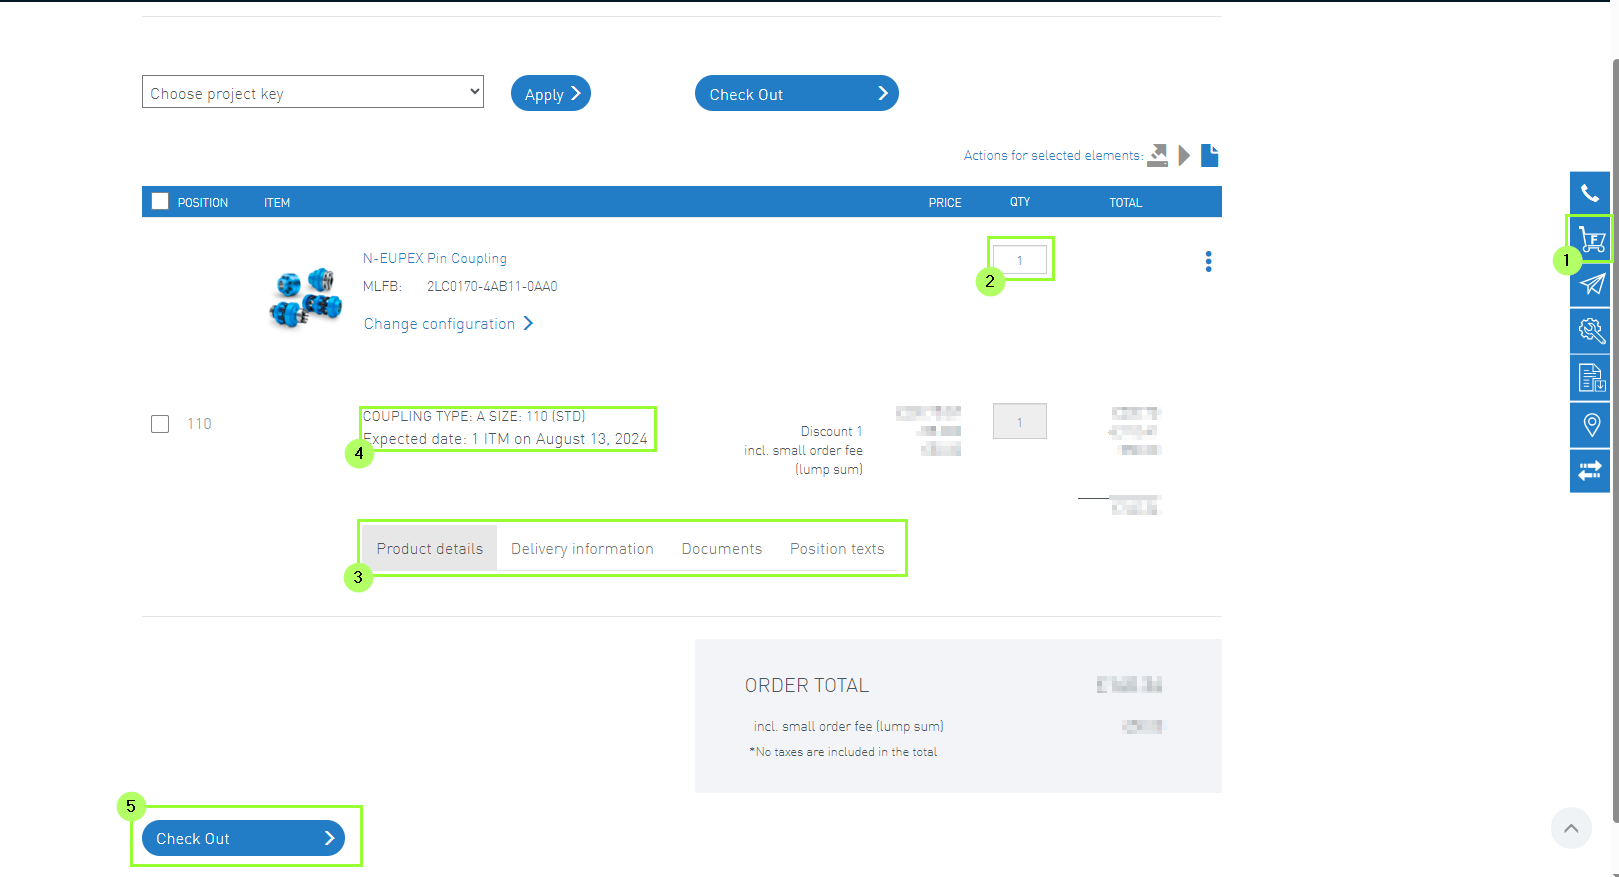
2. Panier
Le panier se trouve dans l'onglet correspondant de la barre latérale (1).
Au début, il faut sélectionner la quantité souhaitée (2).
Ici, vous pouvez également consulter d'autres informations spécifiques au produit et à la commande (3), telles que le délai de livraison prévu (4).
Vous pouvez ensuite passer à la caisse (5).
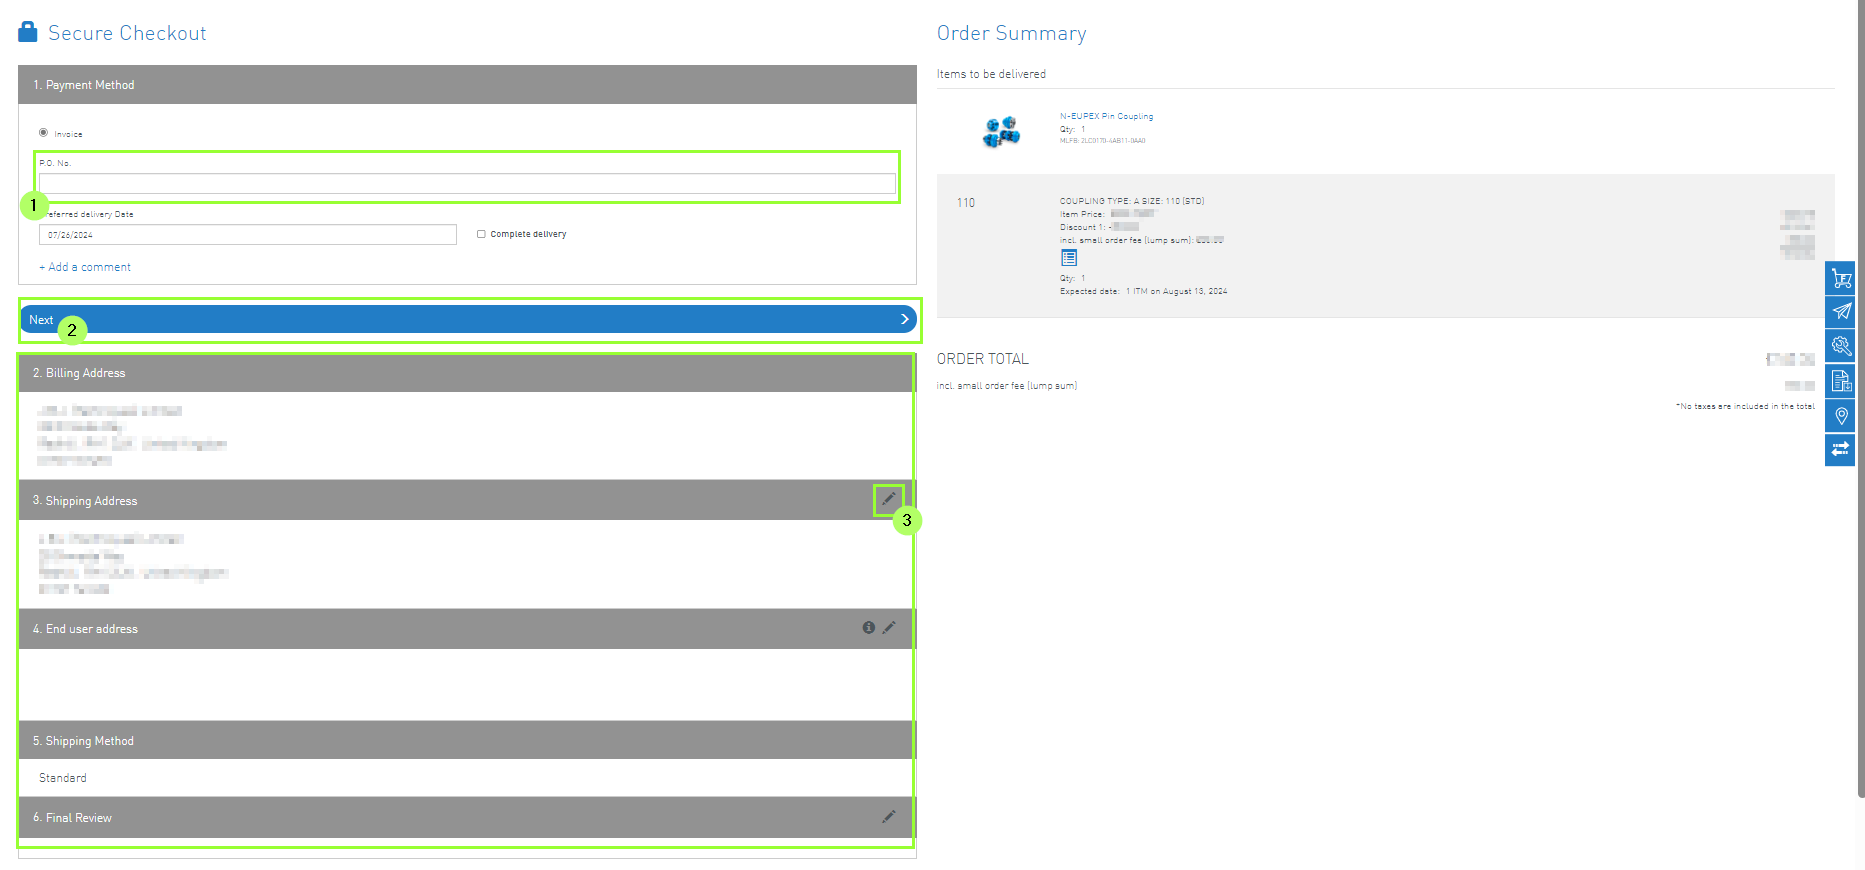
3. Check Out
Pour le paiement sécurisé, les étapes suivantes sont nécessaires :
(1) Indiquez le numéro de commande.
(2) Saisissez les données souhaitées.
(3) Les modifications éventuelles peuvent être effectuées à l'aide du crayon.
La commande peut ensuite être finalisée.
Si vous souhaitez comparer deux ou plusieurs produits, vous pouvez utiliser la fonction de comparaison des produits disponible sur notre site Web.
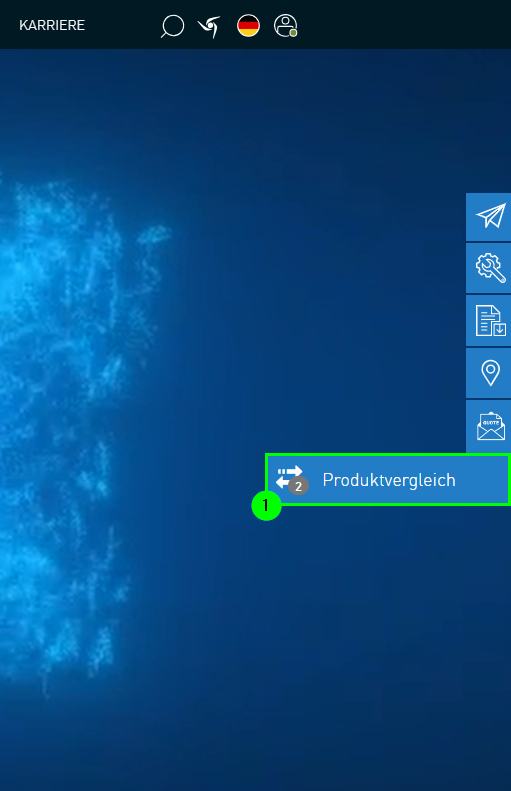
1. Accès à la comparaison de produits
Vous pouvez accéder à la « comparaison de produits » via la barre latérale à droite (1). Celle-ci vous mène directement à la page de comparaison.
Le petit chiffre à côté du symbole dans la barre latérale indique que, dans cet exemple, deux articles ont été ajoutés à la comparaison de produits.
2. Ajouter des produits au comparatif
Il existe deux possibilités pour ajouter des produits Flender au comparatif.
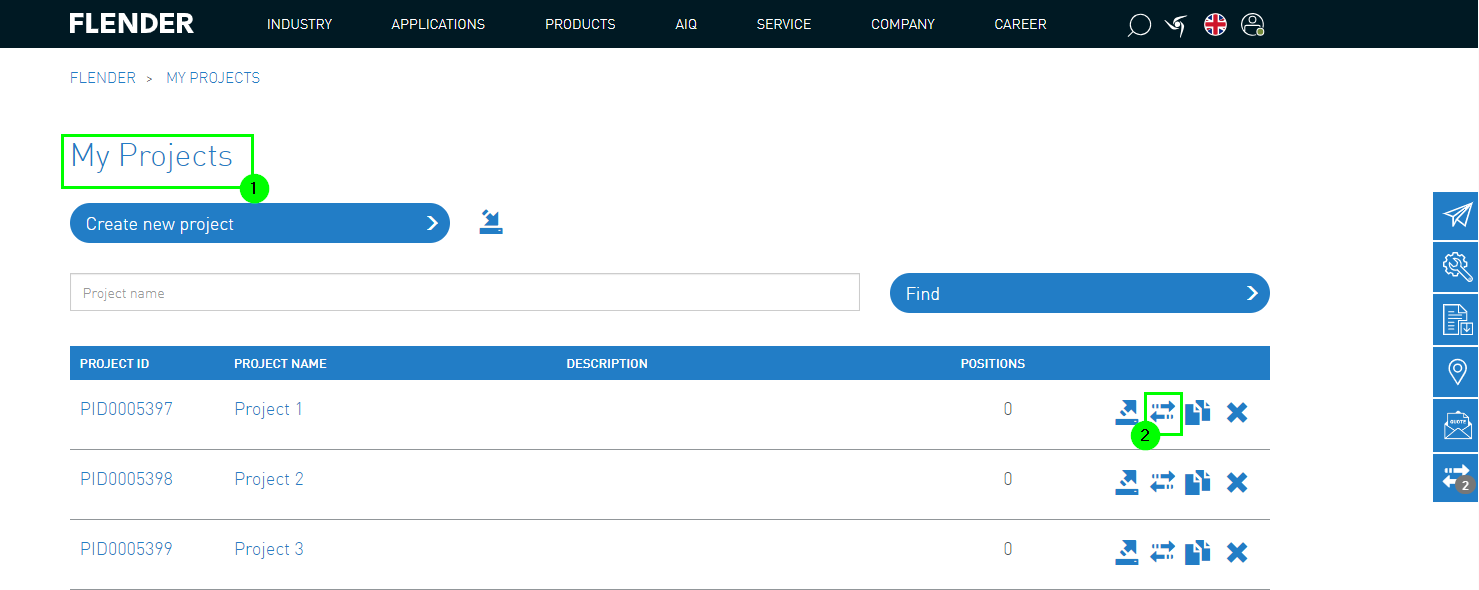
1. Possibilité: My Projects
(1) Ouvrez Mes projets via le menu utilisateur
(2) Ajouter des projets ou des produits individuels à la comparaison de produits
2. Possibilité : Configuration
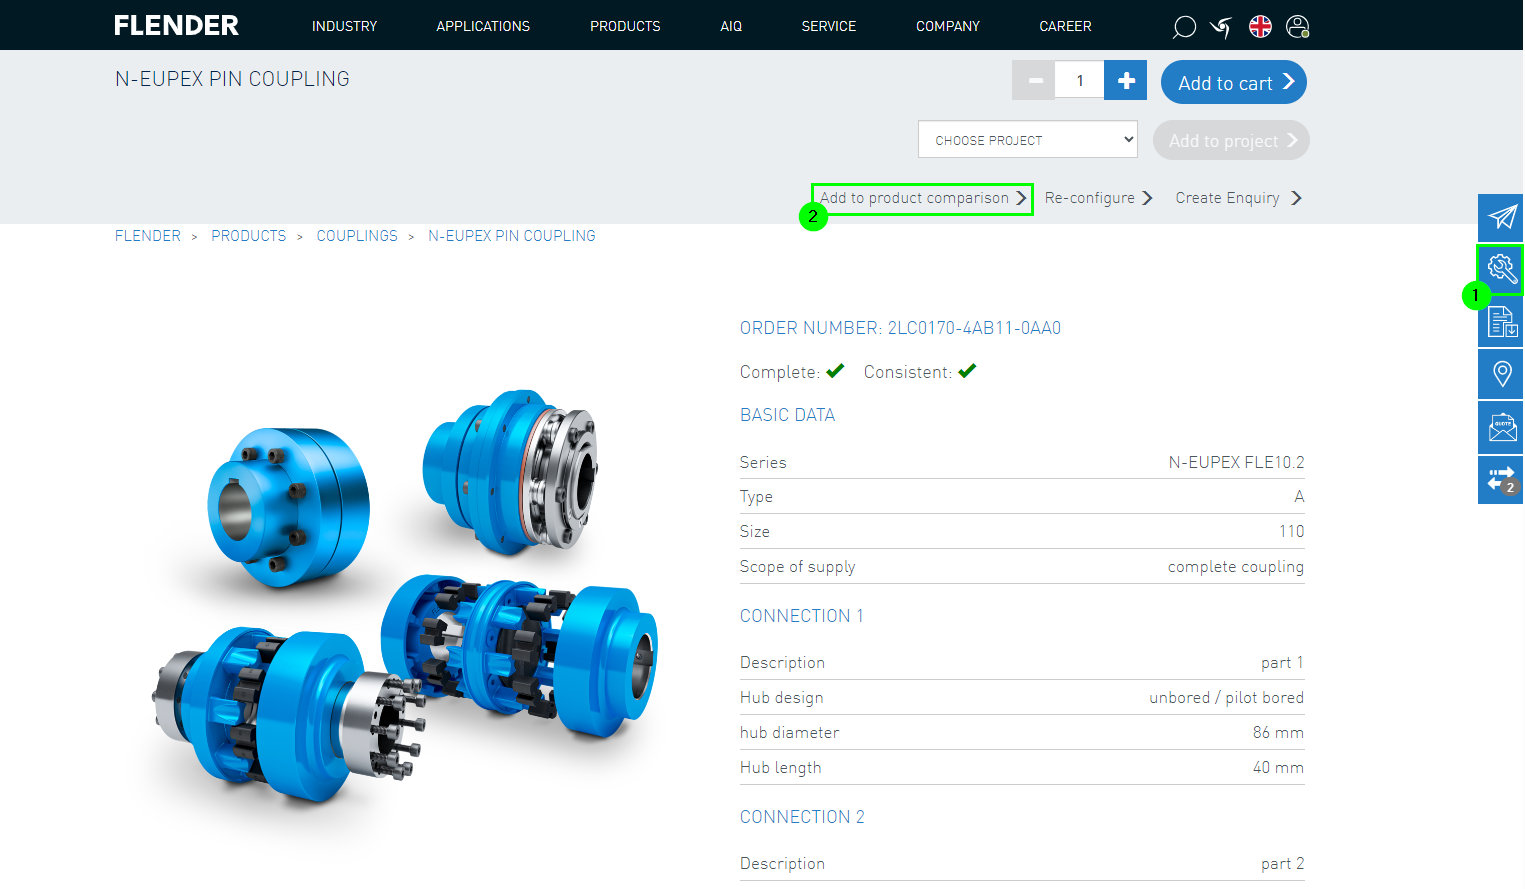
(1) Configuration du produit souhaité
(2) Ajouter le produit configuré à la comparaison de produits
3. Affichage de la comparaison des produits
Une fois que vous avez ajouté tous les produits à comparer via « Mes projets » ou le configurateur, vous pouvez accéder à la « Comparaison des produits » via la barre latérale droite (voir chapitre 1. Accès à la comparaison des produits).
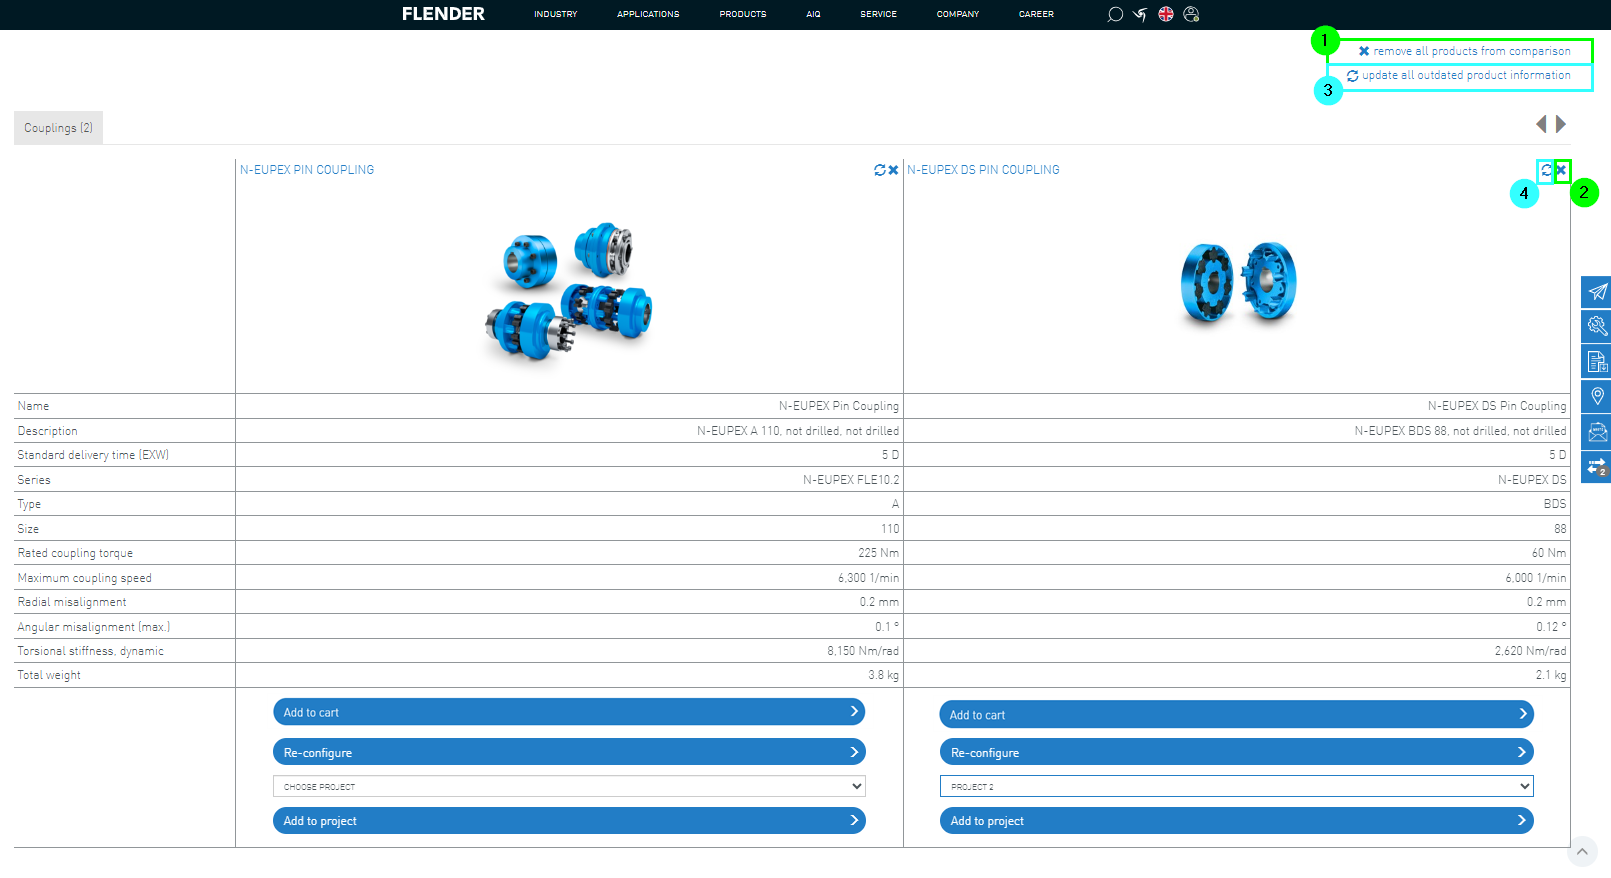
La comparaison des produits permet de comparer et d'afficher les données des produits ajoutés.
Les produits restent dans la « Comparaison de produits » jusqu'à ce que vous les supprimiez activement.
Suppression de produits de la comparaison de produits :
Suppression de tous les produits via le symbole X (1)
Suppression de produits individuels de la comparaison de produits via le symbole X dans la position (2)
Actualisation de la comparaison de produits :
Si un produit reste longtemps dans la comparaison de produits, il est possible que les informations affichées soient obsolètes.
Pour rester à jour, vous pouvez soit actualiser l'ensemble de la comparaison de produits (3), soit actualiser des produits individuels (4).
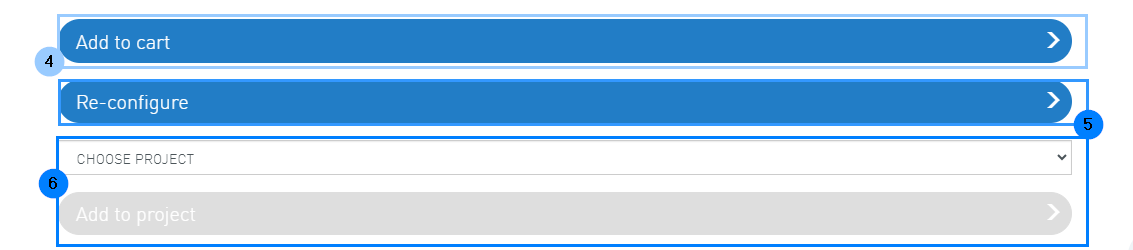
Une fois les différents produits comparés, ils peuvent être ajoutés au panier (4), reconfigurés (5) ou affectés à un projet (6).
<
L’aperçu des commandes permet d’avoir une vue d’ensemble des commandes, des détails des commandes et des informations de livraison.
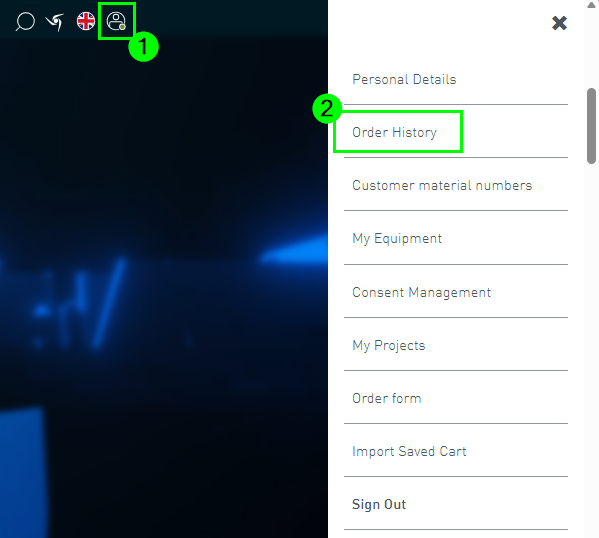
Pour vérifier le statut actuel des commandes existantes et consulter les détails des commandes précédentes, il existe l’aperçu des commandes.
Pour cela, il faut sélectionner l’aperçu des commandes (2) dans le menu utilisateur (1).
L’aperçu des commandes comprend toutes vos commandes chez Flender des 365 derniers jours ou les 1000 dernières commandes.
Peu importe comment la commande a été passée chez Flender (via Flender Mall, Mail2EDI, E-mail ou autre).
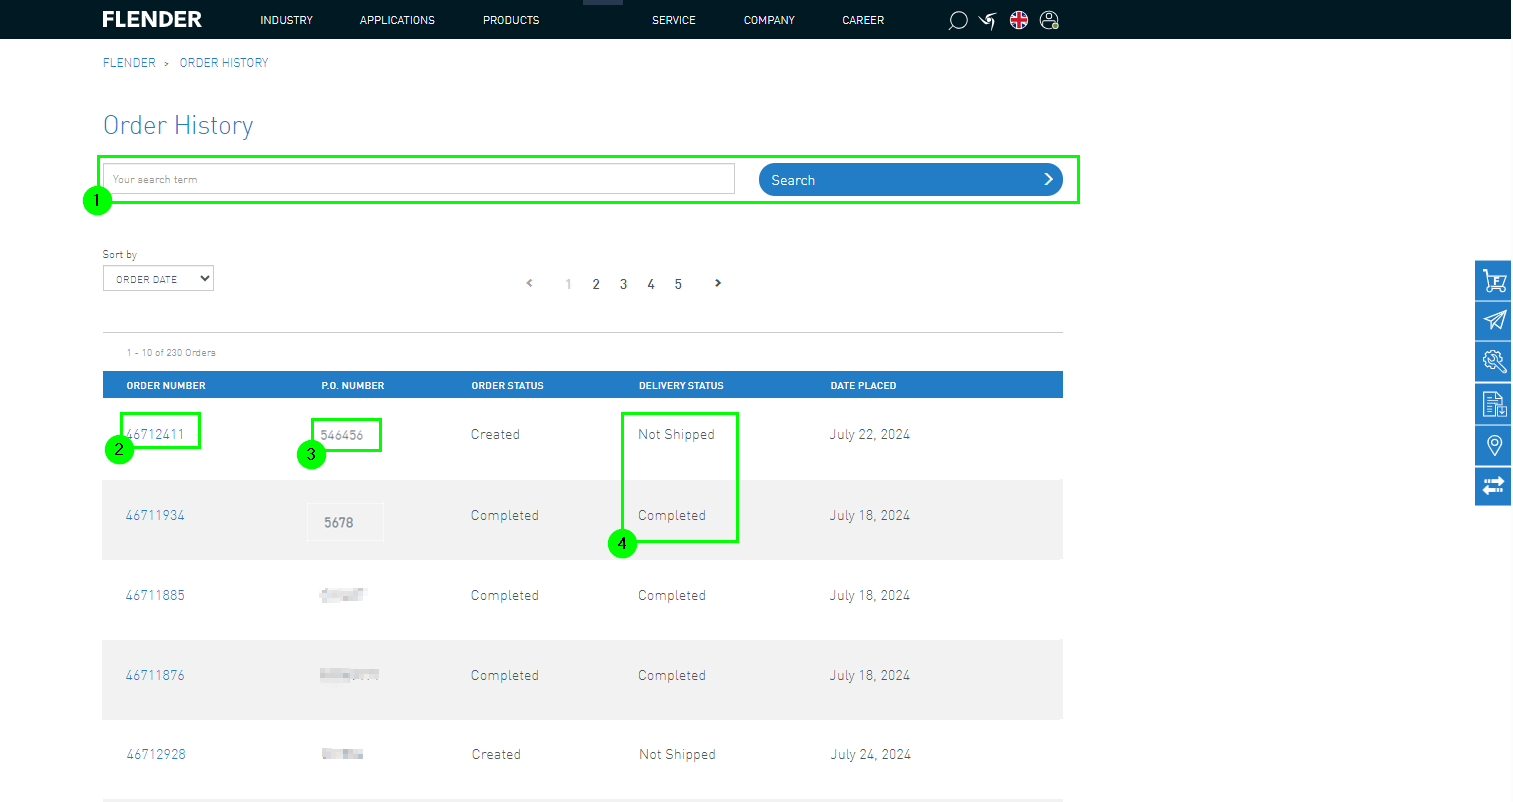
1. Vue d’ensemble des commandes
L’aperçu des commandes offre une fonction de recherche (1) pour trouver spécifiquement des commandes.
De plus, le numéro de commande Flender (2), le numéro de PO (3) et le statut de livraison (4) sont affichés.
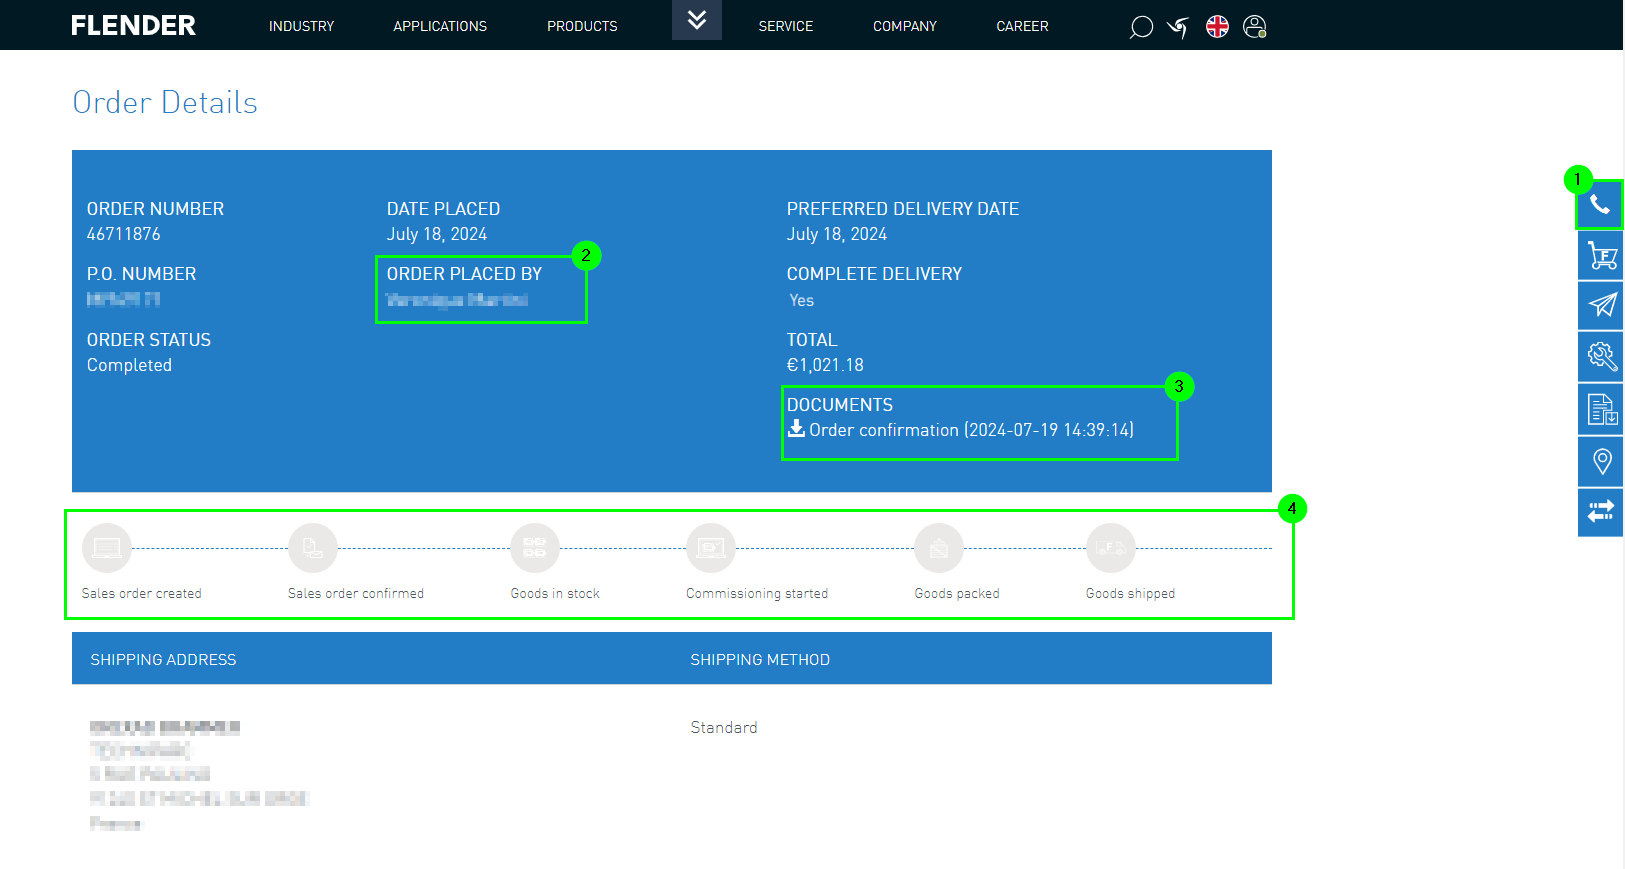
2. Détails de la commande
Pour consulter les détails d’une commande, cliquez sur le numéro de commande dans l’aperçu des commandes (2).
2.1 Données principales
À partir des données principales, vous pouvez obtenir les informations suivantes.
Pour voir votre interlocuteur Flender attribué, cliquez sur le bouton téléphone (1).
Le déposant de la commande du client est également affiché (2).
Vous avez la possibilité de télécharger des documents liés à la commande (3).
De plus, le statut actuel de la commande est affiché (4).
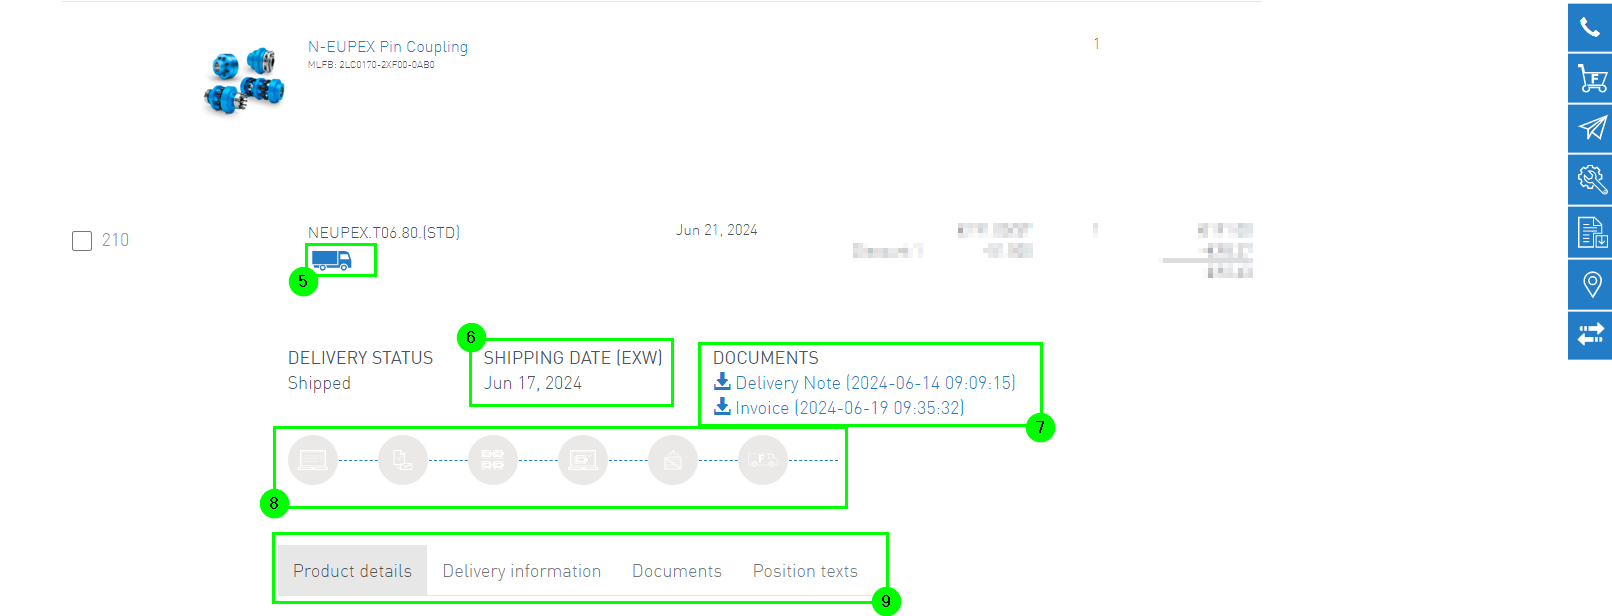
2.2 Données de position
Les données suivantes sont affichées dans les données de position :
Sous l’icône du camion, le suivi de livraison est possible (5)
Pour les commandes terminées, la date de livraison est indiquée (6)
D’autres documents, pour les commandes terminées, tels que le bon de livraison ou la facture peuvent être téléchargés
Affichage du statut de la commande
Plus de détails sur la position sont affichés (ou réduits) en cliquant sur les fonctions sous la barre de progression (10).
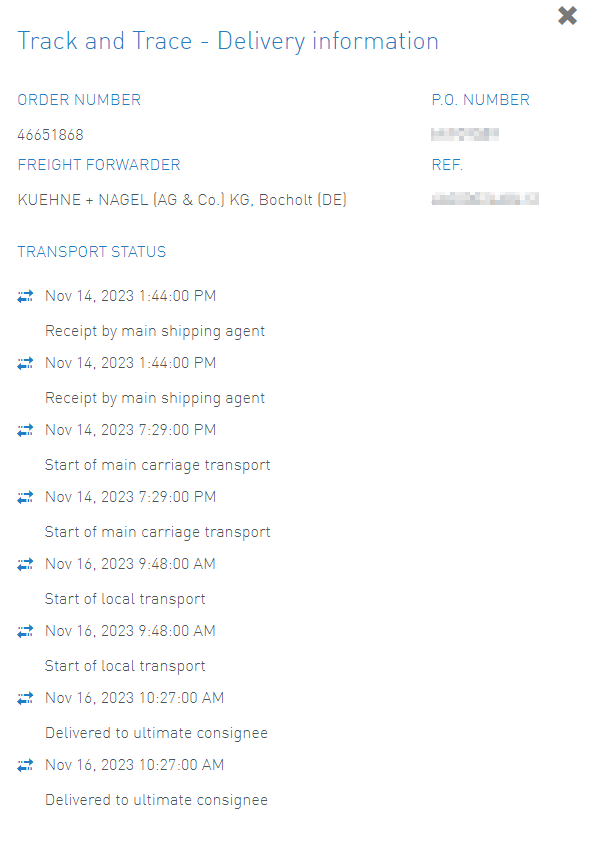
3. Informations de livraison et suivi de livraison
En cliquant sur l’icône du camion, une fenêtre pop-up apparaît.
Ici, vous pouvez suivre les différentes étapes de la livraison.
1. Accès à l’interface de configuration
1.1. Accès à l’interface de configuration - Barre latérale
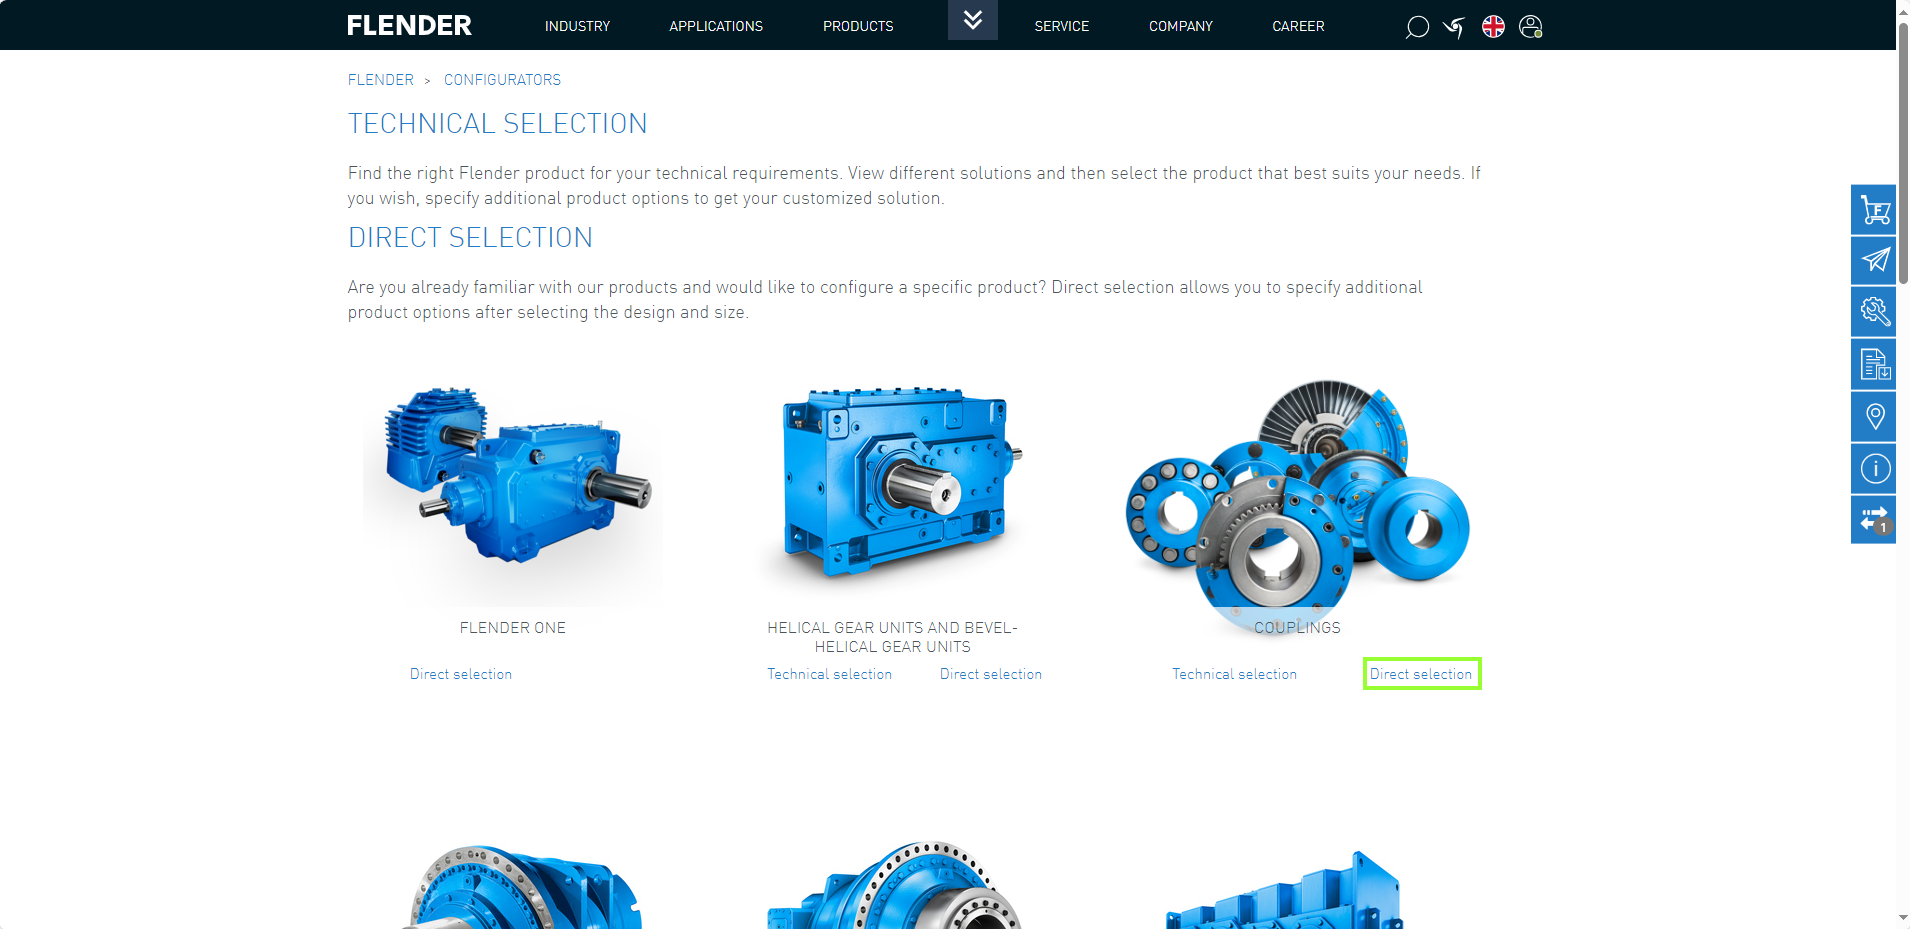
La fonction de configuration est accessible via la barre latérale (1) de la Flender Mall.
Ensuite, vous pouvez choisir entre la sélection directe et la configuration individuelle (2).
1.2. Accès à l’interface de configuration - Produits
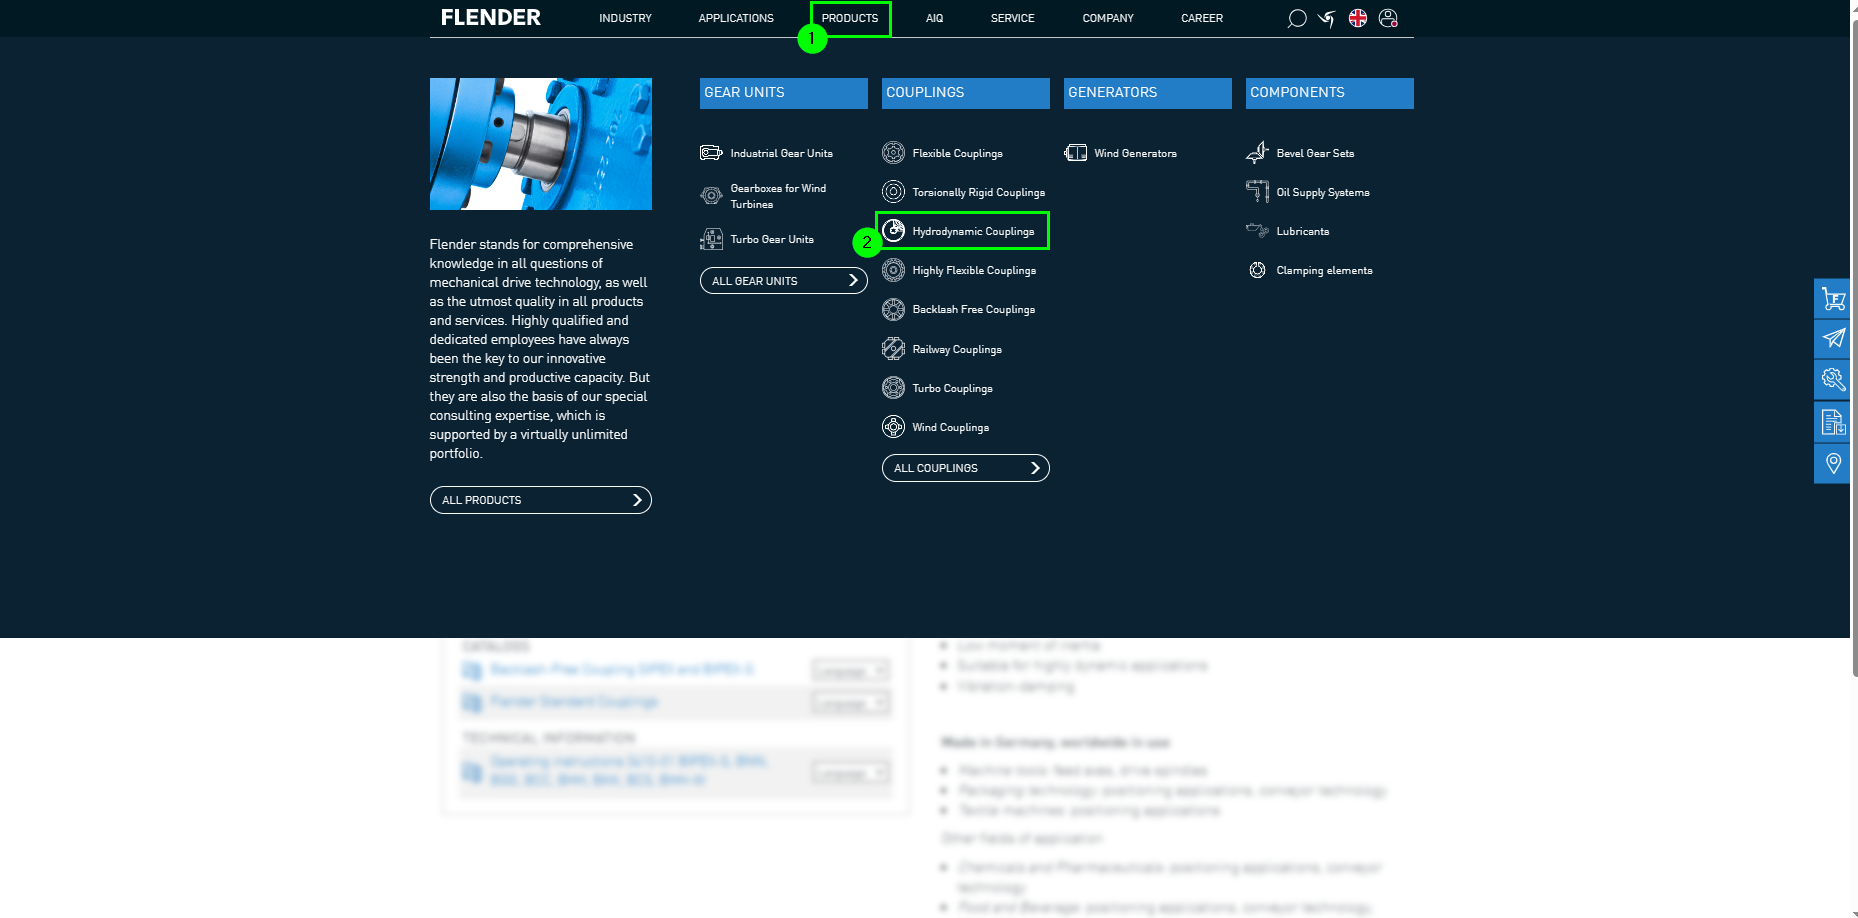
L’accès à l’interface de configuration peut également se faire via l’interface produit des produits Flender.
Pour cela, il est nécessaire de cliquer sur la navigation des produits dans l’en-tête (1).
Ensuite, vous pouvez sélectionner le produit souhaité (2).
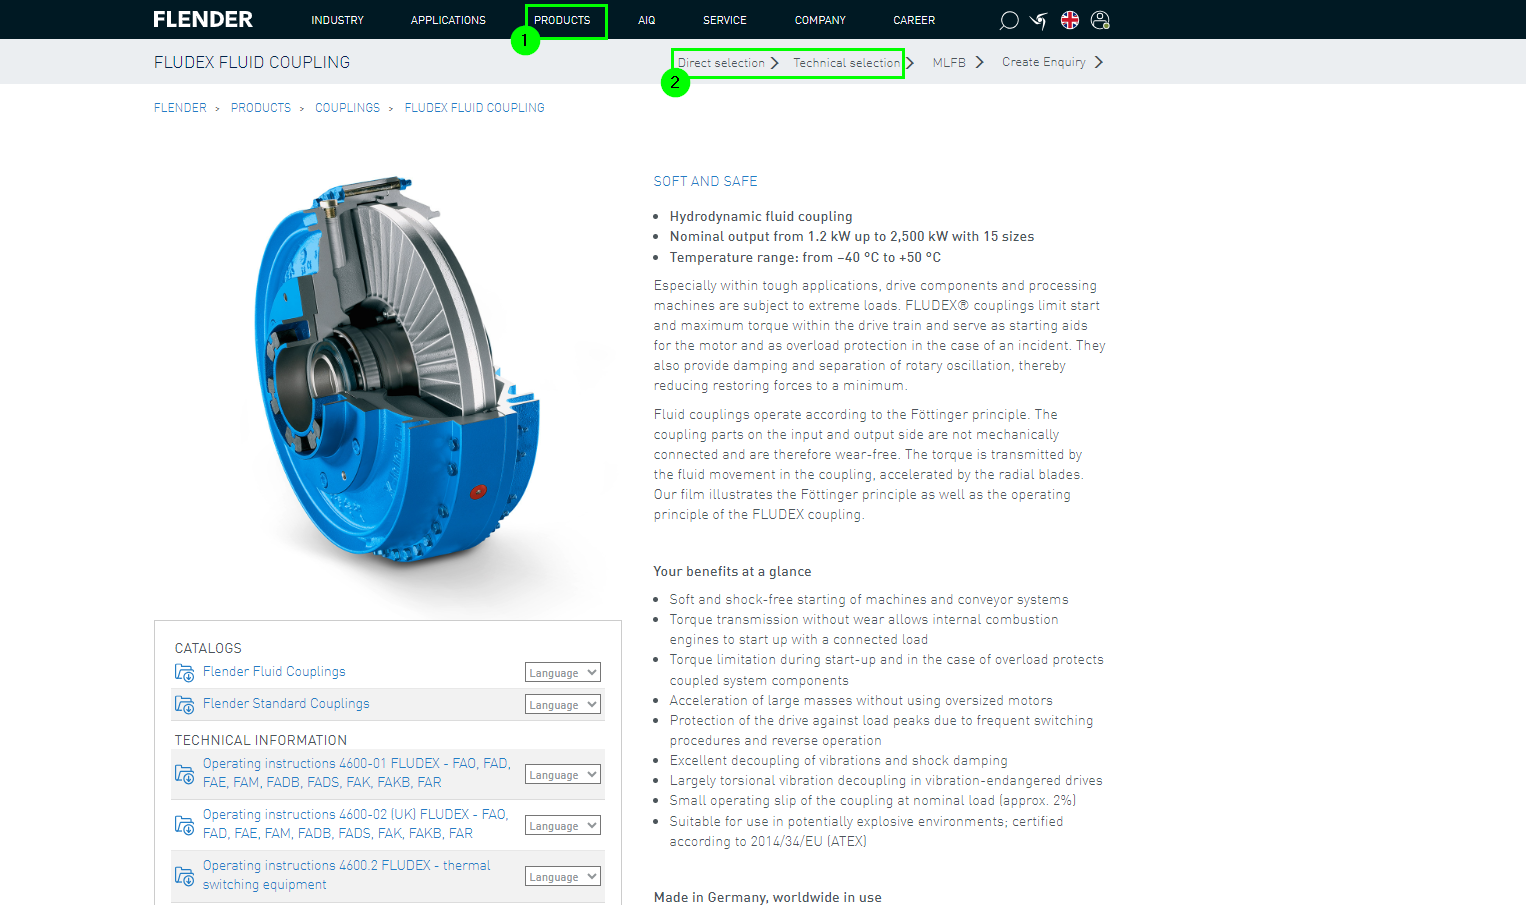
Vous accédez ensuite à l’aperçu du produit (1). Ici aussi, il est possible de choisir entre la sélection directe et la configuration (2).
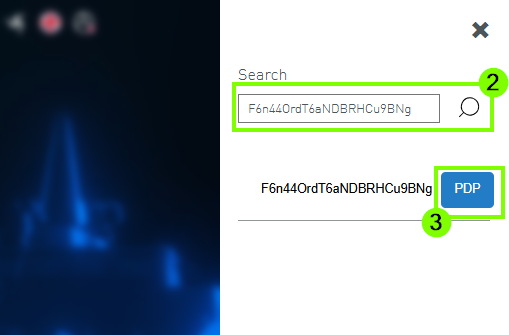
Si la MLFB ou la ConfigID est connue, vous pouvez accéder directement aux détails du produit via la fonction de recherche.
Pour cela, ouvrez la fonction de recherche (1) et saisissez la MLFB / ConfigID souhaitée (2).
L’étape suivante permet d’accéder à la page de détails du produit (PDP) (3).
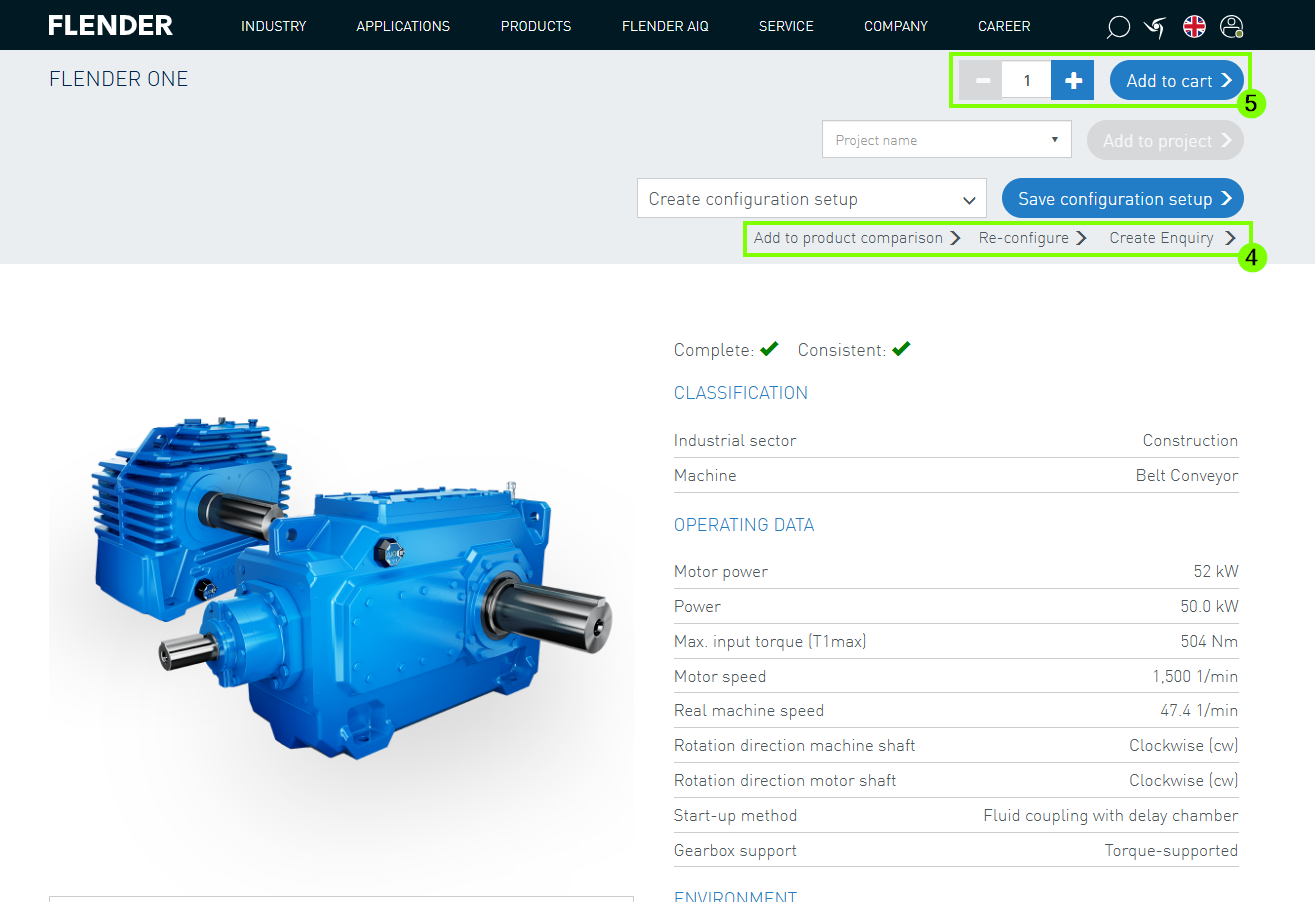
Après connexion réussie, des fonctions telles que « Ajouter à la comparaison de produits » ou « Reconfiguration » sont disponibles (4).
Alternativement, le produit peut être ajouté directement au panier (5).
2. Configurer
Que vous choisissiez la sélection directe ou la configuration, vous accéderez à la même interface utilisateur affichée.
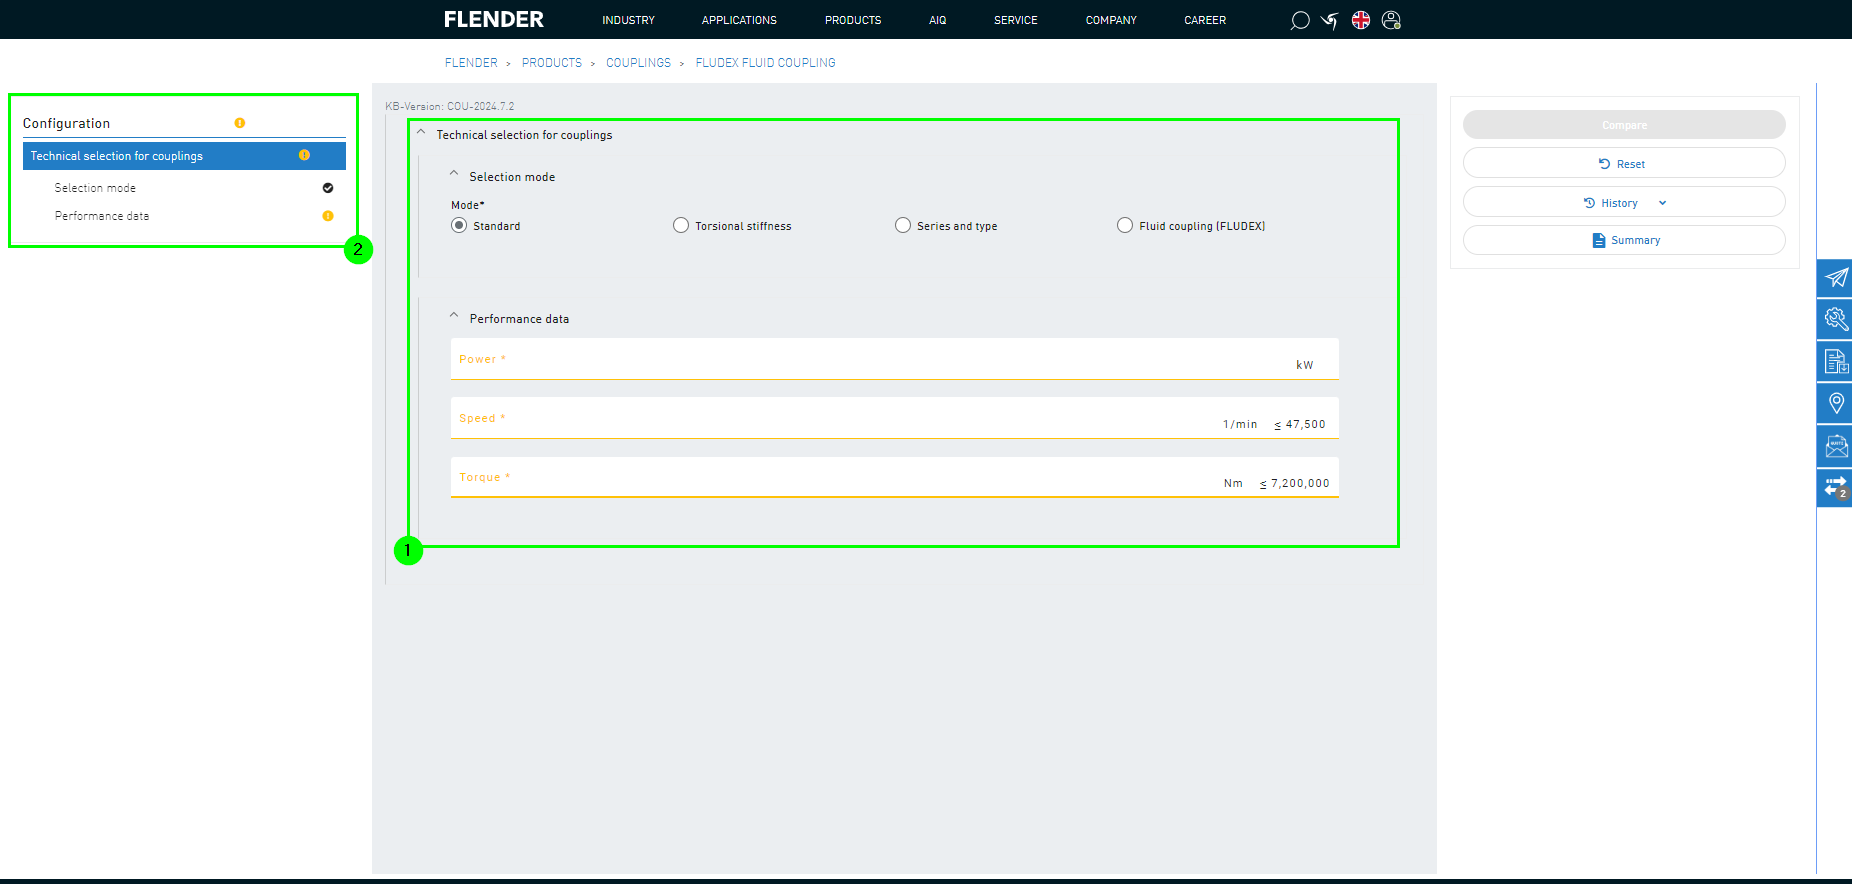
Dans la vue de configuration, tous les paramètres et variables doivent être saisis (1).
Si des points d’exclamation orange apparaissent dans l’aperçu de la configuration, cela signifie que la configuration est incomplète (2).
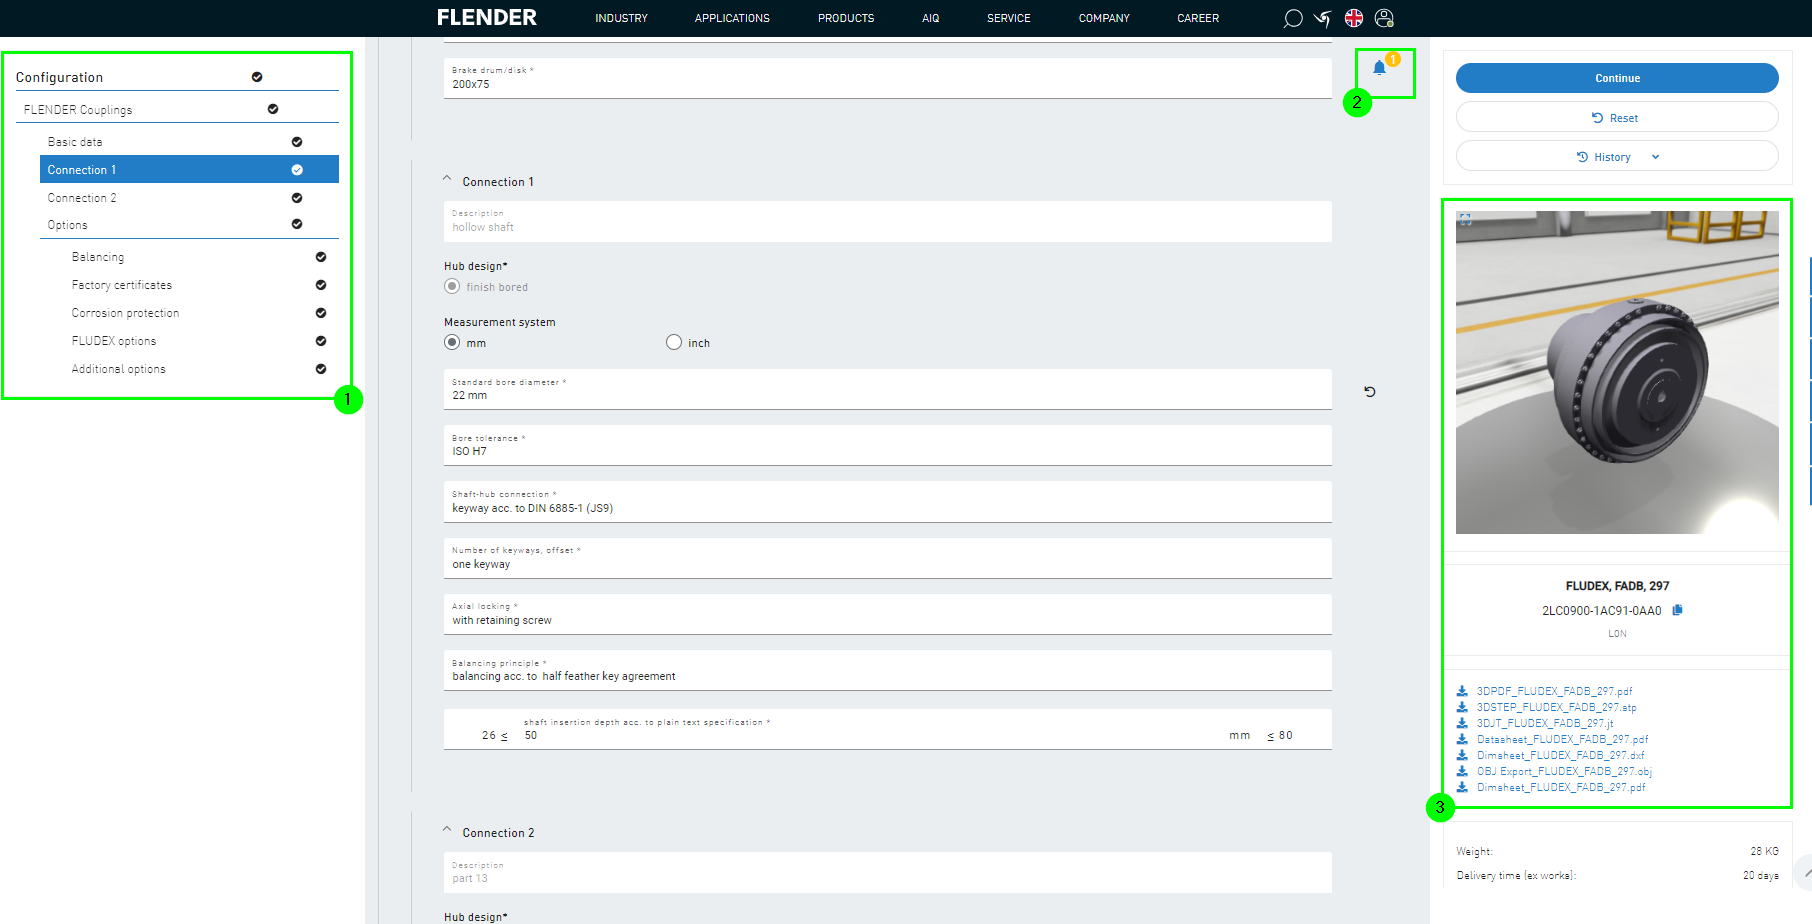
Lorsque toutes les valeurs sont complètes, cela est visualisé par des coches noires (1).
Les informations importantes sont symbolisées par l’icône d’annonce (2).
Sur le côté droit, des documents supplémentaires sont disponibles en téléchargement ou le produit configuré peut être affiché en 3D.
Cliquez ensuite sur "Suivant" pour effectuer d’autres actions.
Vous accéderez ensuite à l’interface utilisateur suivante :
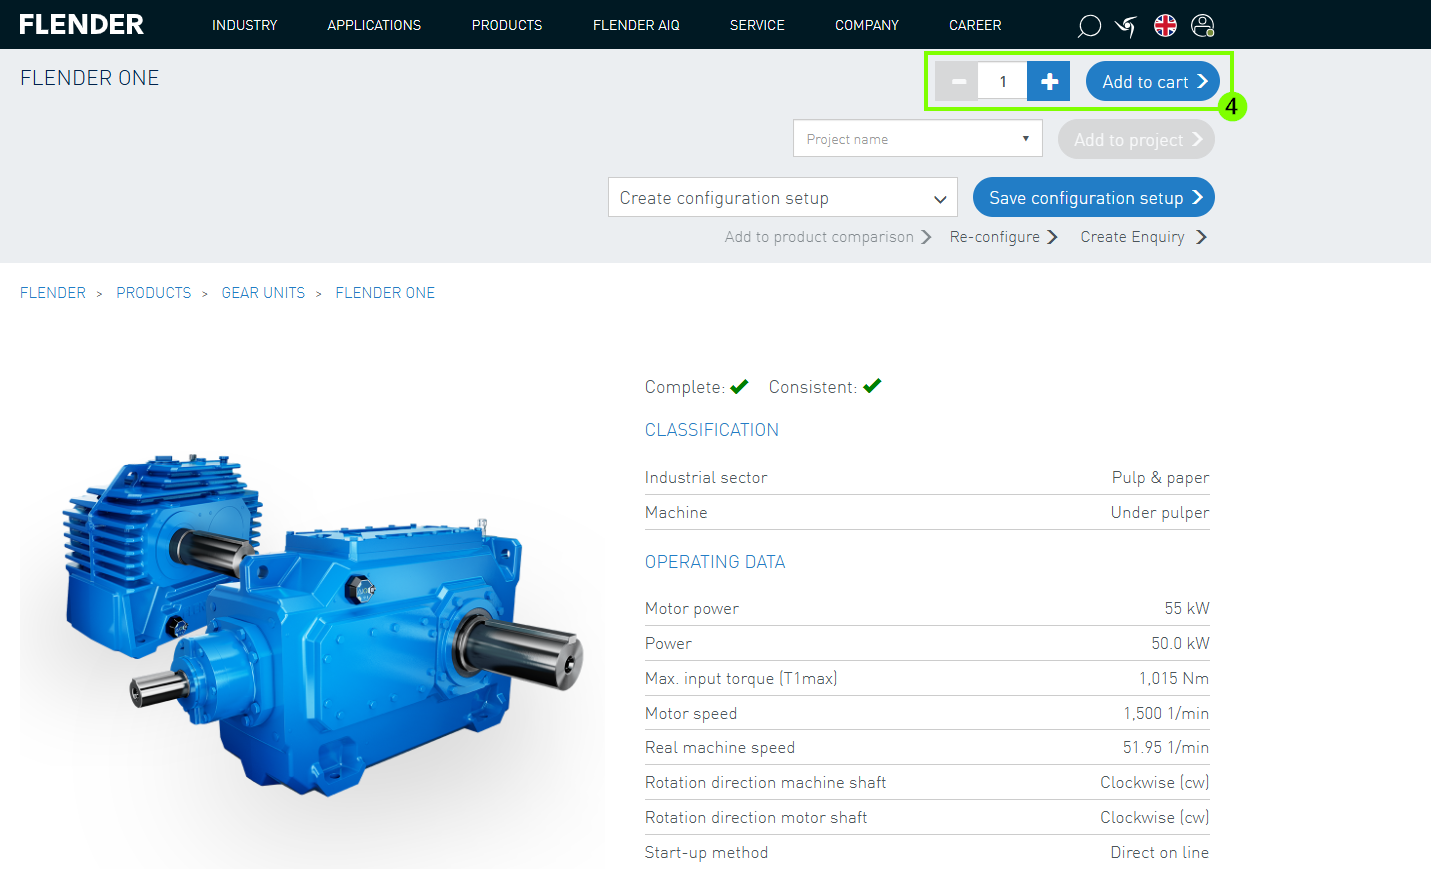
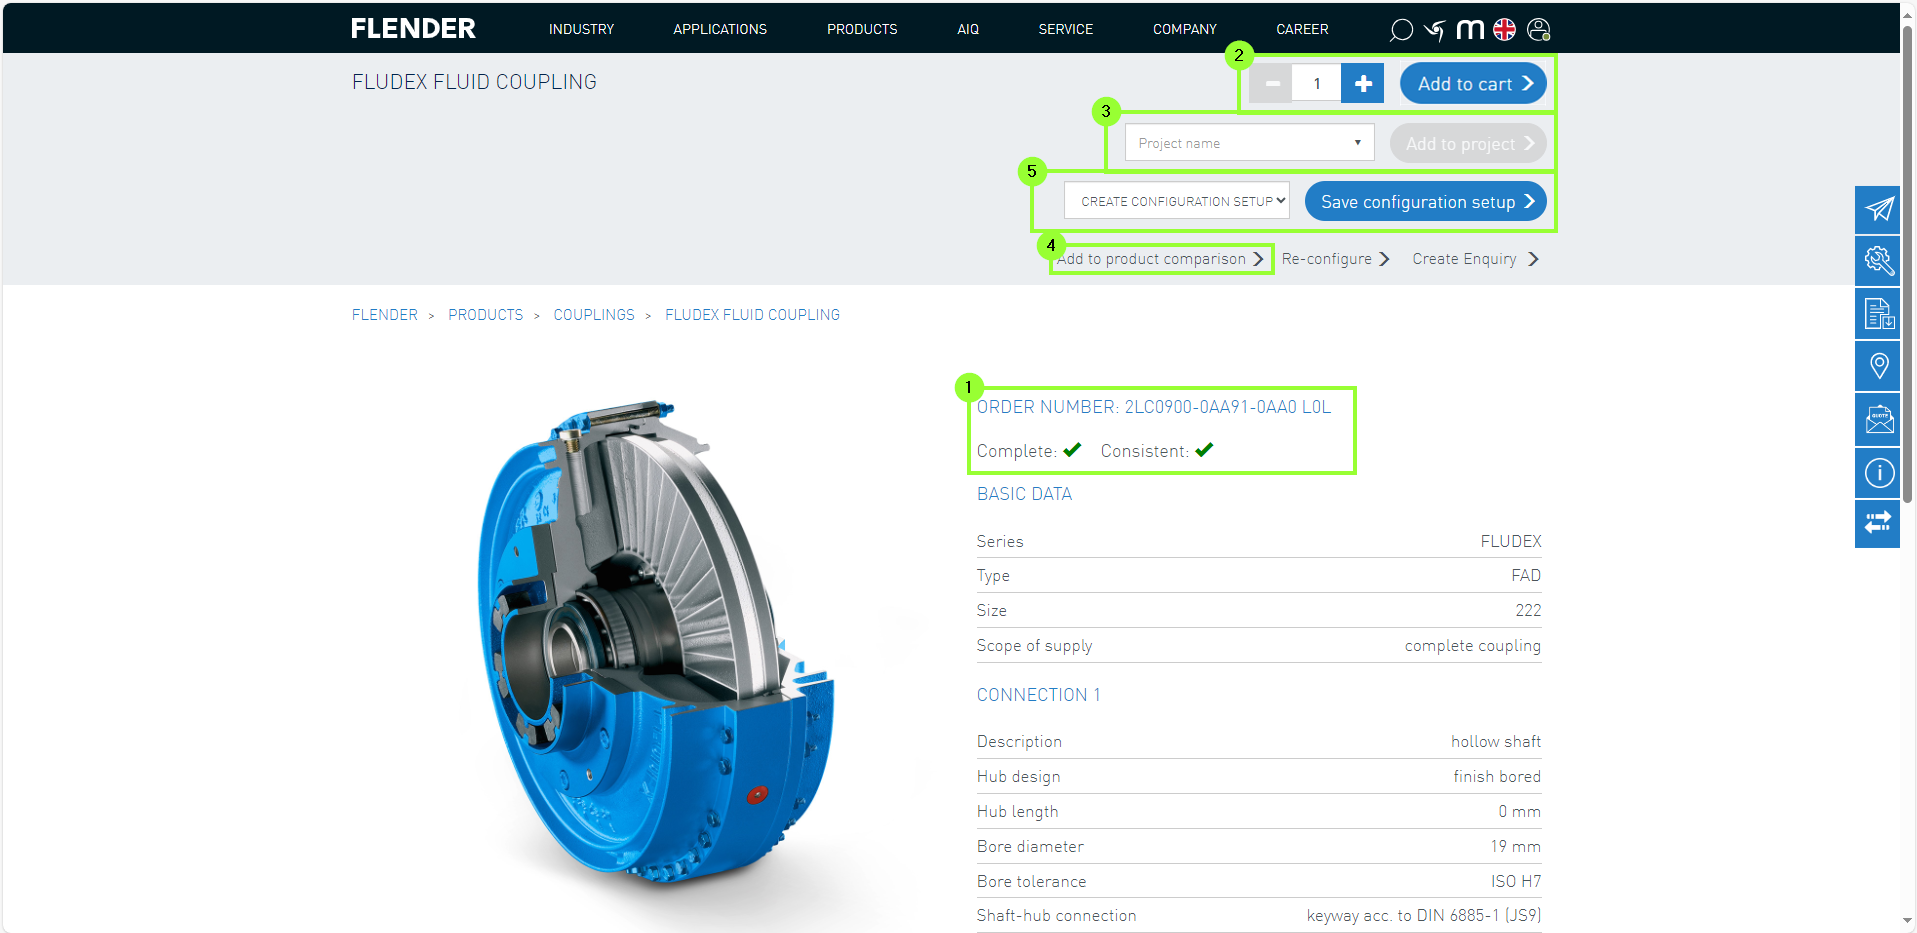
Une attention particulière doit être portée à la complétude et à la cohérence de la configuration (1).
Les paramètres essentiels du produit sont visibles sur le côté droit.
De plus, il est possible de télécharger des documents liés au produit à cet endroit.
Il est également possible d’ajouter le produit configuré au panier (2), de l’ajouter à un projet après sélection (3) ou de le comparer à d’autres produits (4).
Il est également possible d’enregistrer la variante de configuration actuelle (5).
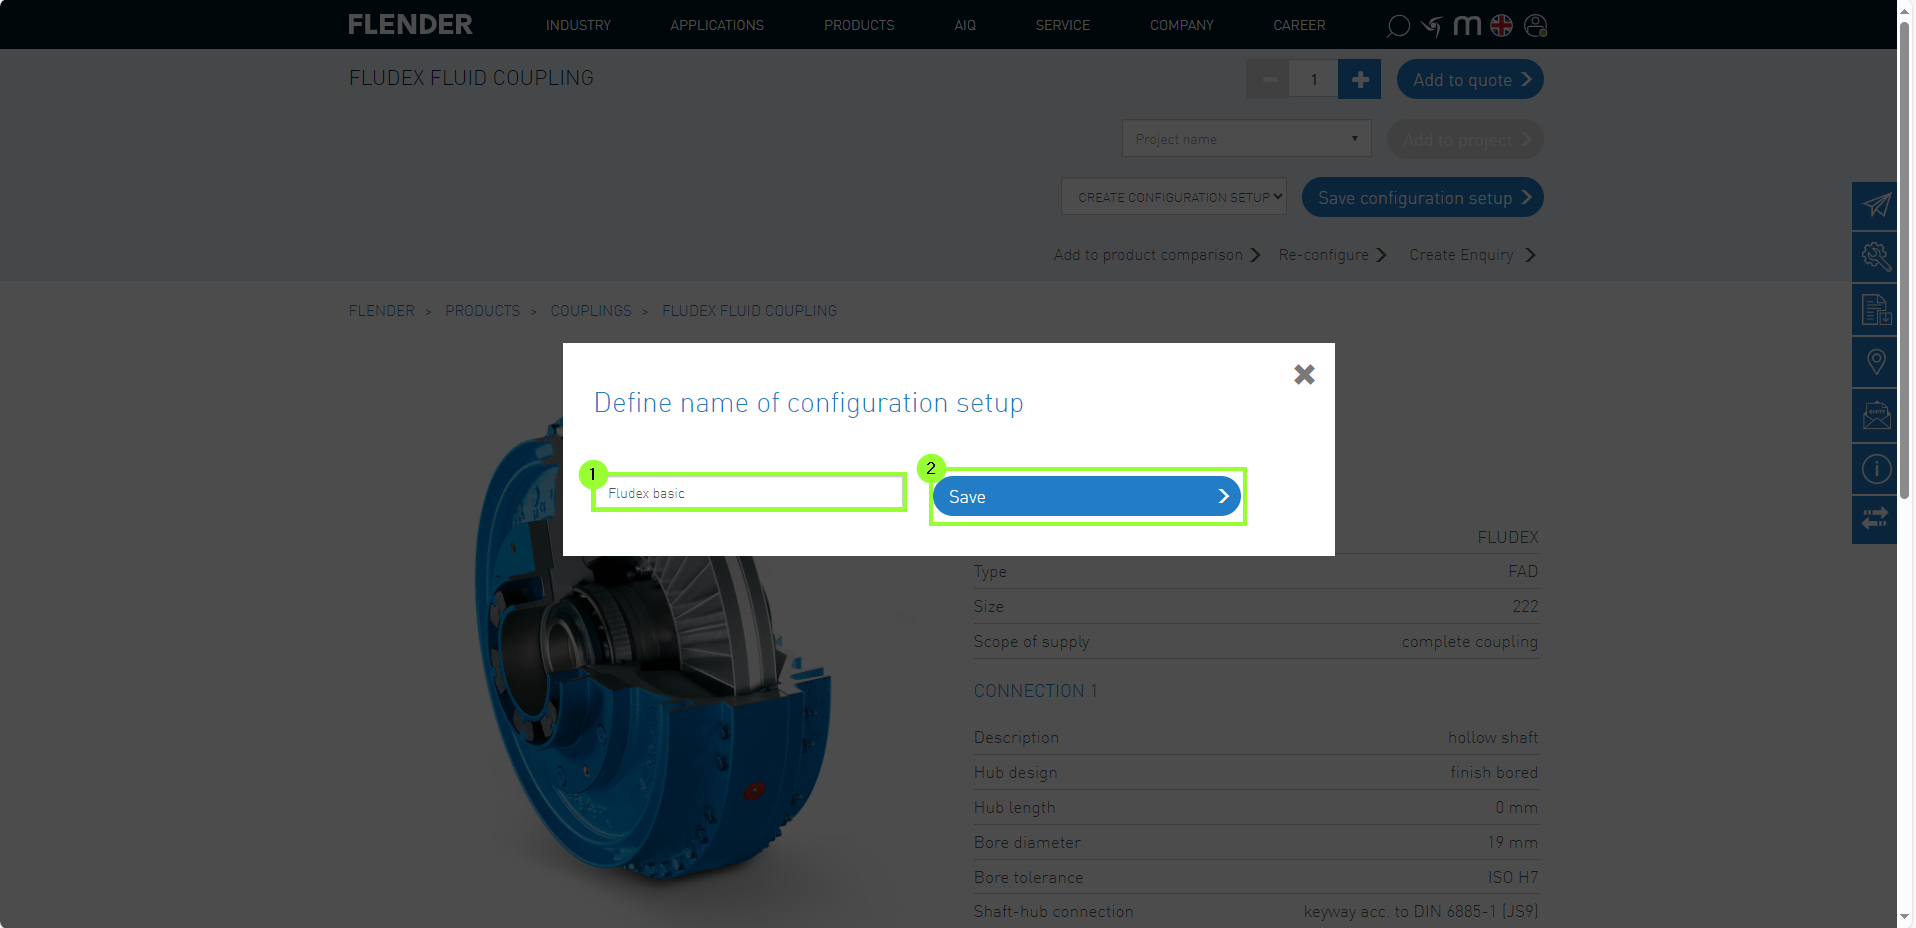
Dans le menu suivant, une désignation libre peut être saisie (1). Celle-ci sera enregistrée dans les données client en cliquant sur "Enregistrer" (2).
3. Ouvrir des variantes de configuration enregistrées
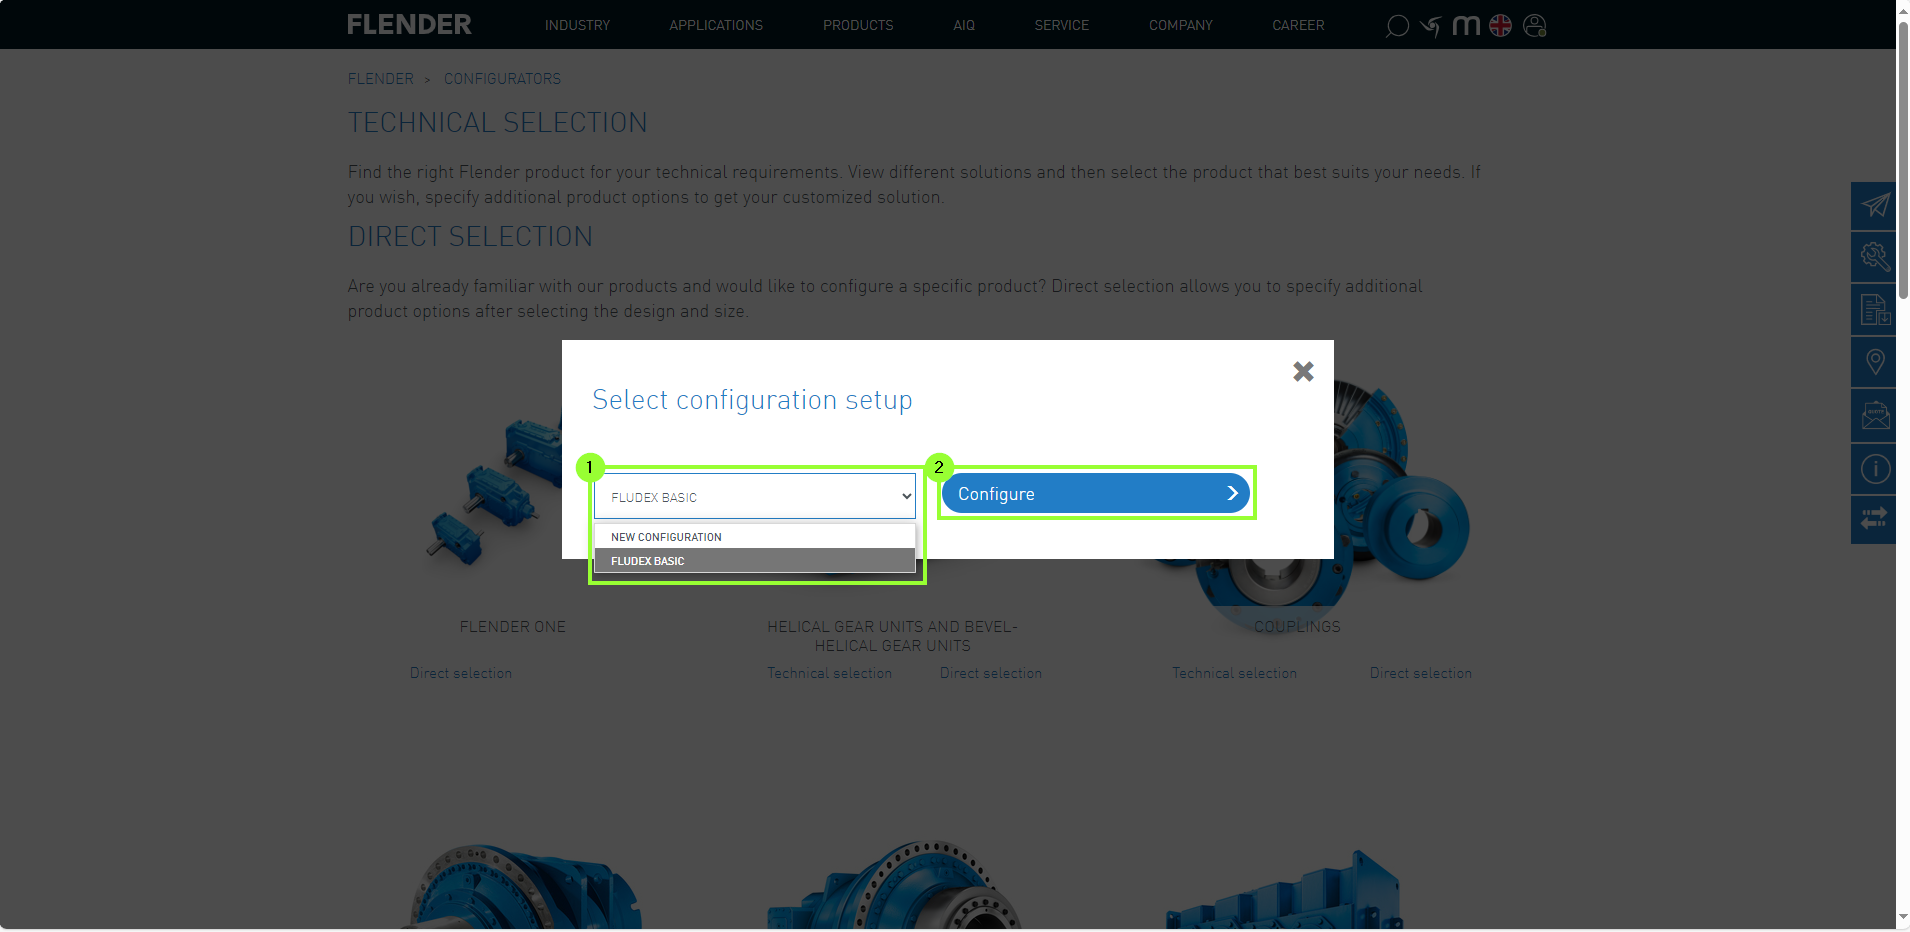
Les configurations enregistrées peuvent être ouvertes via la sélection directe afin de démarrer avec la configuration sauvegardée.
Depuis le menu déroulant, la variante souhaitée peut être sélectionnée (1) puis ouverte dans le configurateur via “Configurer” (2).
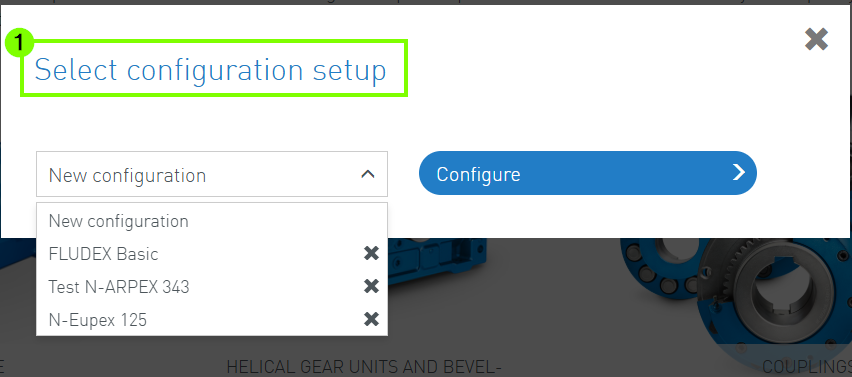
4. Supprimer des variantes de configuration
Si une variante enregistrée n’est plus nécessaire, elle peut être facilement supprimée via l’icône « X » (1). Une confirmation de la suppression est alors requise (2).
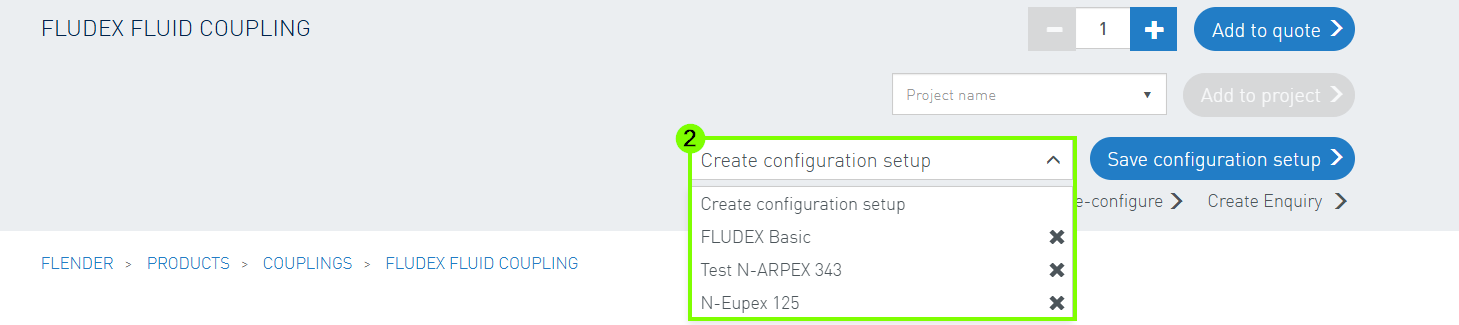
Une variante peut être supprimée soit directement lors de la création d’une nouvelle configuration (1), soit lors de l’enregistrement d’une configuration (2).
My Projects est une fonctionnalité qui permet de rassembler une liste de produits sans les ajouter directement au panier.
Un grand avantage de My Projects est que vous pouvez collaborer efficacement avec vos collègues.
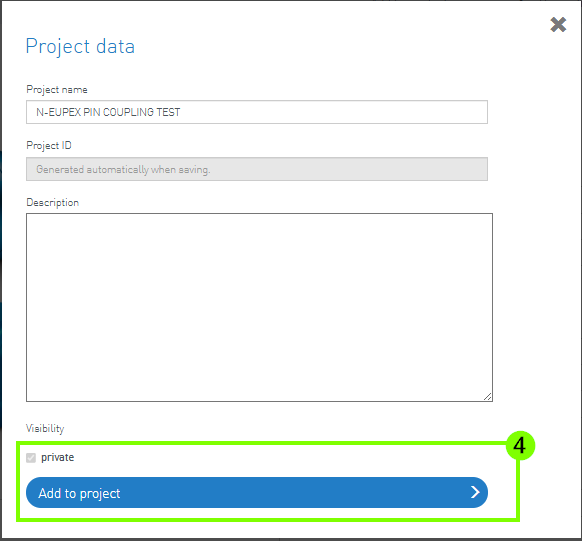
Par défaut, les projets sont visibles pour tous vos collègues. Vous avez l’option de créer des projets privés, accessibles uniquement pour vous.
Pour accéder à cette fonctionnalité, naviguez vers le menu "My Projects" après avoir cliqué sur le menu utilisateur.
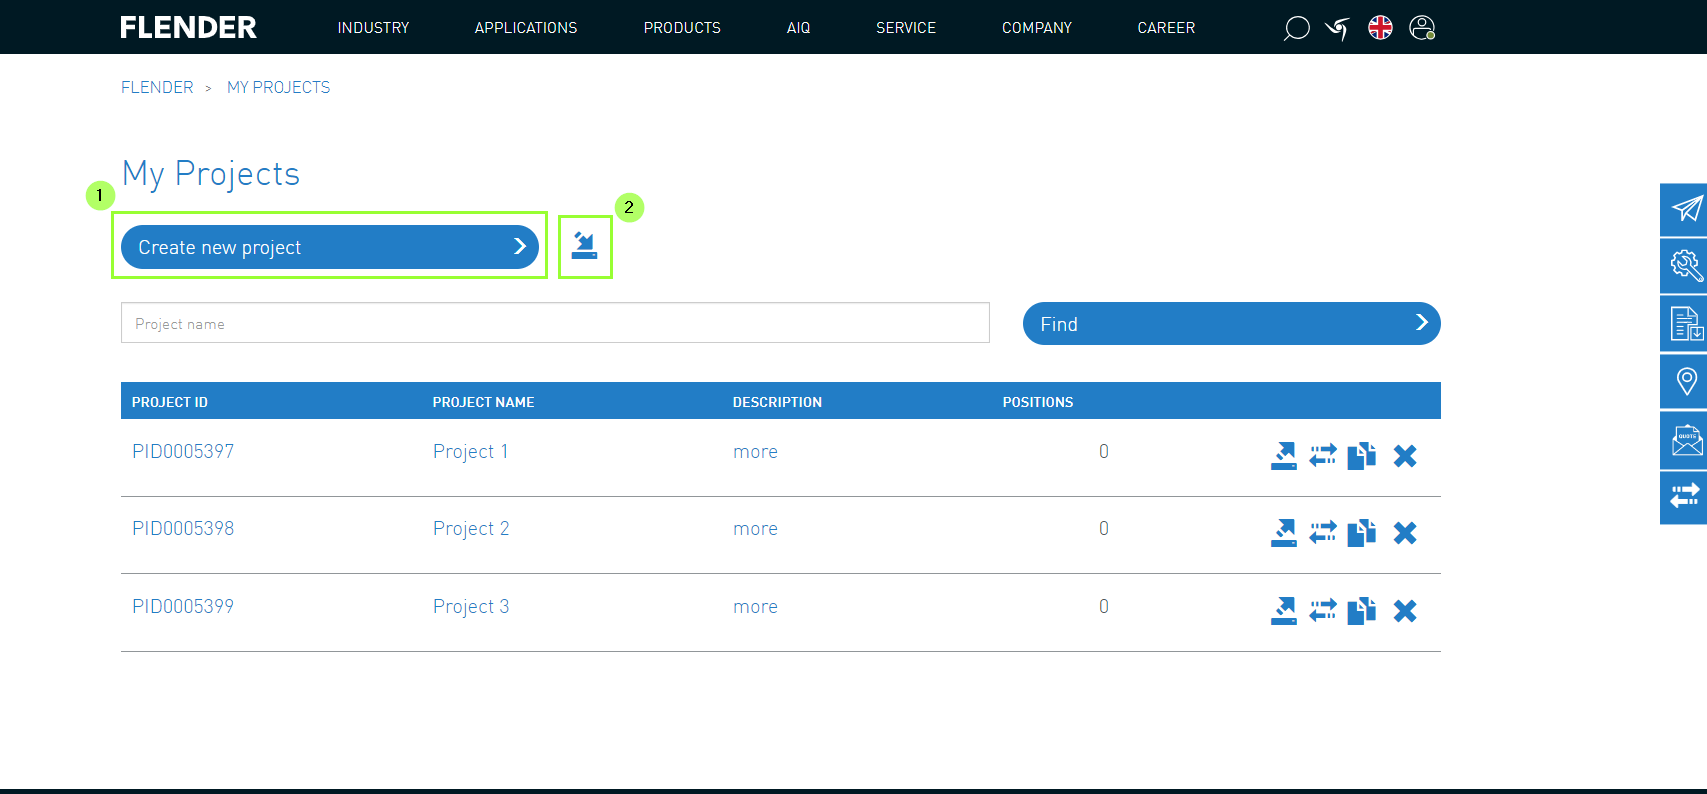
1. Création de projet
Lors de la création de nouveaux projets, deux possibilités sont proposées.
Création manuelle (1)
Importation de projets existants (fichier texte avec l’extension CSV, XLS, XLSX) (2)
2. Ajouter des produits au projet
Procédure : Ajout de produits au projet
Sélectionner/configurer un produit Flender
Sélectionner le projet (1)
Ajouter le produit au projet (2)
Alternativement, il est possible de créer un nouveau projet via la page de détails du produit (3).
Pour cela, saisissez les données nécessaires et enregistrez le projet (4).
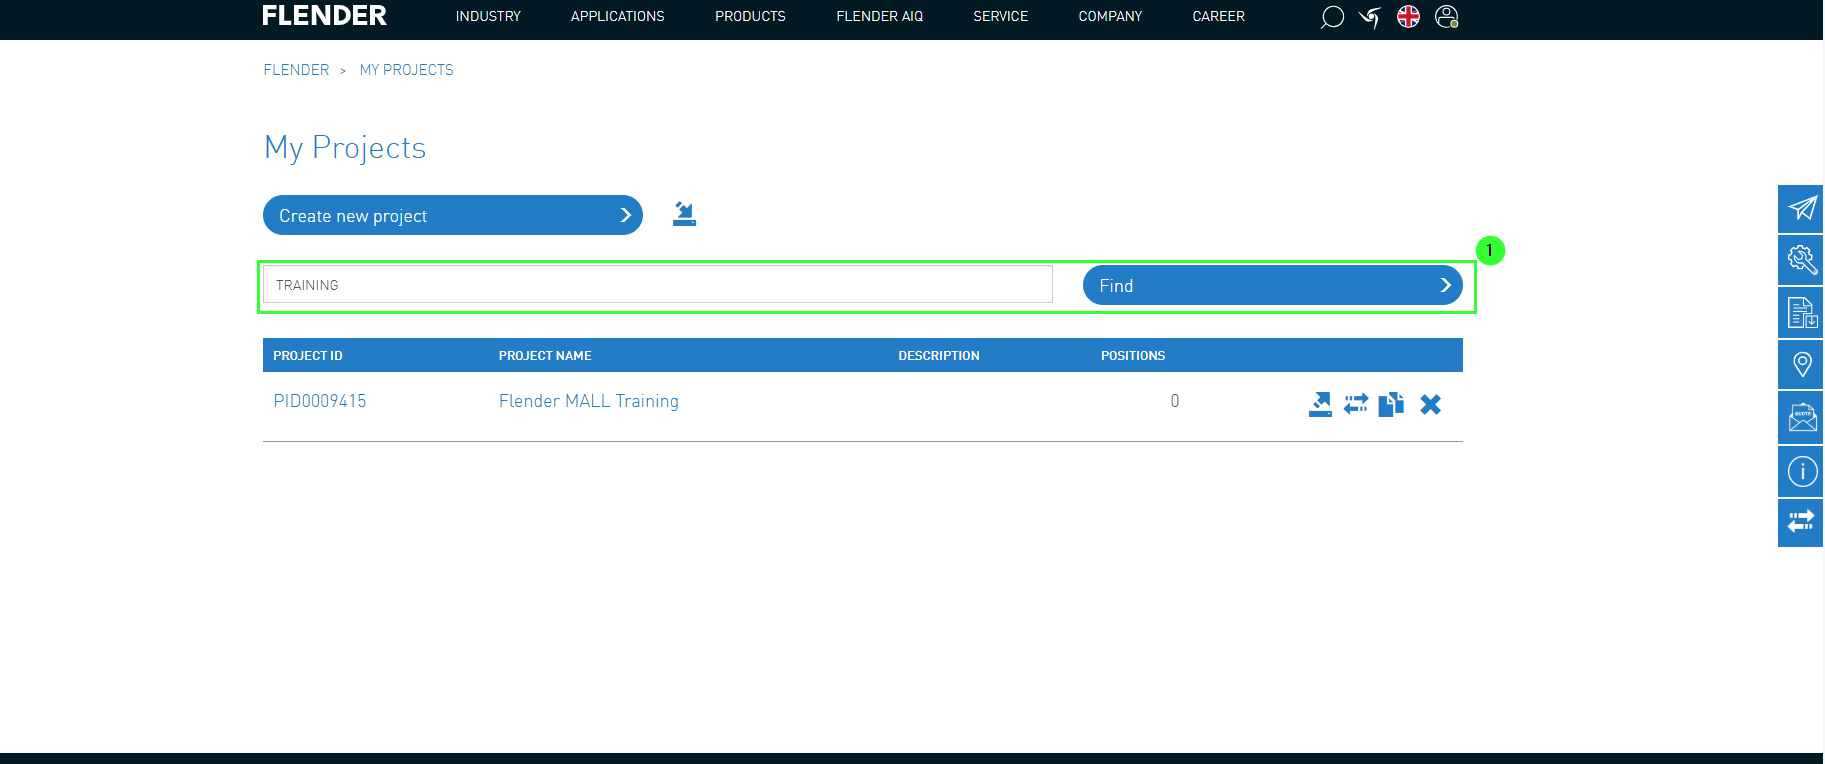
Les projets déjà créés sont ici (1) classés par ordre alphabétique et peuvent être rapidement trouvés grâce à la fonction de recherche.
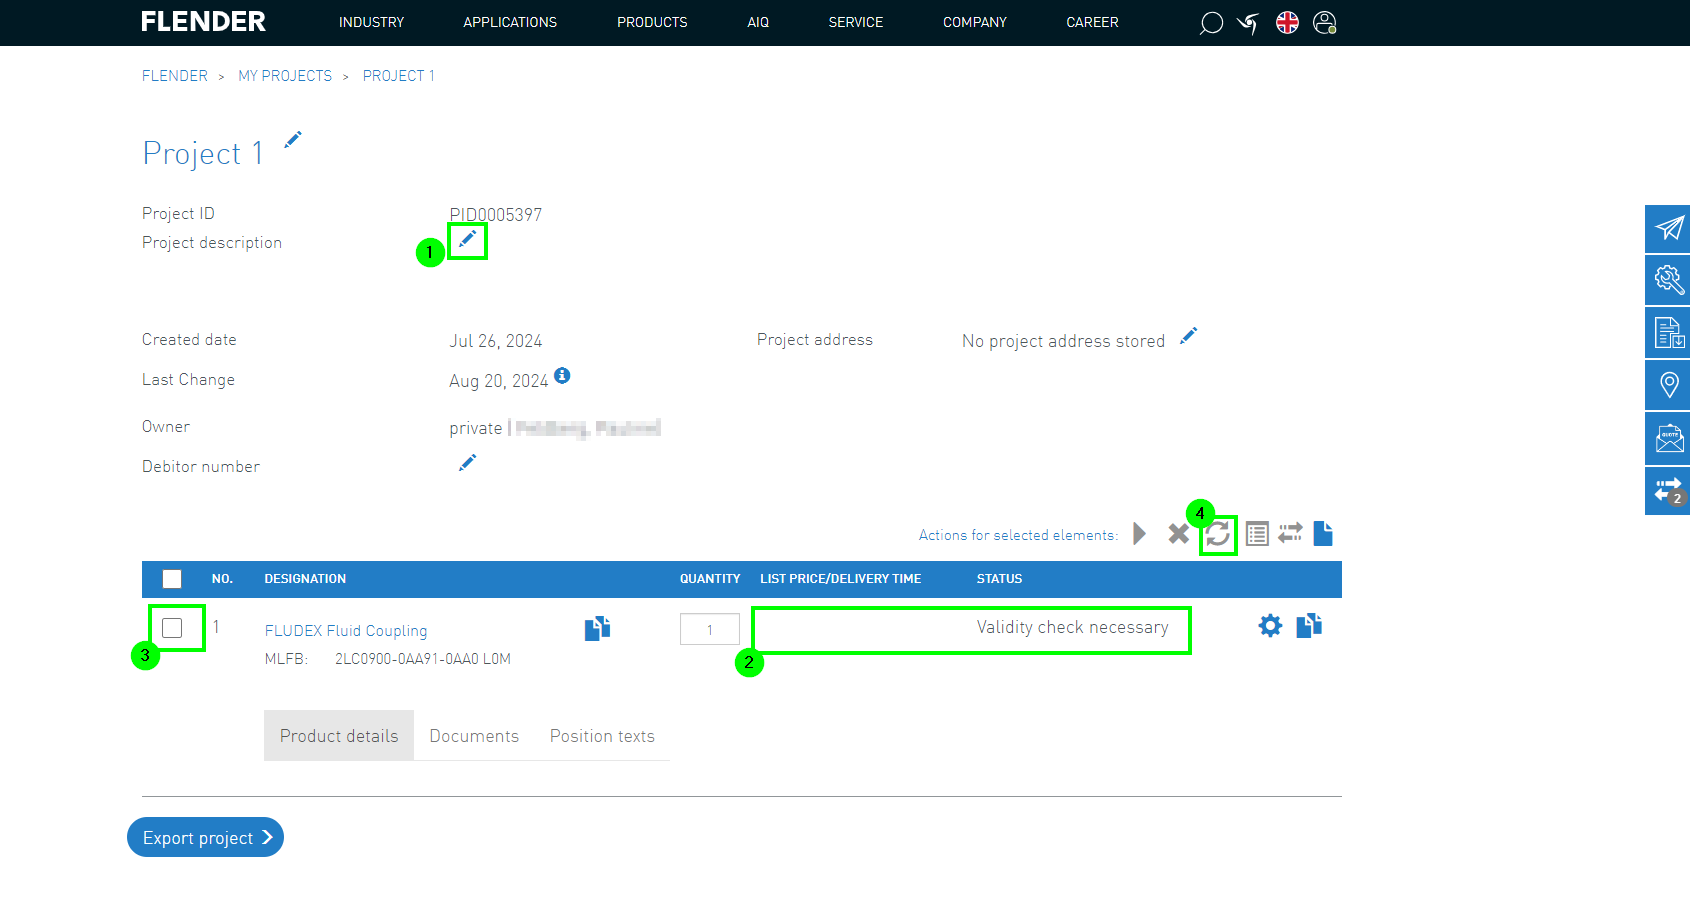
3. Contenu du projet
En cliquant sur un projet dans la liste, le contenu du projet est affiché et peut être modifié à l’aide de l’icône crayon (1) si nécessaire.
Il est important de noter que la configuration du produit doit être validée lors de l’ouverture du projet. Il est donc nécessaire de vérifier le statut (2).
Pour cela, il faut sélectionner chaque position du projet (3)
et ensuite les mettre à jour (4).
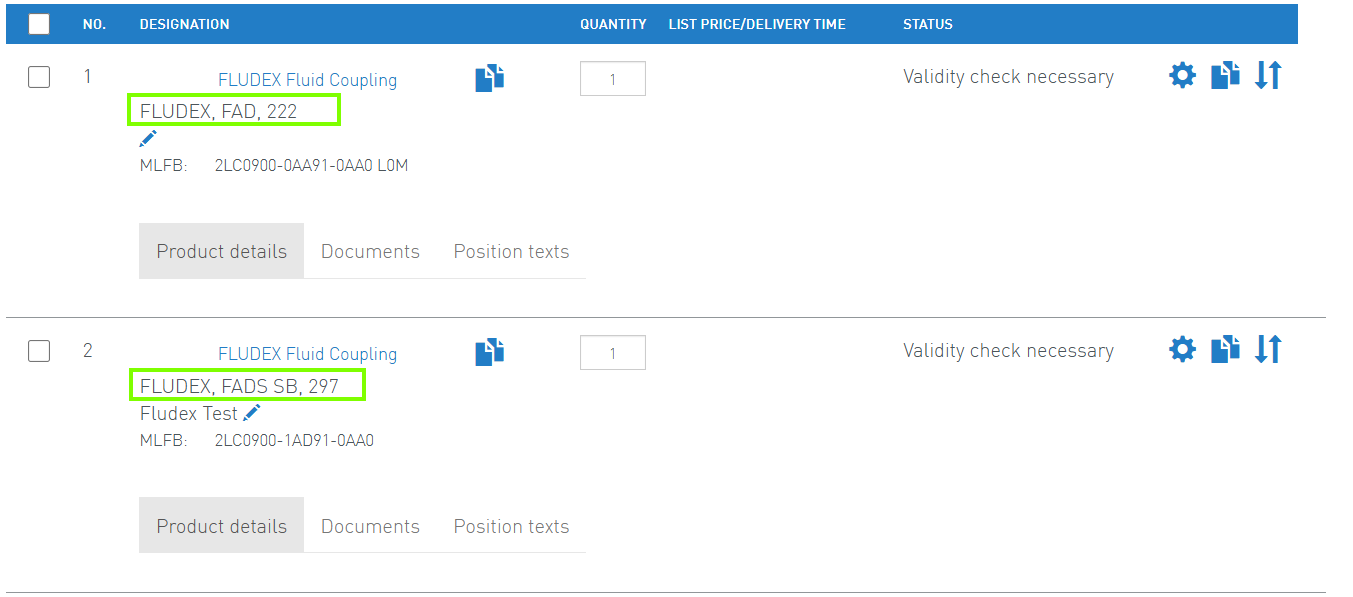
De plus, les détails des produits de chaque position sont affichés.
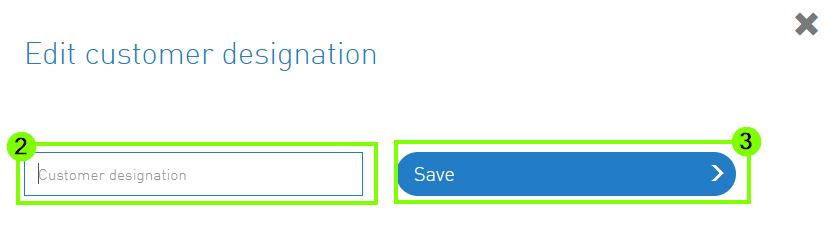
En outre, des informations ou des désignations individuelles et complémentaires peuvent être ajoutées aux produits. Pour cela, sélectionnez d’abord l’icône crayon (1), saisissez le texte souhaité (2) et enregistrez (3).
4. Export du projet
Une fois un projet créé dans Flender Mall, il est également possible de l’exporter.
Pour cela, il faut suivre les étapes suivantes :
(1) Cliquez sur le bouton "Exporter"
(2) Sélectionnez le format souhaité
(3) L’exportation se trouve dans les téléchargements
Les autres fonctions de My Projects sont :
(4) Ajout à la comparaison de produits
(5) Clonage de projets
Après l’export des projets sélectionnés, le document téléchargé est disponible. Un exemple de document XLS téléchargé est présenté dans l’image suivante. Les numéros MLFB ou, pour les réducteurs FlenderOne, la ConfigID sont indiqués ici.
My Equipment vous offre une plateforme complète pour la gestion de vos produits Flender. Voici quelques-unes des principales fonctionnalités qui sont à votre disposition :
Gestion des produits Flender achetés
Consultation des données de commande pour les équipements
Accès aux listes de pièces de rechange
Ajout de pièces de rechange à MyProjects ou au panier
Téléchargement de dessins
Pour utiliser les fonctionnalités de My Equipment, des droits d’accès spécifiques sont requis. Si vous souhaitez utiliser "My Equipment" mais que cette option n’apparaît pas dans votre menu utilisateur, n’hésitez pas à nous contacter via le formulaire de contact.
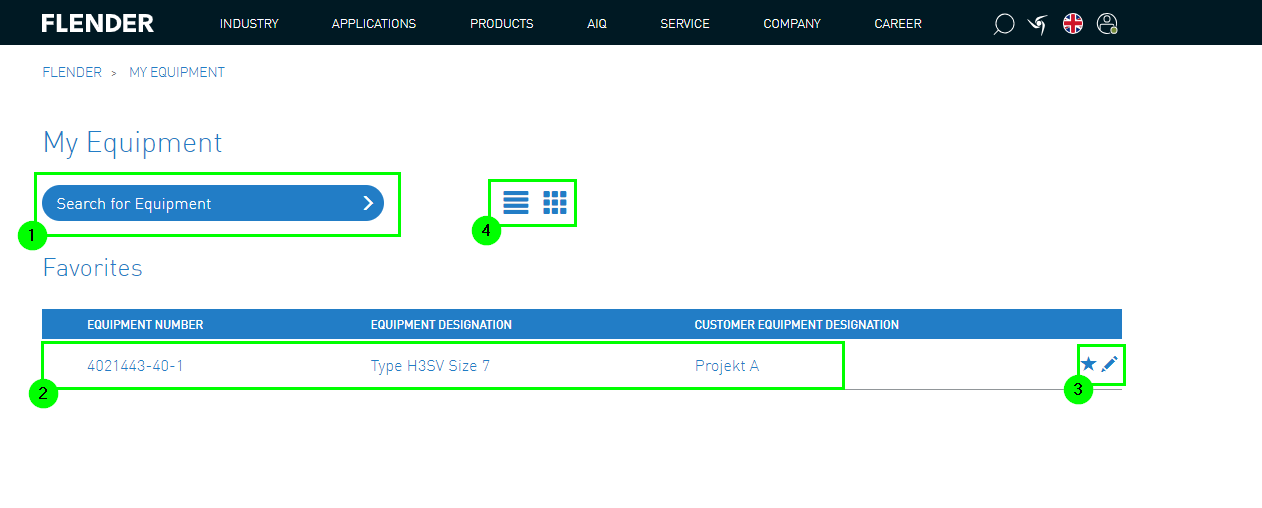
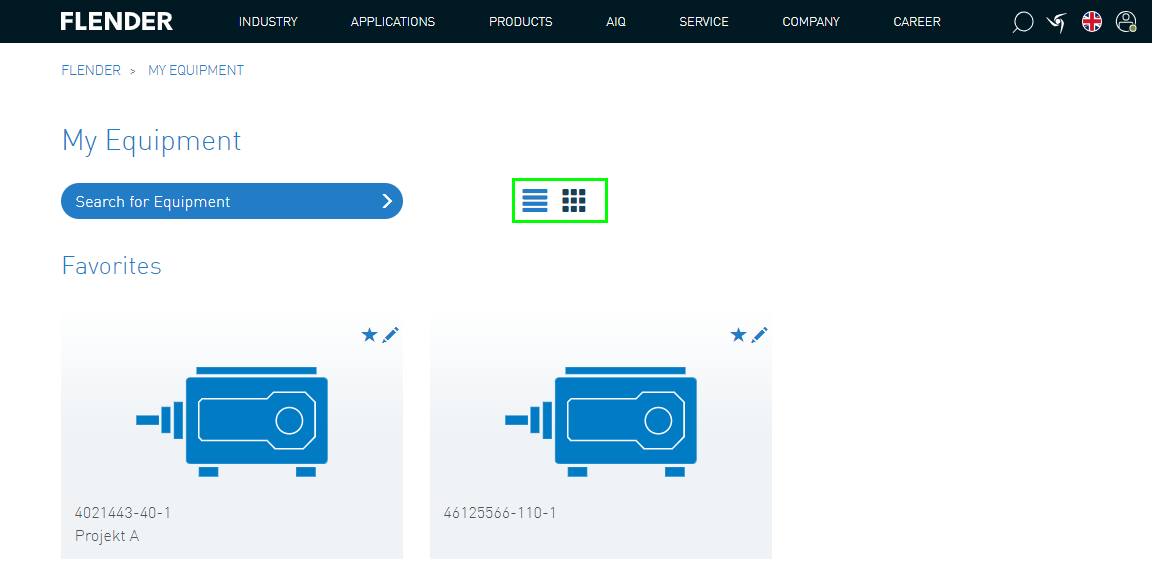
1. Liste des équipements
Depuis le menu utilisateur "My Equipment", vous accédez à la liste des équipements.
Vous pouvez y rechercher les différents numéros de pièces de rechange (1).
La liste des équipements affichée contient tous les numéros marqués comme favoris et les informations suivantes (2) :
Numéro d’équipement
Désignation de l’équipement
Désignation de l’appareil client
À l’aide de l’icône crayon, la désignation de l’appareil client peut être modifiée.
De plus, en retirant l’étoile, l’équipement peut être supprimé des favoris (3)
Il existe deux modes d’affichage pour la liste des équipements (4).
En plus du mode liste, les équipements peuvent également être affichés sous forme de tuiles individuelles :
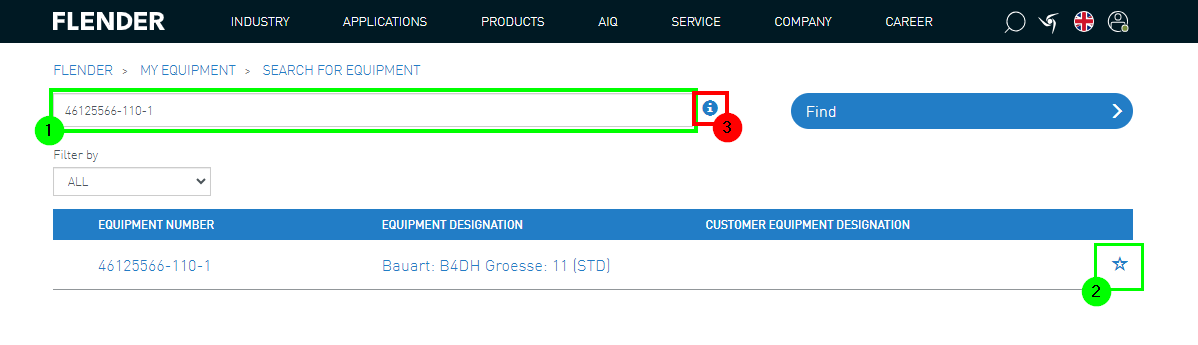
2. Recherche d’équipement
Dans la barre de recherche, vous pouvez saisir le numéro d’équipement correspondant (1).
Ensuite, l’équipement apparaît dans la liste ; il peut être ajouté aux favoris à l’aide de l’étoile (2).
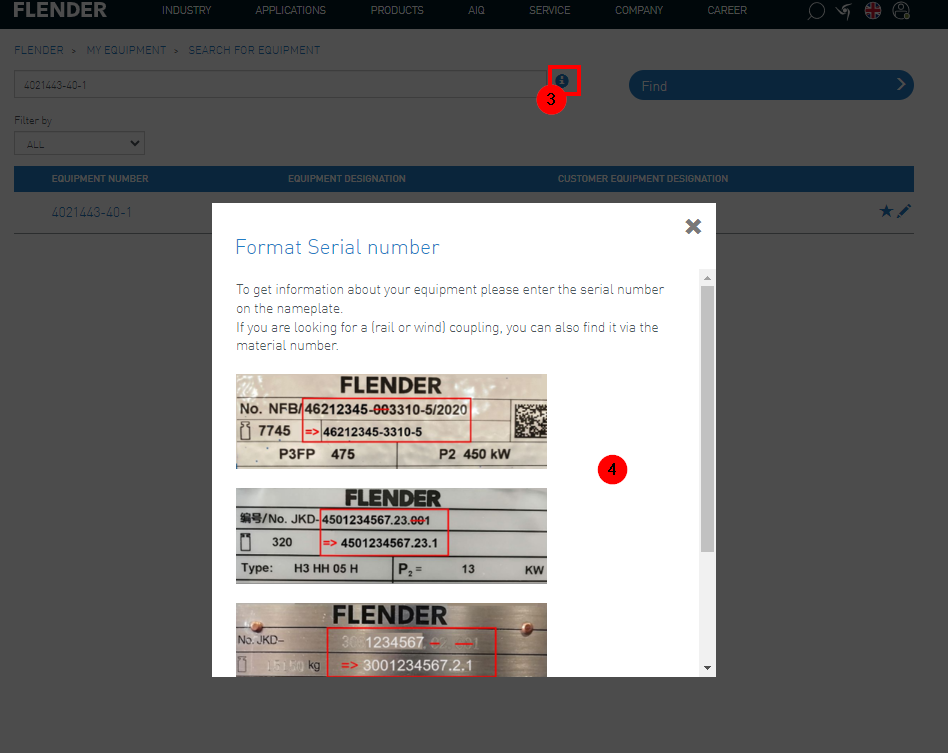
Pour plus d’informations, cliquez sur le bouton d’info (3).
Des informations utiles sont alors affichées.
En saisissant le numéro de série, tous les numéros d’équipement sont affichés (4).
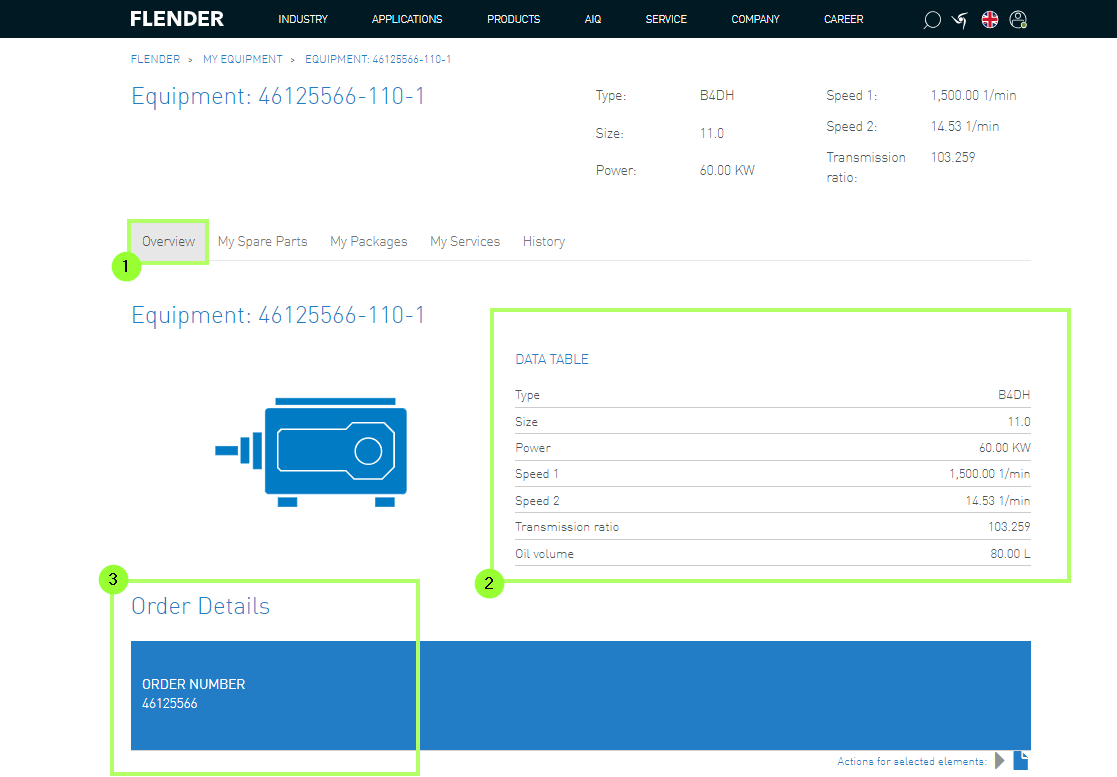
3. Détails de l’équipement
En cliquant sur le numéro d’équipement dans le résultat de la recherche ou dans la barre des favoris, vous pouvez consulter les détails de la commande.
Les détails se composent de 3zones d’information :
3.1 Équipement - Vue d’ensemble
Dans l’aperçu (1), les principales informations sur le produit sont affichées (2).
De plus, les informations de commande telles que le numéro de commande (3) sont indiquées.
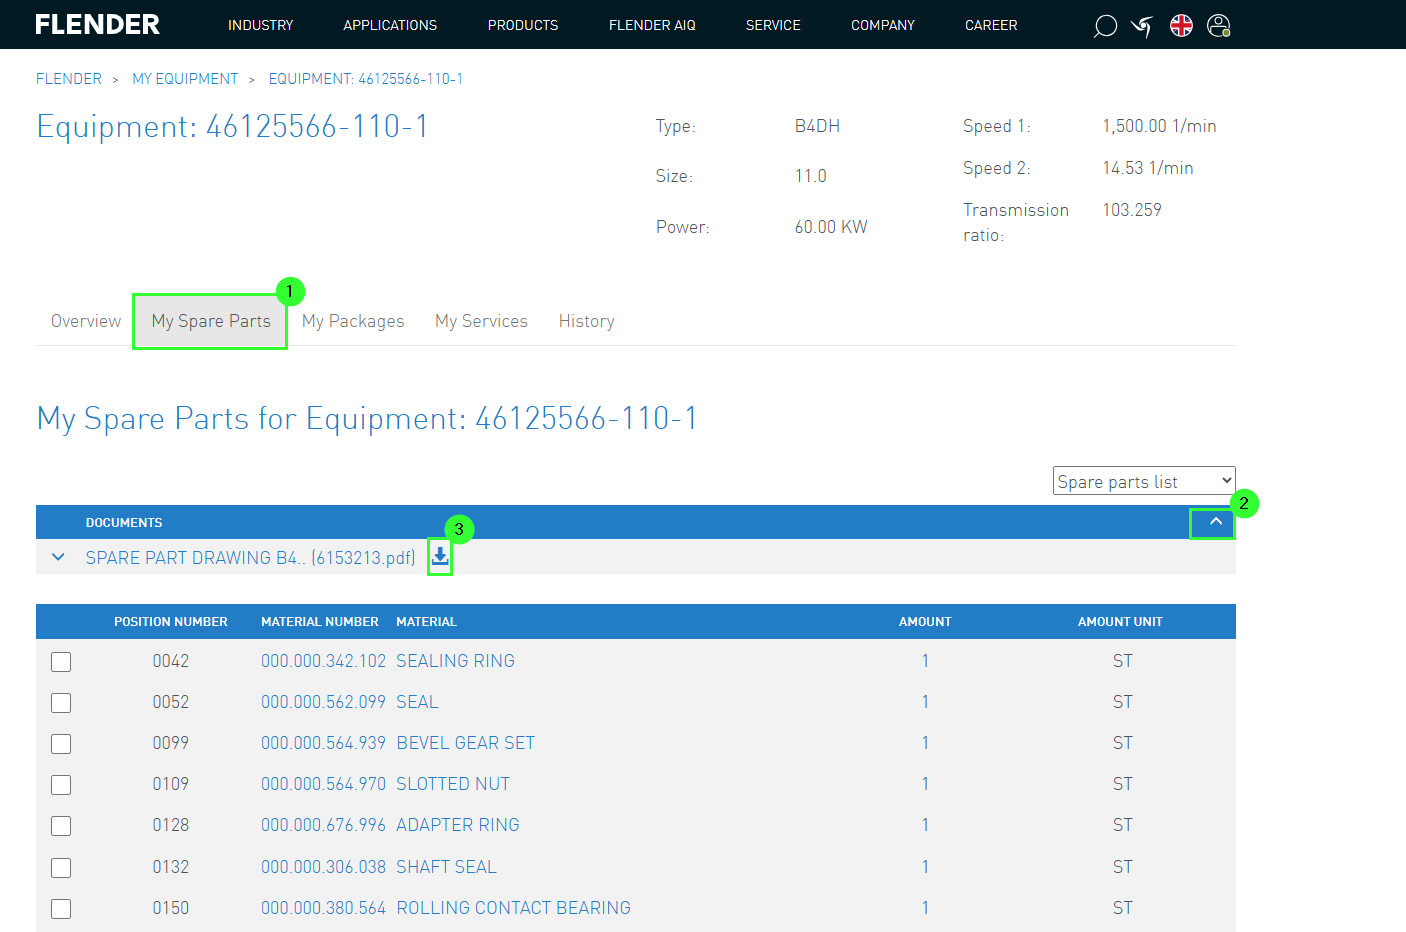
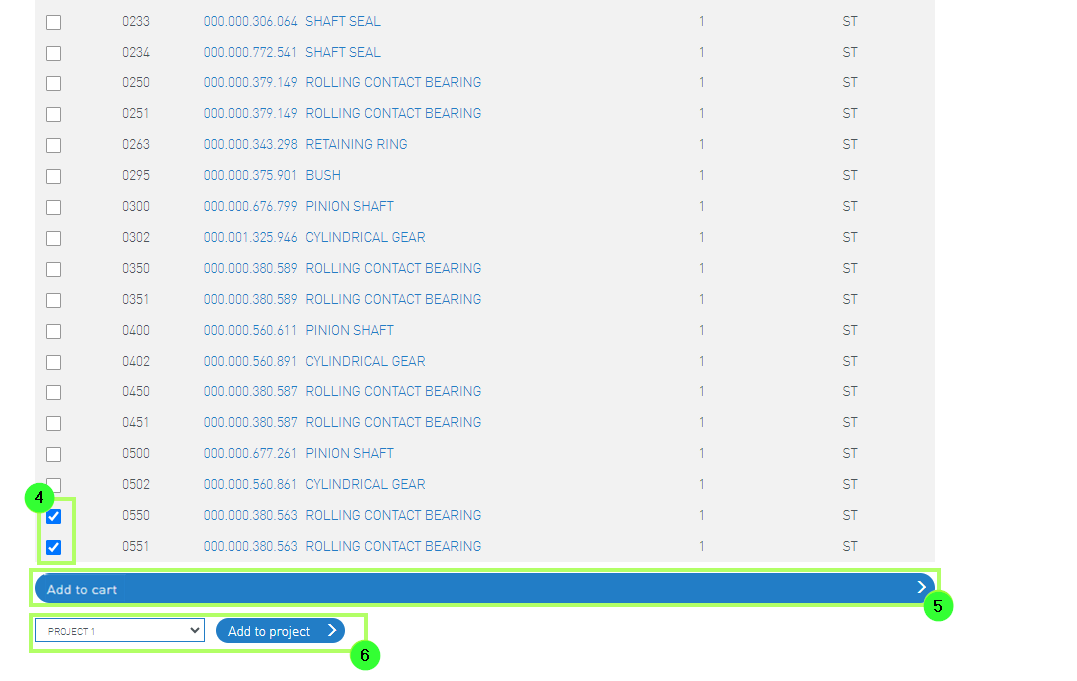
3.2. Équipement - Mes pièces de rechange
Toutes les pièces de rechange du produit Flender sont listées ici (1).
Sous la flèche (2), les documents des pièces de rechange peuvent être téléchargés (3)
Vous pouvez sélectionner les pièces souhaitées (4) et soit les ajouter au panier (5), soit les ajouter à votre projet sélectionné dans "My Projects" (6).
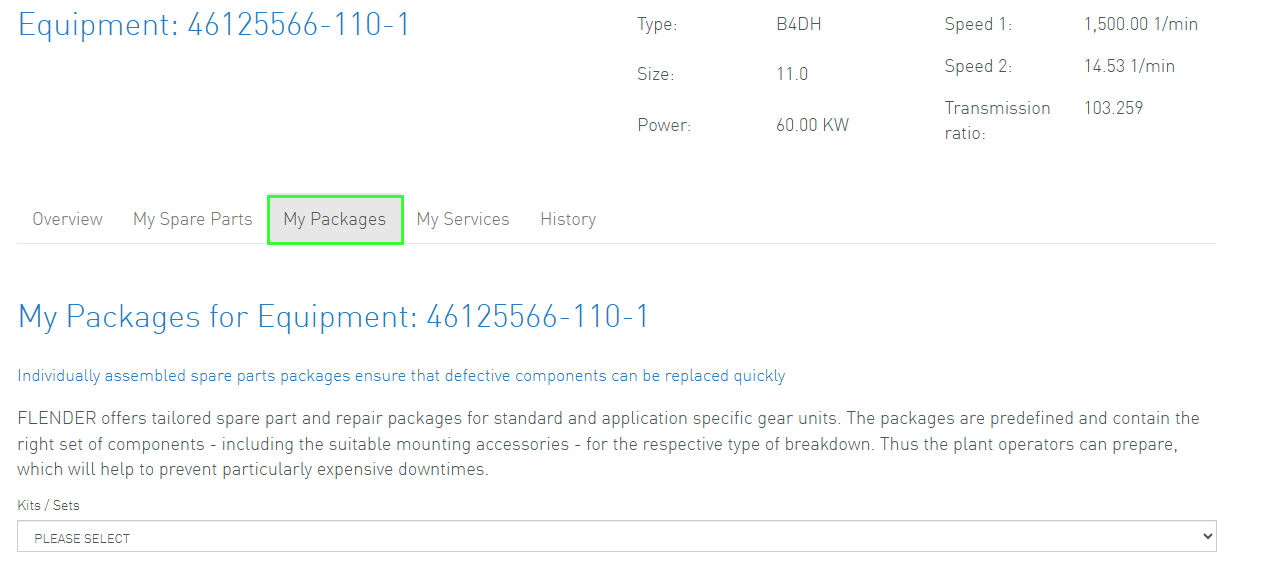
3.3. Équipement - My Packages
Grâce à My Packages, les clients peuvent commander des kits de réparation.
Les kits proposés comprennent les pièces de rechange correspondantes afin de permettre aux clients une préparation rapide
et de simplifier la commande des pièces les plus sollicitées.
Les kits souhaités peuvent être sélectionnés ici (1) et