We (Flender GmbH) and certain third parties use cookies on this website. The details regarding the types of cookies, their purpose and the third parties involved are described below and in our Cookie Notice. Please click on “Allow all and continue” to consent to our usage of cookies as described in the Cookie Notice in order to have the best possible experience on our websites. You can also set your preferences or reject cookies (except for strictly necessary cookies).
Cookie Notice and further details
Puede contactar al equipo de E-Business en cualquier momento a través del formulario de contacto:
Formulario de contacto
Una vez que haya completado el proceso de registro en Flender Mall, su persona de contacto personal aparecerá mediante el botón de teléfono en la barra lateral.
El registro para nuevos usuarios incluye la verificación de la dirección de correo electrónico, la creación de una contraseña, la configuración de la autenticación multifactor (MFA) y la introducción de todos los datos requeridos.
Puede encontrar una guía paso a paso en la función Registro.
La introducción repetida incorrecta de la contraseña es una causa común del bloqueo de una cuenta en la Flender Mall. El desbloqueo de esta cuenta puede ser realizado por el equipo de E-Business en nuestro sistema de administración.
Después de iniciar sesión, el menú de usuario se encuentra en la parte superior derecha de la página web. Para ello, haga clic en el "icono de persona".
El color del punto en la esquina inferior derecha indica el estado de inicio de sesión del usuario. Un punto verde señala un inicio de sesión exitoso, mientras que un punto rojo indica que aún no se ha iniciado sesión.
Según los permisos de acceso, aquí se pueden acceder a varias funciones.
En el menú de usuario, en la sección "Datos personales", tiene la posibilidad de ver y modificar sus datos. Aquí se pueden modificar los siguientes datos:
Dirección de entrega (las direcciones de entrega guardadas aquí se pueden seleccionar en el proceso de compra)
No se pueden modificar los siguientes datos:
Dirección de facturación
Nombre y apellido
Si desea modificar estos datos, póngase en contacto con el equipo de E-Business a través del formulario de contacto: Formulario de contacto
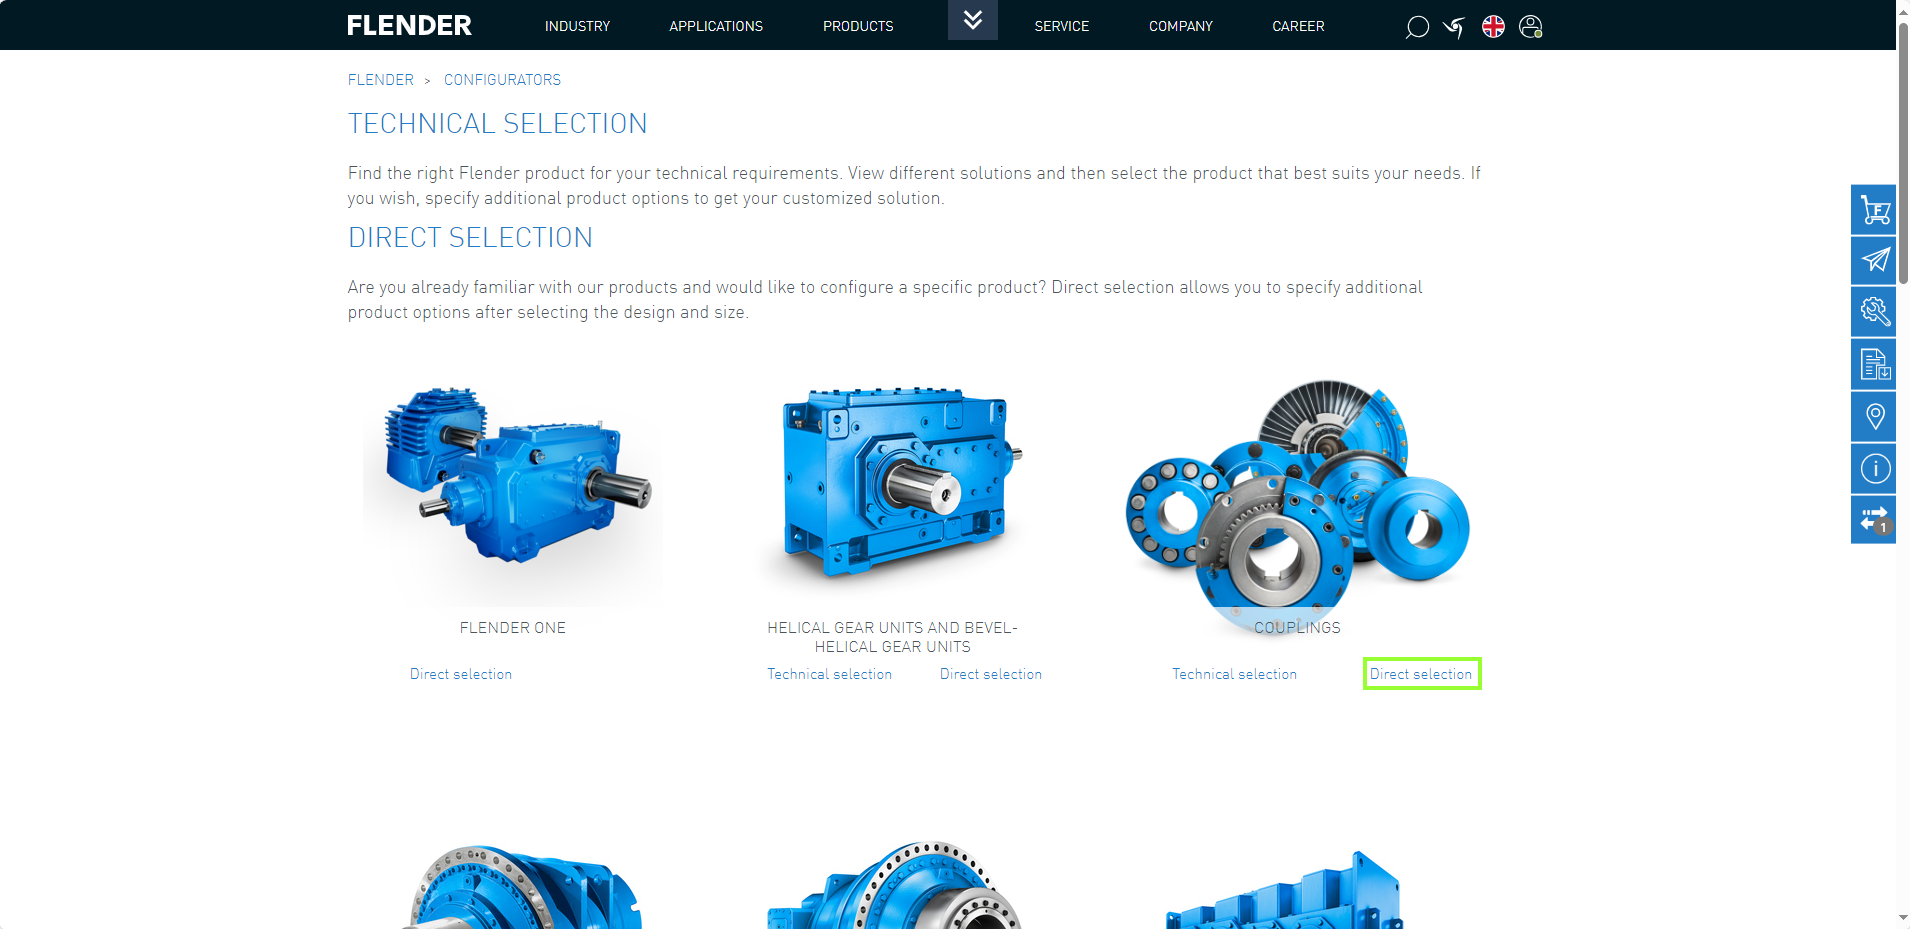
¿Aún no está claro cuál es el producto Flender adecuado? – Al introducir varios requisitos, la configuración permite mostrar y comparar diferentes soluciones posibles.
A partir de los requisitos, por ejemplo, de la máquina de trabajo (configuración de reductores) o de los datos de rendimiento y dimensiones (configurador de acoplamientos), se diseña una solución a medida.
El inicio de sesión en Flender Mall se realiza mediante autenticación multifactorial (MFA). Se distingue entre tres procedimientos diferentes.
1. Proceso de autorregistro
Para el autorregistro, hay que seguir estos pasos.
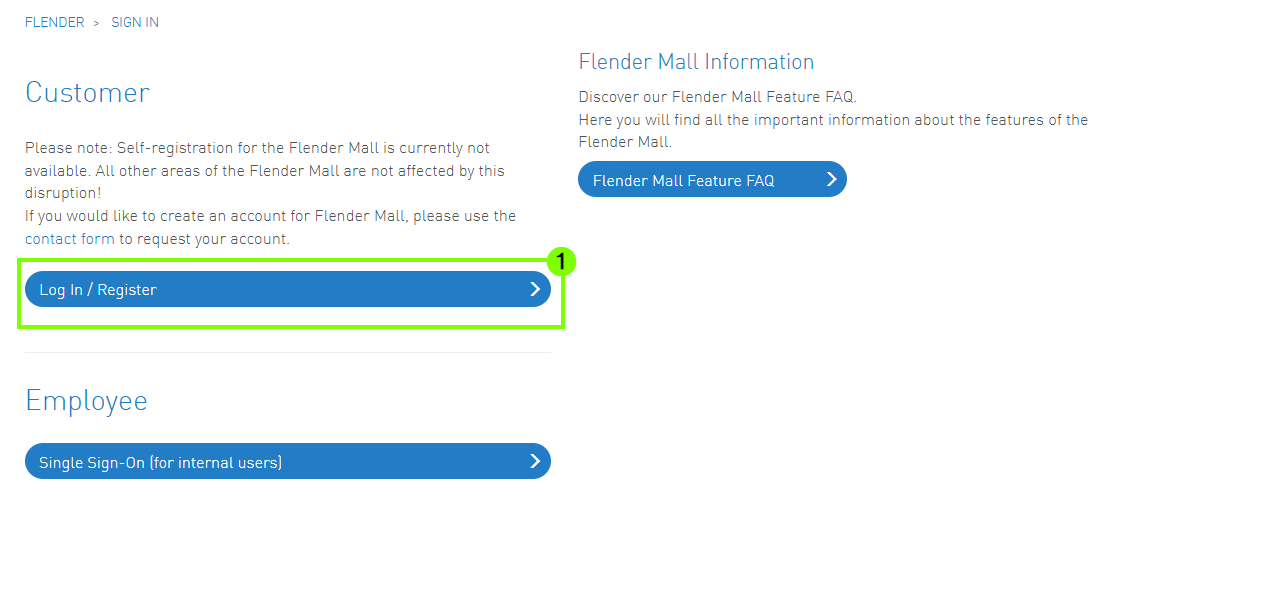
1. Acceda a la página de inicio de sesión Flender Mall - Login y seleccione la opción «Log In / Register» (1).
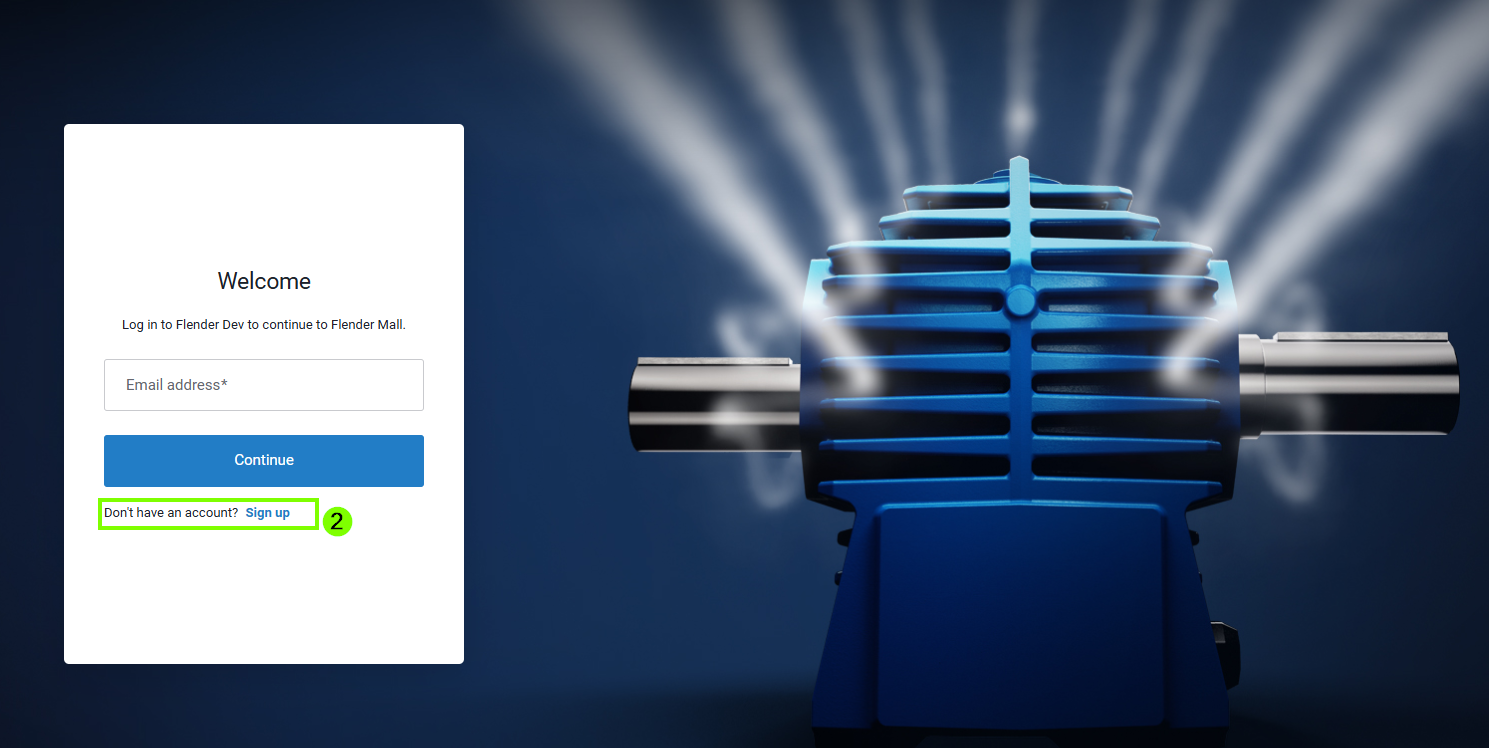
2. A continuación, haga clic en «Sign Up» (2) en la pantalla de registro para registrarse en FlenderMall.
3. En el siguiente paso, introduzca la dirección de correo electrónico (3) y haga clic en «Continue» (4).
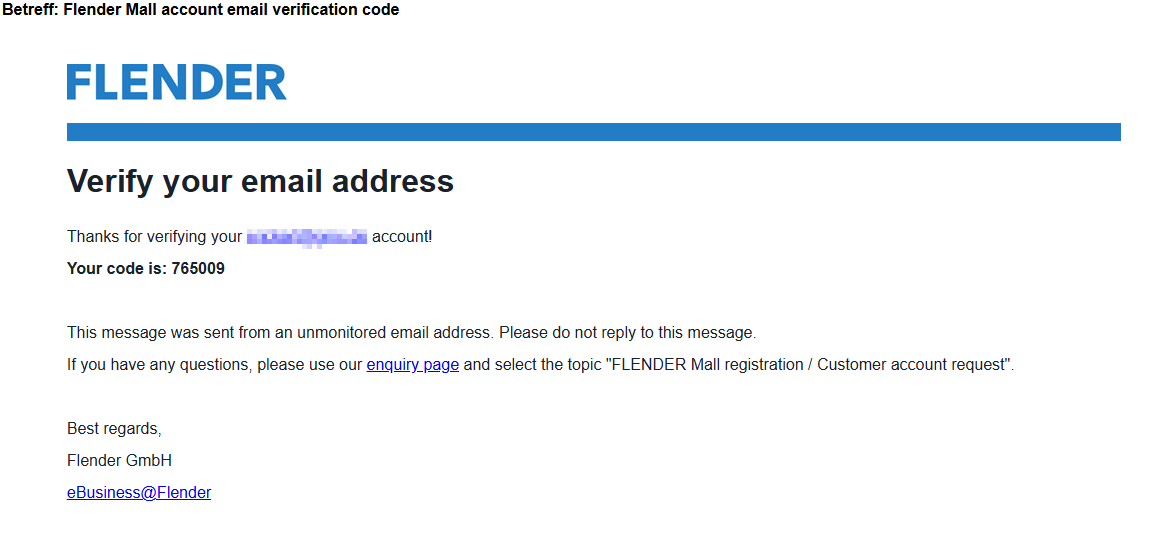
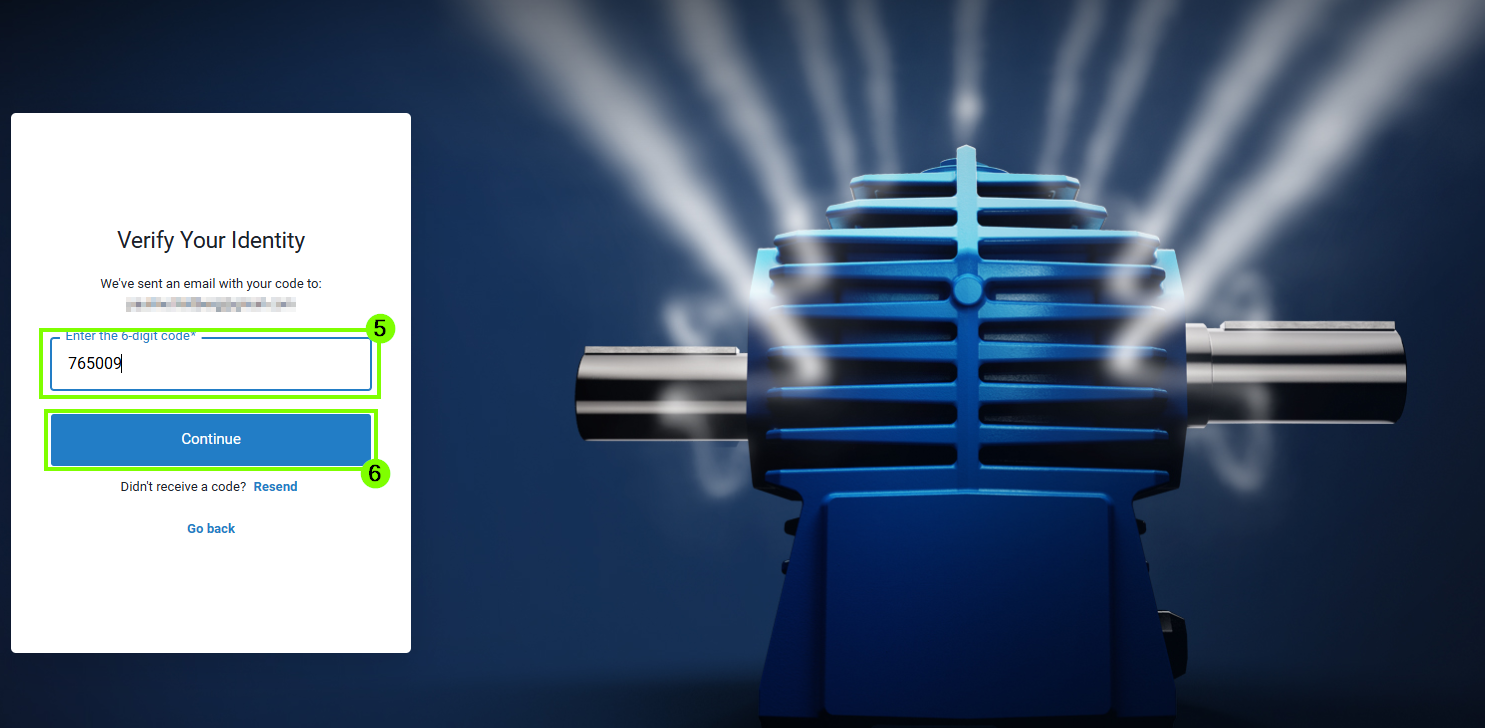
4. A continuación, recibirá un código de autenticación por correo electrónico. Introduzca el código de 6 dígitos en el campo correspondiente (5) y seleccione «Continue» (6).
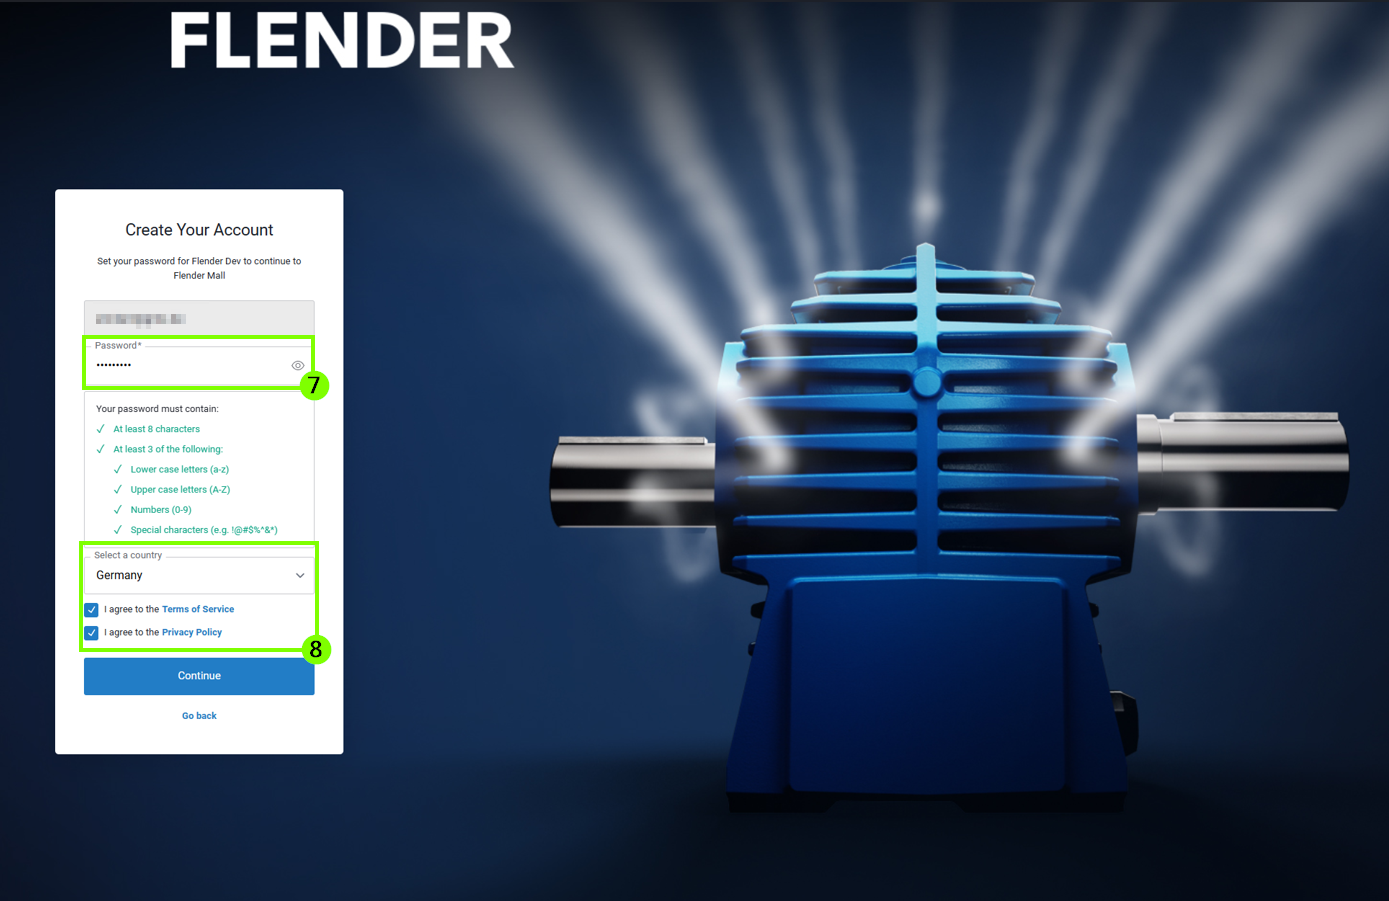
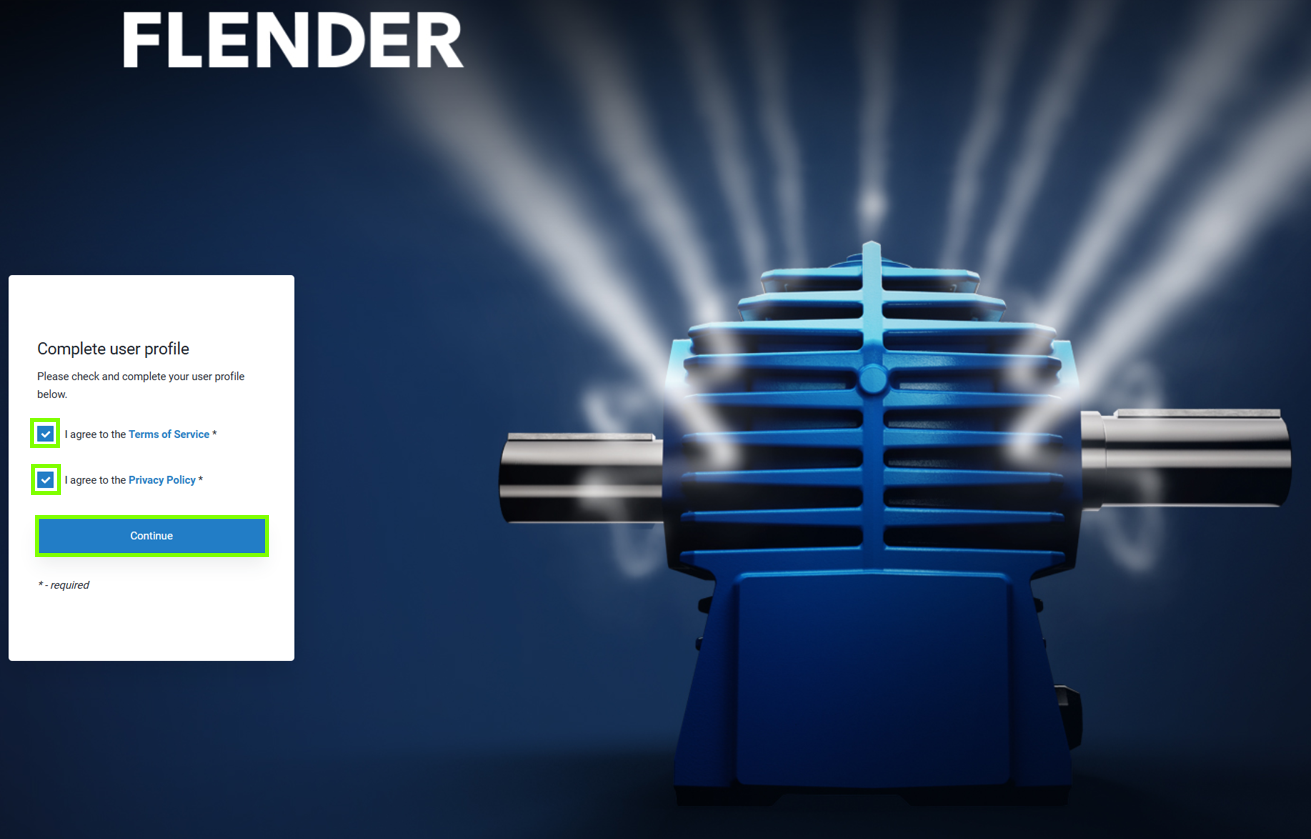
5. A continuación, asigne una contraseña personal (7). Para continuar con el proceso, debe aceptar las condiciones de uso (8).
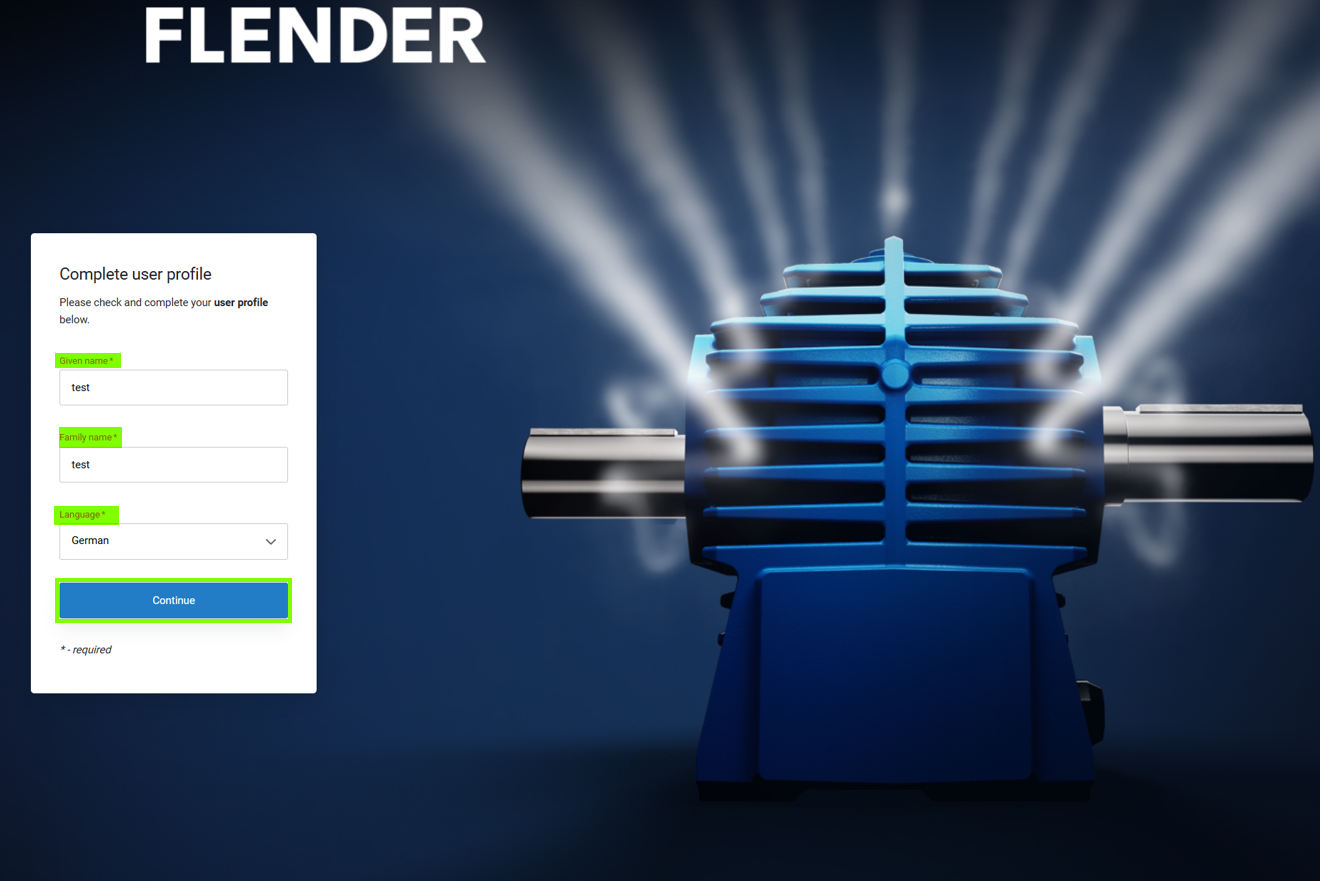
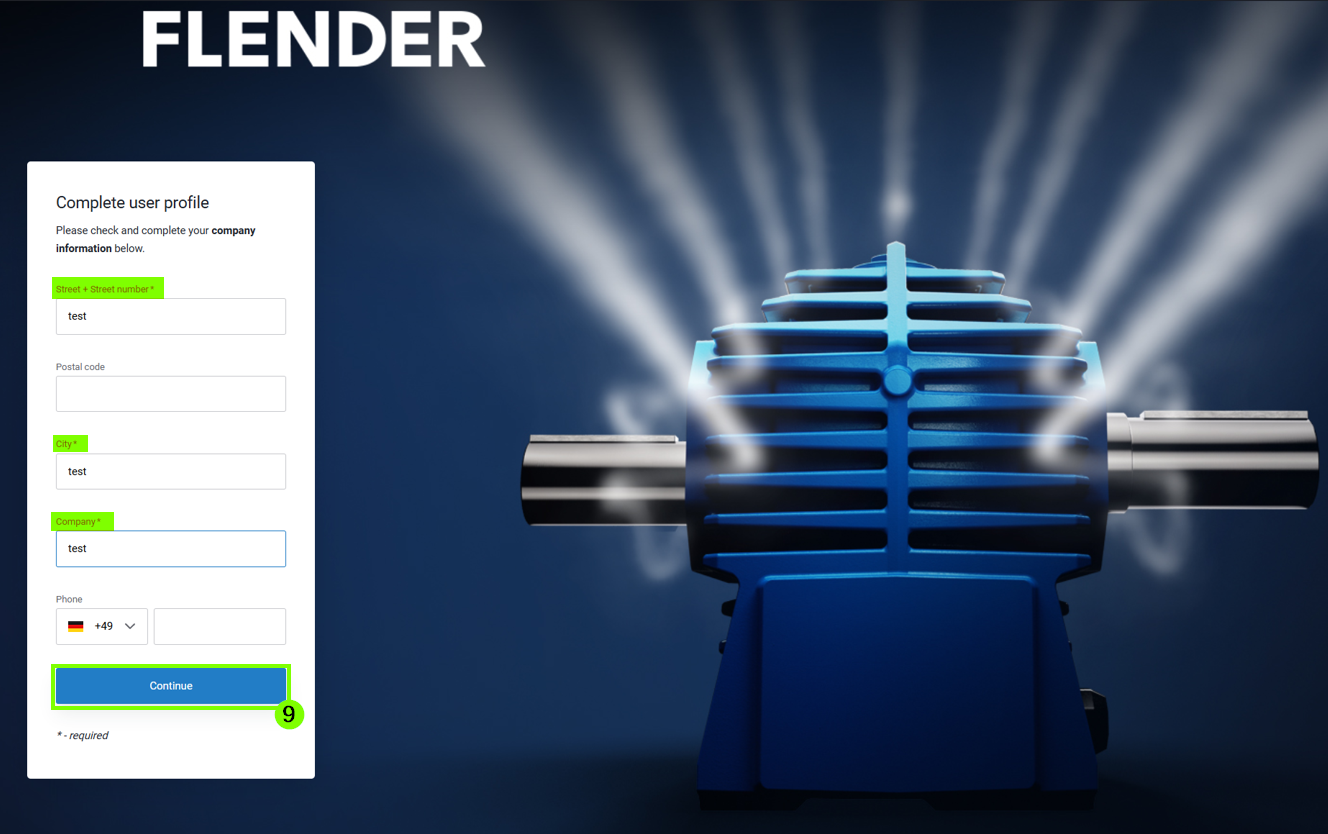
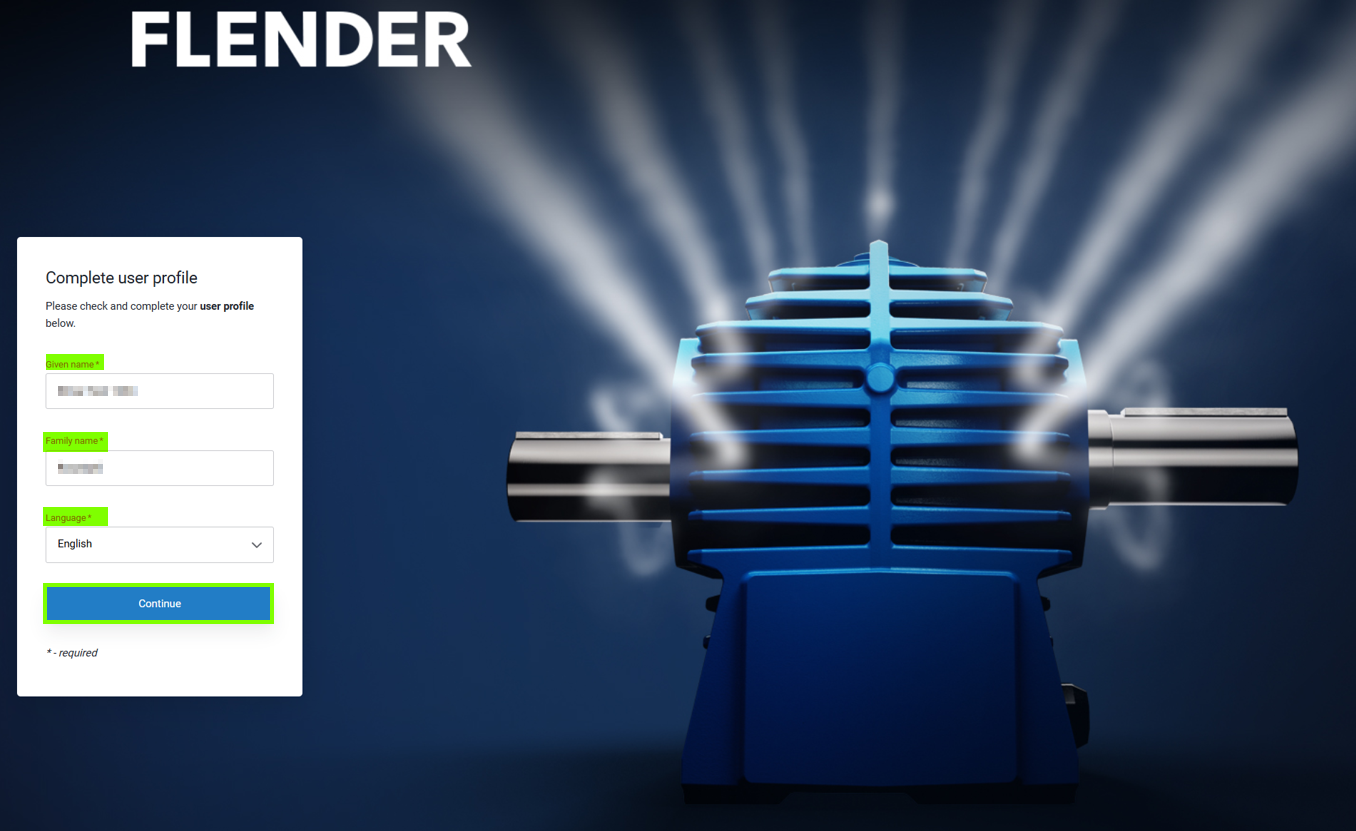
6. En el siguiente paso, debe completar sus datos personales. Para ello, debe rellenar todos los campos obligatorios marcados con un asterisco (*) para poder continuar con el siguiente paso (9).
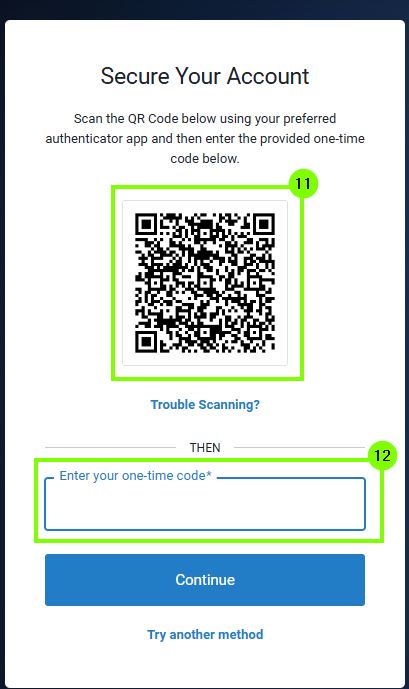
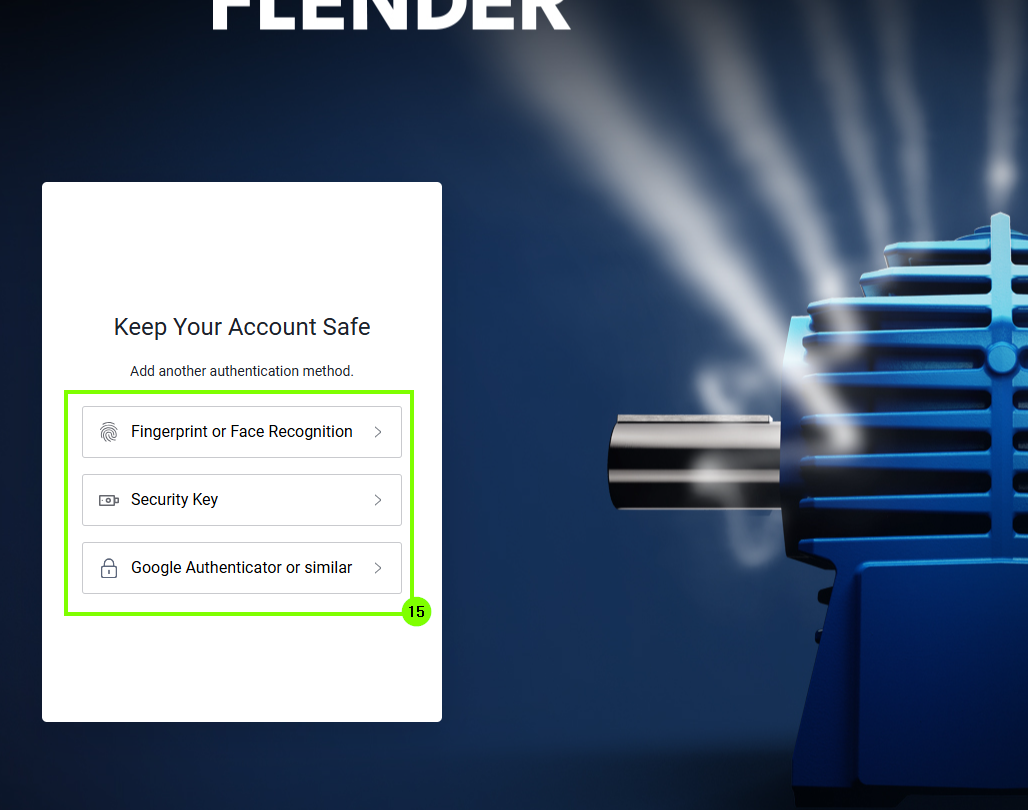
7. Existen diferentes opciones para la autenticación (10). Por ejemplo, la autenticación puede realizarse mediante huella dactilar, reconocimiento facial o PIN. También es posible utilizar una aplicación de autenticación o una clave de seguridad. Encontrará más información en el capítulo 5, en «Instrucciones para la aplicación de autenticación». En el siguiente ejemplo se ha utilizado una aplicación de autenticación.
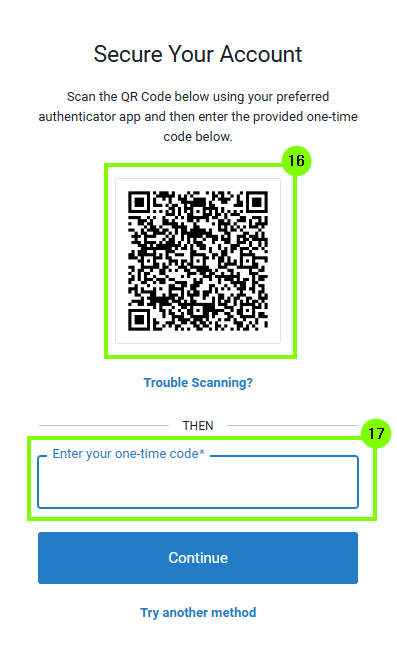
8. Tras seleccionar la aplicación de autenticación, aparecerá un código QR (11) que deberá escanearse con la aplicación. A continuación, la aplicación mostrará un código que podrá introducirse en el campo de entrada correspondiente (12).
9. Tras introducir el código único (One-Time-Code), el registro automático habrá finalizado y podrá utilizar FlenderMall.
Tenga en cuenta que la autenticación se guardará para los próximos inicios de sesión y que no debe eliminar la opción.
2. Inicio de sesión tras registrarse correctamente
1. Para ello, primero acceda a la página de inicio de sesión Inicio de sesión | Flender y seleccione Inicio de sesión de cliente (1). 2. A continuación, se lleva a cabo la autenticación. Para ello se utiliza la opción de autenticación almacenada. En el ejemplo mostrado, se ha almacenado una aplicación de autenticación (2) para la autenticación. Ahora hay que introducir la contraseña de un solo uso de la aplicación de autenticación almacenada en el campo correspondiente.
Los datos de autenticación se pueden almacenar opcionalmente durante 30 días (3).
Para completar el registro, seleccione «Continue» y utilice FlenderMall.
3. Inicio de sesión para clientes actuales de Flender Mall
Tras el cambio en el procedimiento de registro, es necesario seguir los siguientes pasos para iniciar sesión por primera vez con la cuenta existente de Flender Mall:
En primer lugar, acceda a la página de inicio de sesión de Flender Mall. Para ello, haga clic en el icono de persona
o vaya directamente a la página Inicio de sesión | Flender.
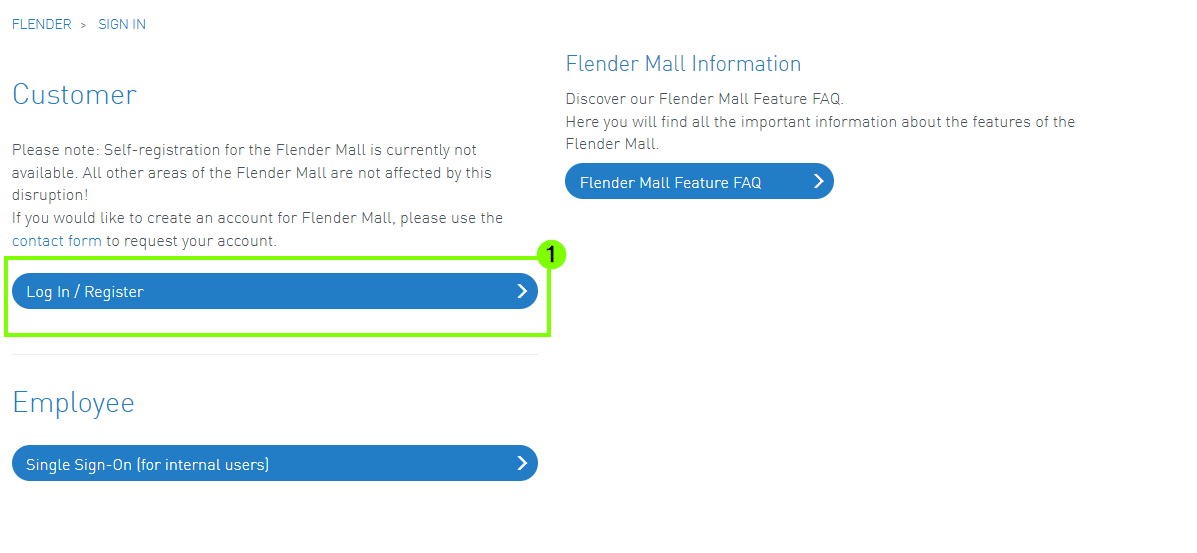
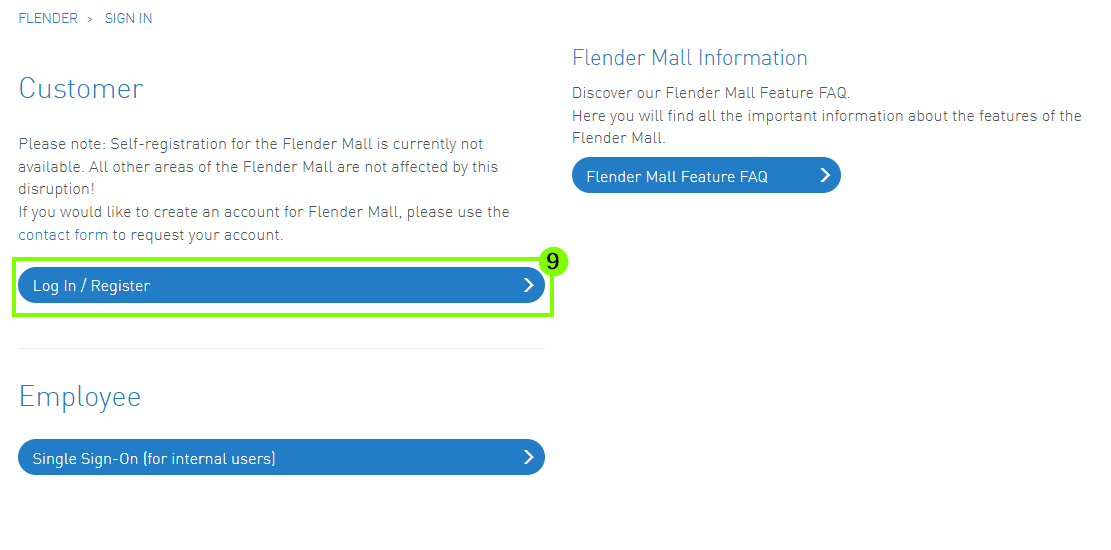
1. En la página de inicio de sesión, seleccione la opción «Iniciar sesión/Registrarse» (1).
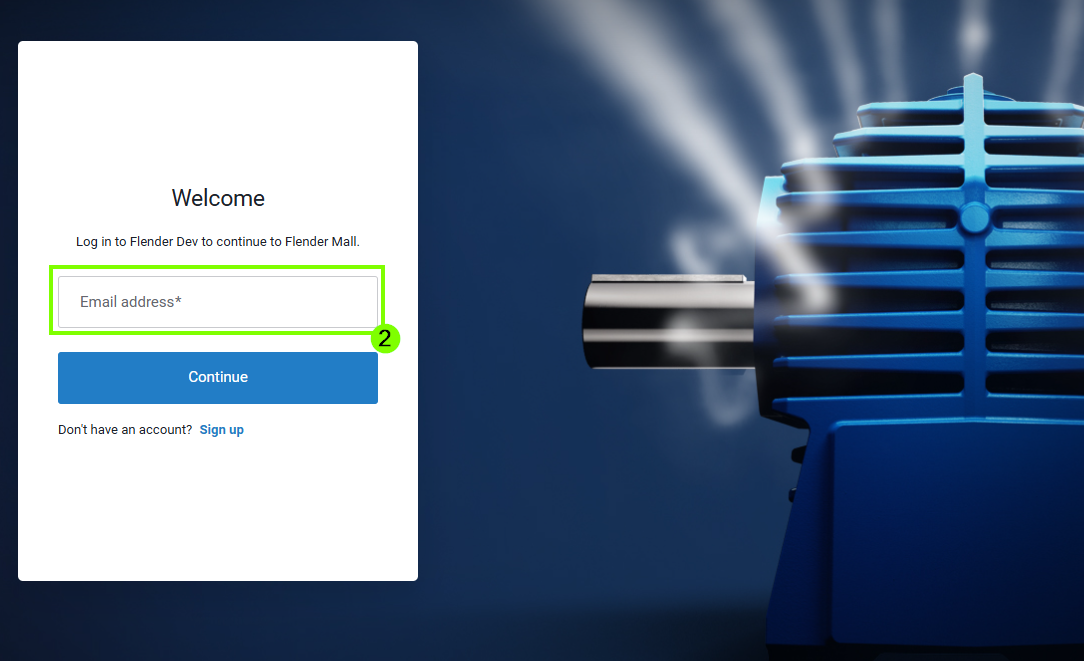
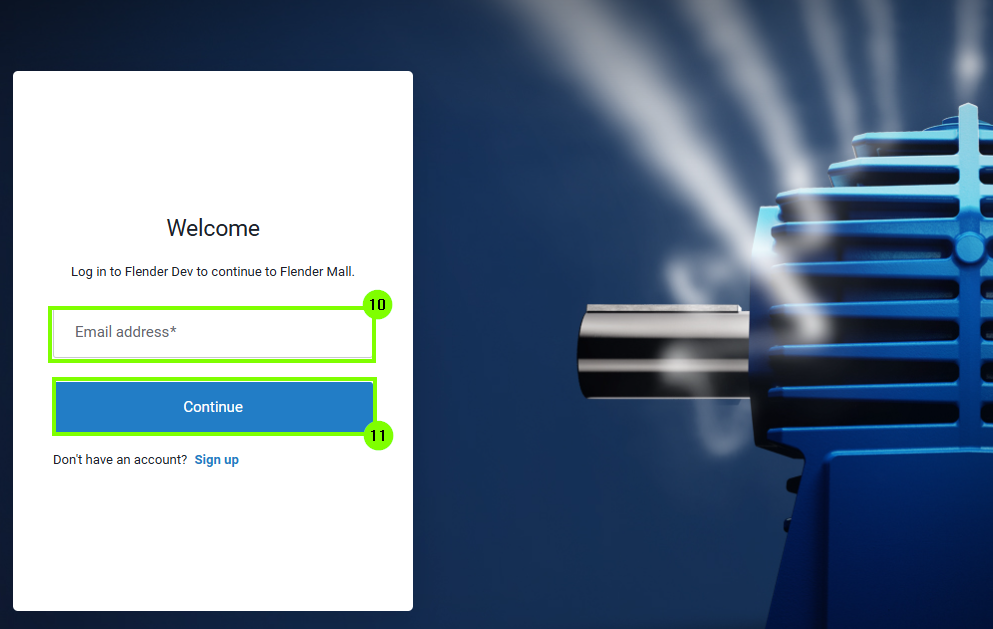
2. A continuación, introduzca en la máscara de registro la dirección de correo electrónico registrada en Flender Mall (2).
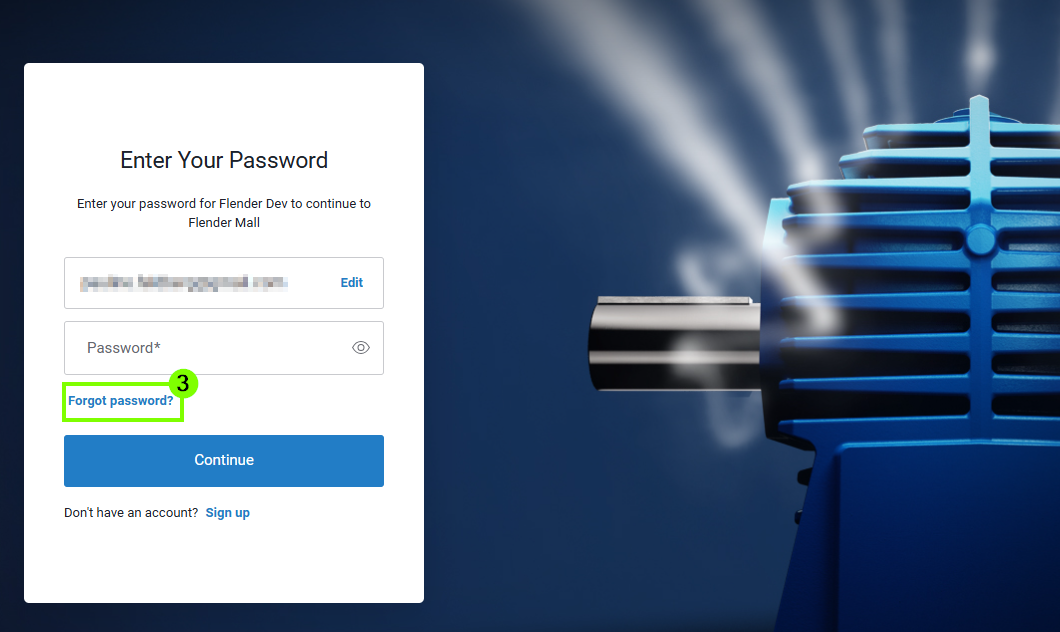
3. Debido a cambios técnicos, es necesario restablecer la contraseña la primera vez que se inicia sesión. Para ello, haga clic en
«Forgot password» (3).
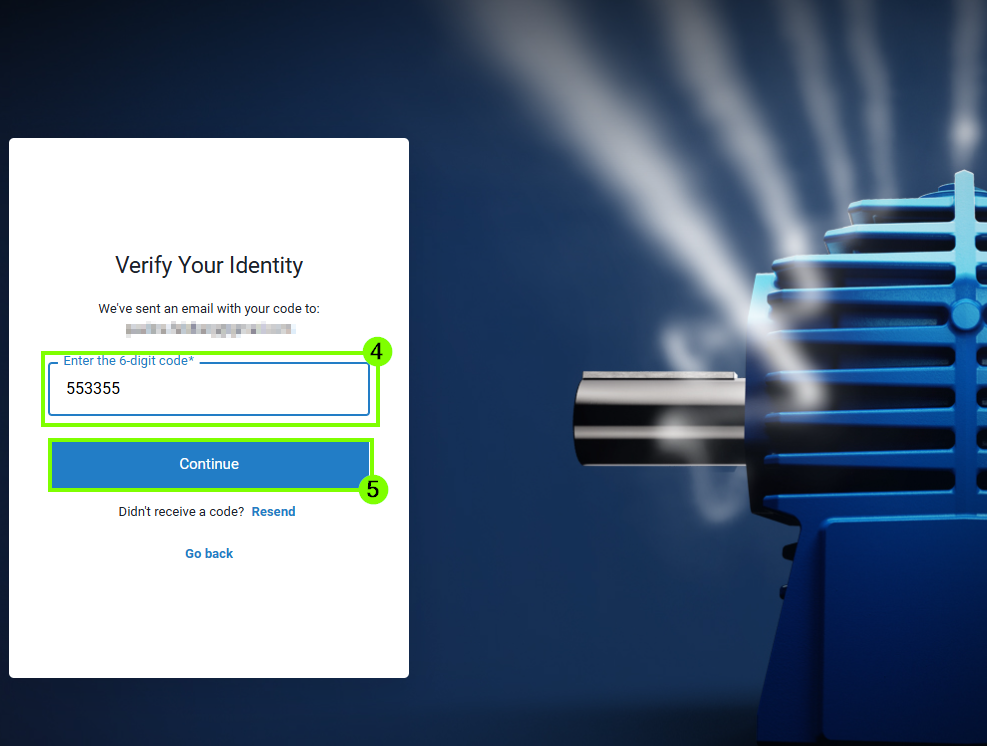
4. A continuación, se enviará un código de verificación a la dirección de correo electrónico registrada. Introduzca este código de 6 dígitos en el campo correspondiente (4) y, a continuación, haga clic en «Continue» (5).
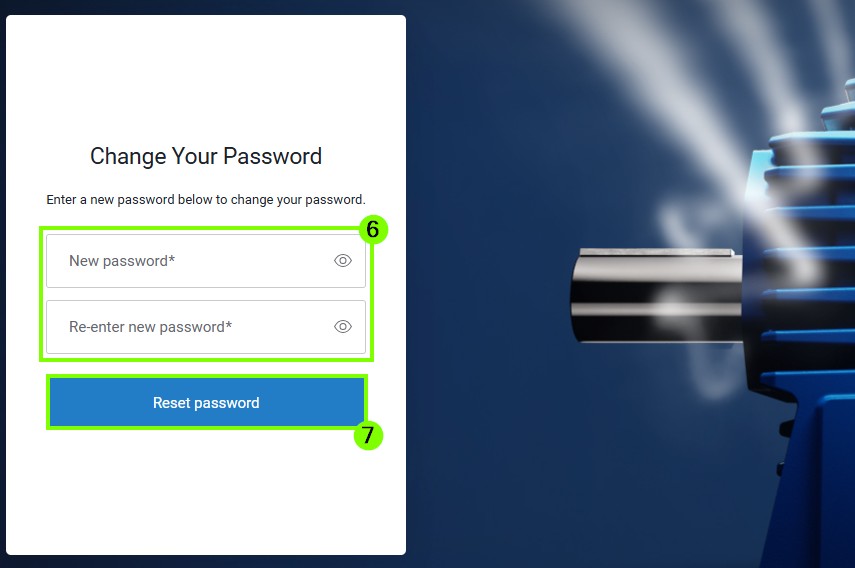
5. En el siguiente paso, asigne una nueva contraseña y vuelva a introducirla para confirmarla (6). A continuación, haga clic en «Continue» (7) para completar el proceso. Tenga en cuenta las directrices vigentes sobre contraseñas al asignar la contraseña.
6. La contraseña se ha asignado correctamente. En el siguiente paso, se le redirigirá automáticamente de vuelta al Flender Mall (8).
7. Para poder utilizar las funciones de FlenderMall y completar el registro, vuelva a abrir la página de inicio de sesión y seleccione la opción «Log In / Register» (9).
8. En el siguiente paso, introduzca la dirección de correo electrónico (10) y haga clic en «Continue» (11).
9. A continuación, introduzca la contraseña asignada anteriormente (12) y haga clic en «Continue» (13) para pasar al siguiente paso.
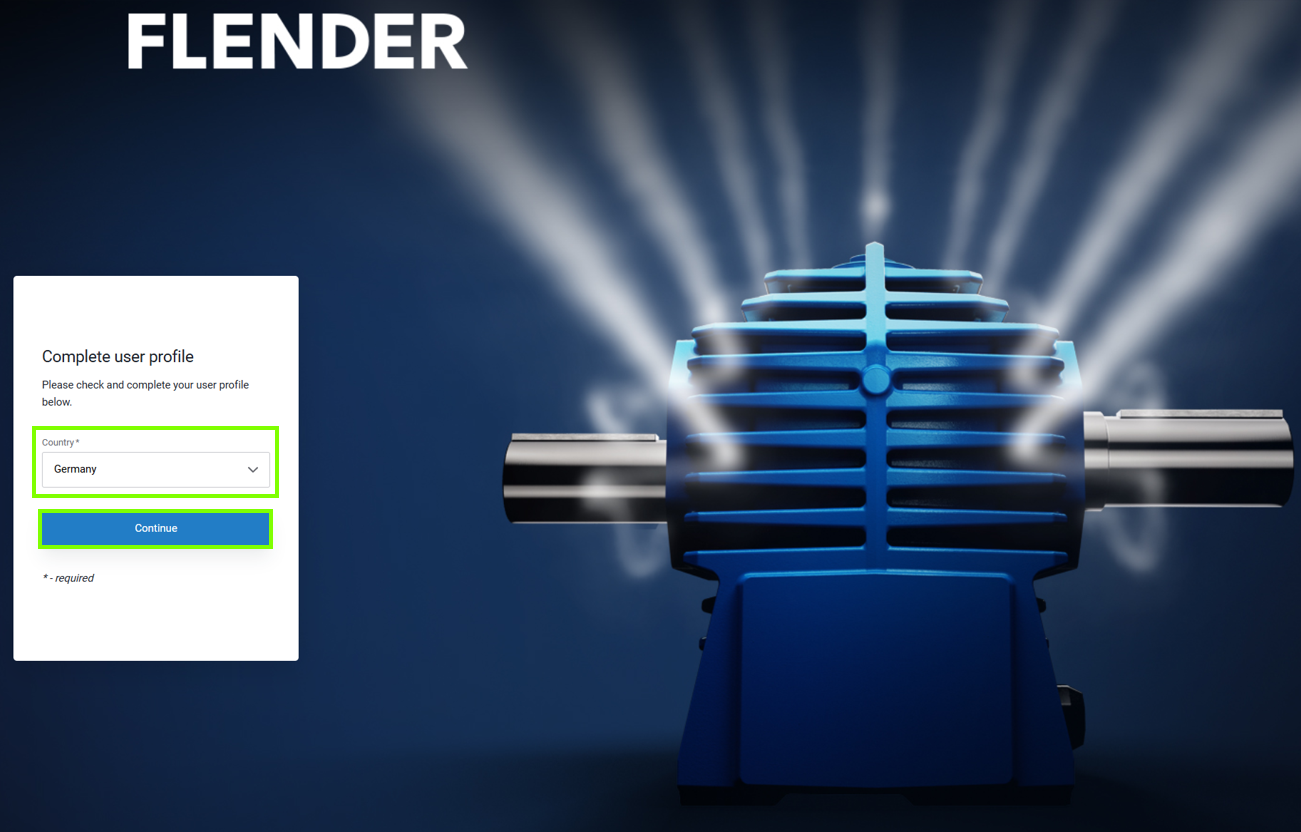
10. En el siguiente paso, complete los datos personales y acepte las condiciones de uso.
Todos los campos obligatorios marcados con un asterisco (*) deben completarse para poder pasar al siguiente paso haciendo clic en «Continue» (14).
11. Ahora seleccione una opción de autenticación (15). En el ejemplo mostrado se ha seleccionado la autenticación mediante aplicación. Encontrará más información en el capítulo 5, en «Instrucciones para la aplicación de autenticación».
12. Al seleccionar la aplicación de autenticación, se muestra un código QR (16) que debe escanearse con la aplicación.
A continuación, introduzca el código generado por la aplicación en el campo de entrada correspondiente (17).
13. Tras introducir la contraseña de un solo uso, se podrá utilizar FlenderMall con los permisos anteriores.
4. Autorizaciones de acceso
A los usuarios del Flender Mall se les pueden asignar diferentes permisos de acceso.
Administrador: gestión de los permisos de acceso de las cuentas existentes de la propia empresa, gestión de las direcciones de entrega visibles en todo el proceso de pago de la empresa.
Cliente: realizar pedidos, guardar y gestionar cestas de la compra, visualizar el historial de pedidos con seguimiento de la entrega y descargar documentos relacionados con el pedido.
Visor: añadir productos a la cesta de la compra, visualizar el historial de pedidos con seguimiento de la entrega y descargar documentos relacionados con el pedido.
Básico: añadir productos a la cesta de la compra y guardar cestas de la compra sin mostrar información comercial (por ejemplo, precio, plazo de entrega), visualizar el historial de pedidos con seguimiento de la entrega y descargar documentos relacionados con el pedido.
Prospect: función general tras el autorregistro sin más permisos.
5. Instrucciones para la aplicación de autenticación
Para la autenticación se pueden utilizar diferentes aplicaciones de autenticación. Aquí encontrará las instrucciones para vincularlas.
Acceder a la página de detalles del producto mediante la función de búsqueda
Crear un nuevo proyecto desde la página de detalles del producto
Visualización de detalles de información del producto en MyProject
Las exportaciones de MyProject incluyen información del producto
Las variantes de configuración se pueden eliminar
Los documentos descargados ahora incluyen el nombre del producto en el nombre del archivo
Optimización del rendimiento
Si desea pedir un producto, tiene cinco opciones diferentes para añadir productos a su carrito de compras:
Cuándo debería utilizar el formulario de pedido:
Si ya conoce el número MLFB/FFA del producto deseado.
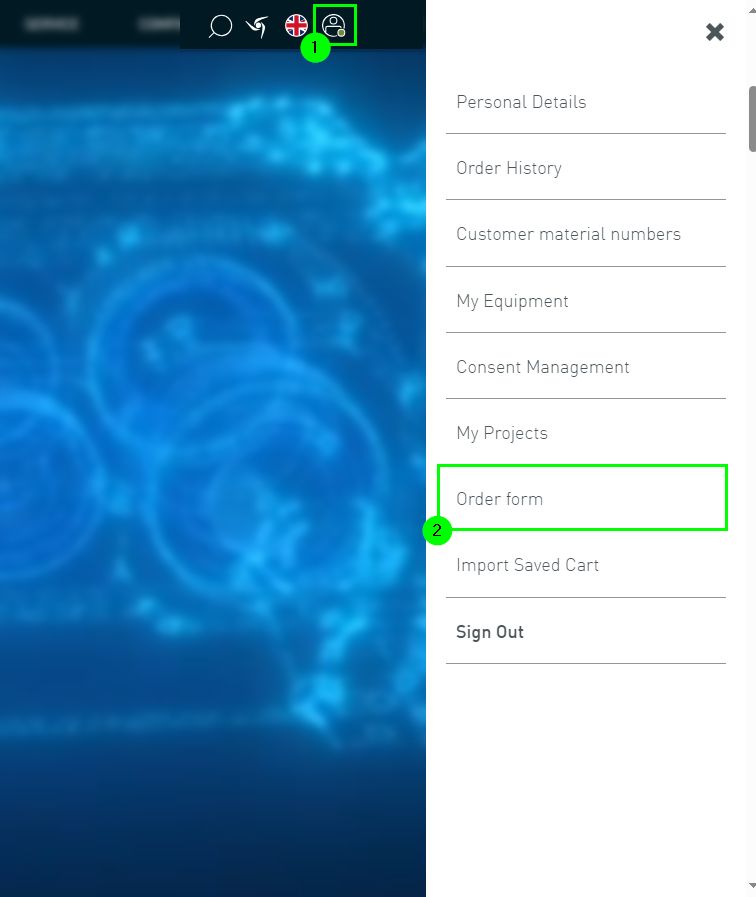
Se puede acceder al formulario de pedido a través del menú de usuario (1) seleccionando el formulario de pedido (2).
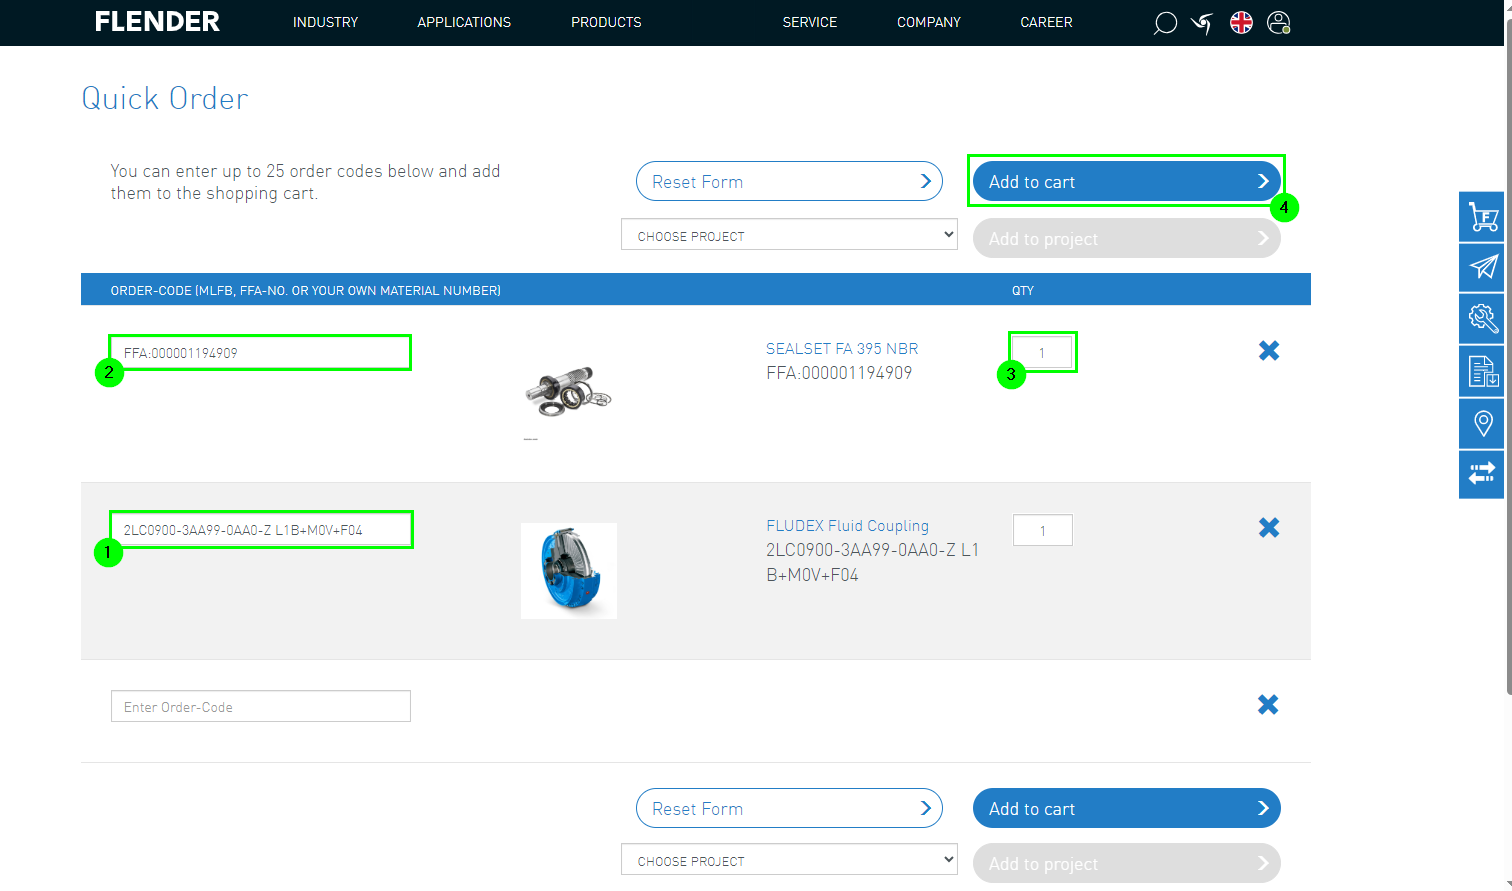
A continuación, se pueden ingresar los números correspondientes en el campo de entrada:
1. Se pueden ingresar números MLFB (1) o números FFA (2).
2. Indicar la cantidad correcta (3).
3. El formulario de pedido se puede añadir al carrito de compras (4).
2. Configuración de productos FLENDER
Cuándo debería utilizar la configuración:
Si no conoce los números de material o las denominaciones
Si busca un producto personalizado que se ajuste a sus necesidades
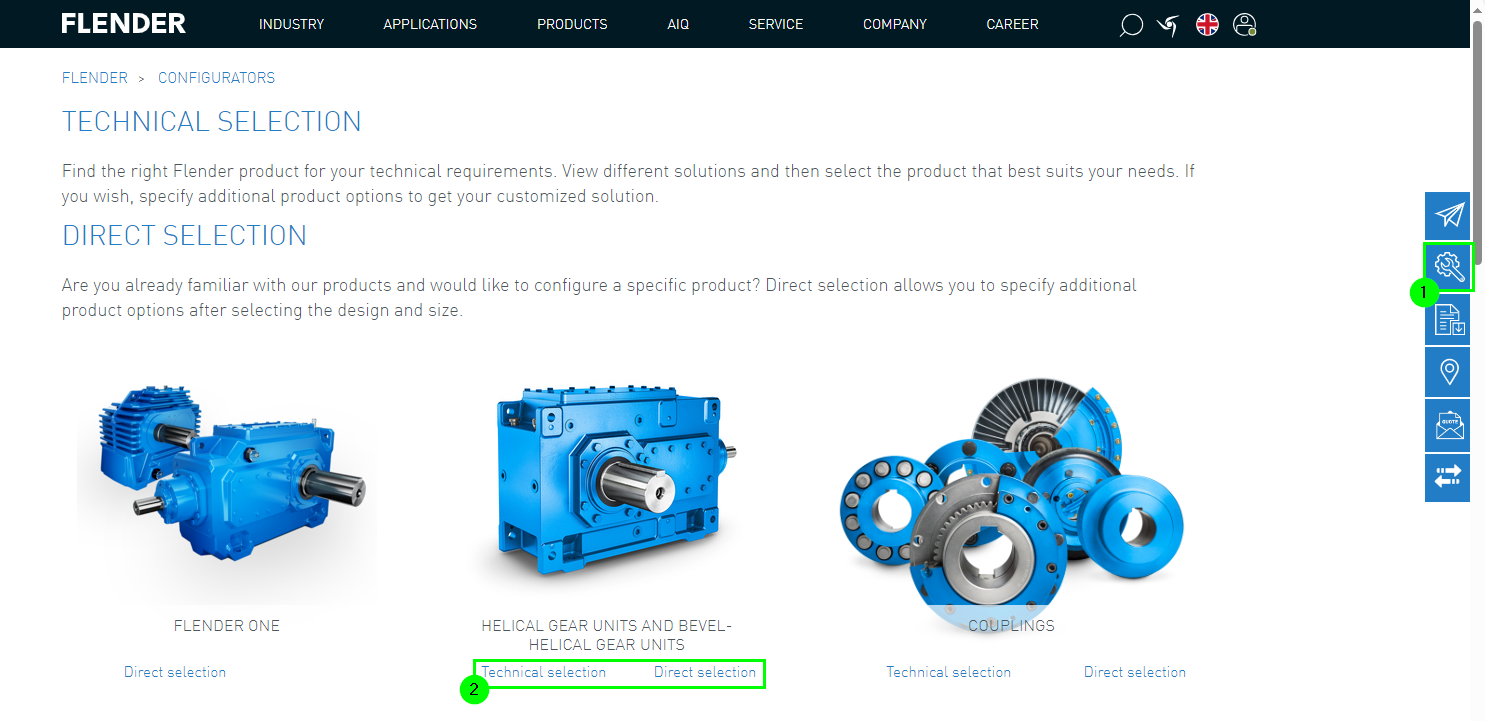
Los configuradores se pueden acceder a través de la barra lateral (1).
Aquí se puede elegir entre selección directa y configuración (2).
A continuación, se deben ingresar todos los parámetros (1) y se puede finalizar la configuración (2).
Después, el producto configurado se puede añadir al carrito de compras (3).
3. Pedido utilizando números de material del cliente
Cuándo debería utilizar el pedido con números de material del cliente:
Ya se ha realizado el intercambio de números de material del cliente con Flender
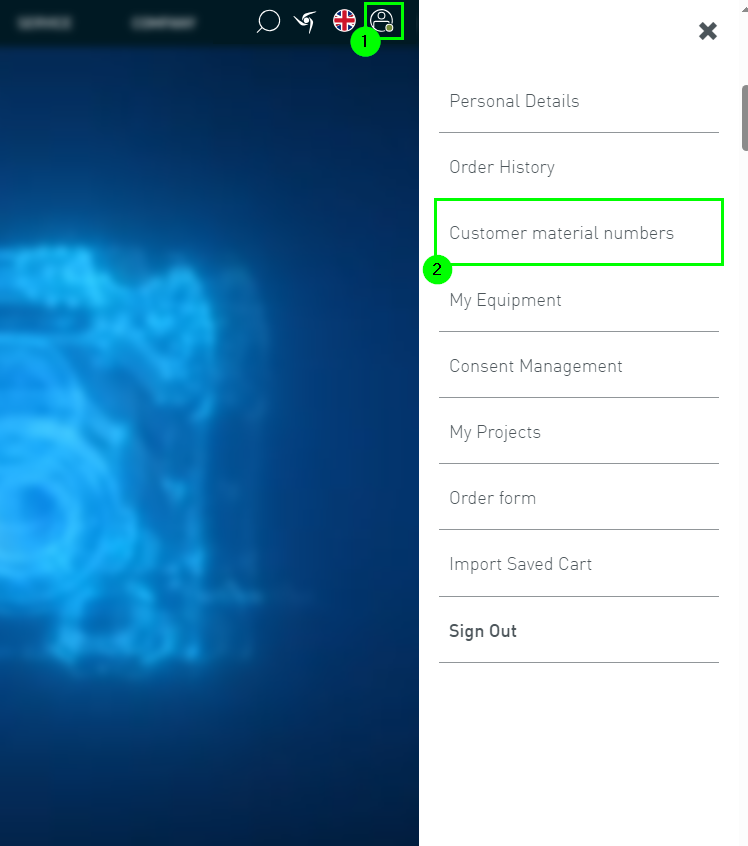
La opción de pedido se accede a través del menú de usuario (1) y la selección de los números de material del cliente (2).
Procedimiento adicional:
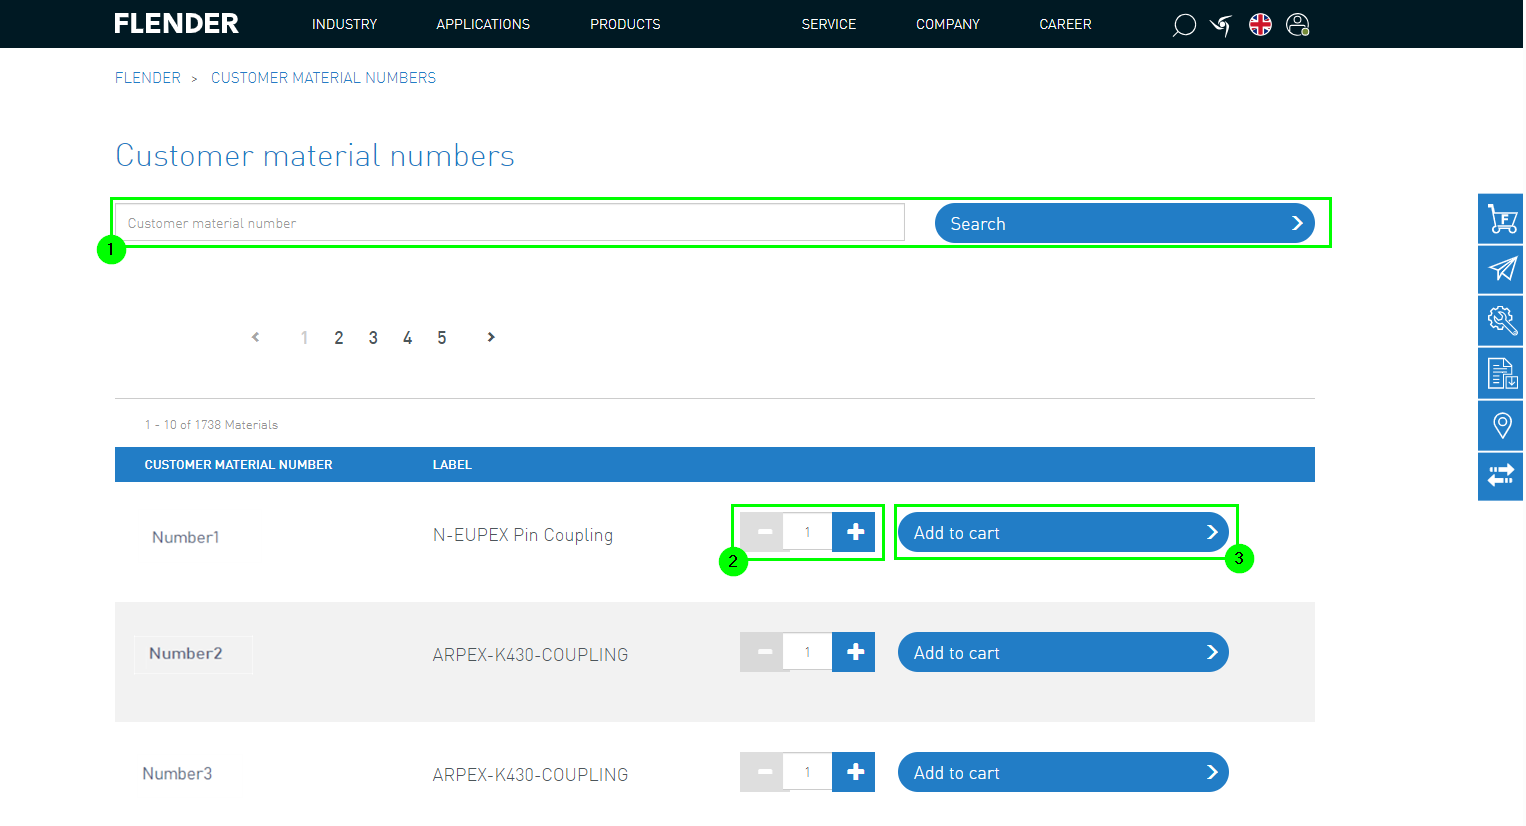
Buscar el número de material del cliente acordado utilizando la función de búsqueda (1).
Los resultados de la búsqueda se muestran en la lista inferior.
Seleccionar el producto e indicar la cantidad deseada (2).
Añadir el producto al carrito de compras (3).
4. Pedido importando un carrito de compras guardado
Cuándo debería utilizar el pedido con carritos guardados:
Si ya conoce los números de material (MLFB / FFA)
La opción de pedido se accede a través del menú de usuario bajo “Importar carrito de compras guardado” (1).
A continuación, se pueden cargar los productos deseados en el formato especificado.
Para ello, indique el número de SKU correspondiente y la cantidad.
Ahora se puede cargar el archivo. Para ello, seleccione el archivo (2) y haga clic en “Importar” (3).
Después de la importación, el carrito de compras guardado se puede visualizar aquí (4).
Dentro de los carritos de compras guardados hay otras funciones, como restaurar (5), editar (6) o eliminar (7).
Después de seleccionar el botón “Restaurar” (5), se accede al carrito de compras, donde se puede completar el pedido (8).
5. Pedido utilizando la función de búsqueda y la página de detalles del producto (PDP)
Cuándo debería utilizar el pedido con carritos guardados:
Si ya conoce los números de material (MLFB/ConfigID)
Para utilizar esta opción de pedido, primero debe acceder a la función de búsqueda.
Esta se encuentra en el menú de encabezado (1).
A continuación, se puede ingresar el MLFB o ConfigID deseado (2) y acceder a la página de detalles del producto (3).
A continuación, el producto se puede añadir al carrito de compras (4) y luego realizar el pedido.
1. Añadir productos al carrito de compras
Si se tiene la autorización de acceso, es posible pedir productos de Flender a través de la Flender Mall.
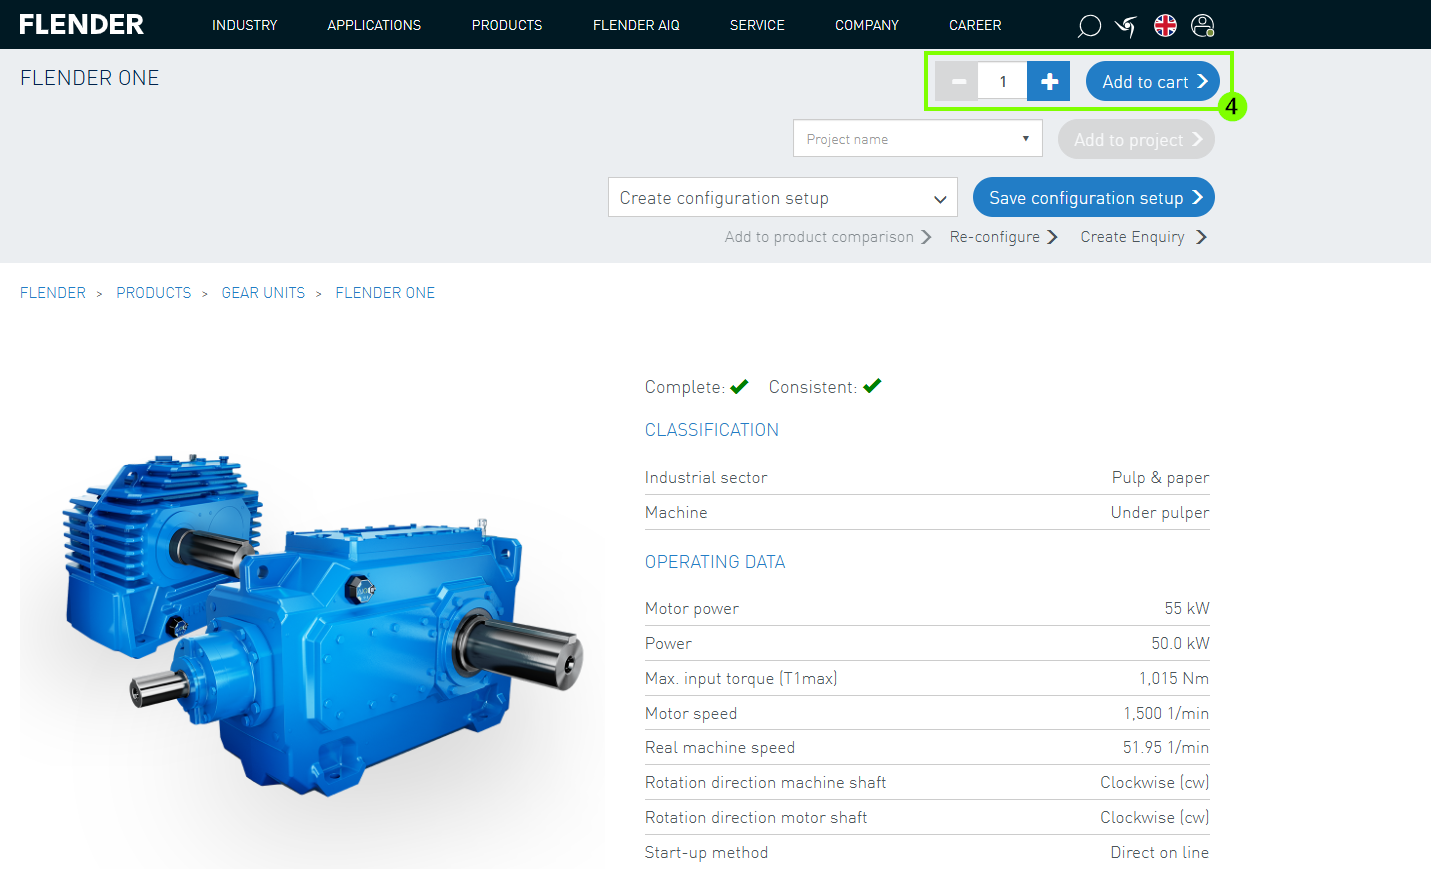
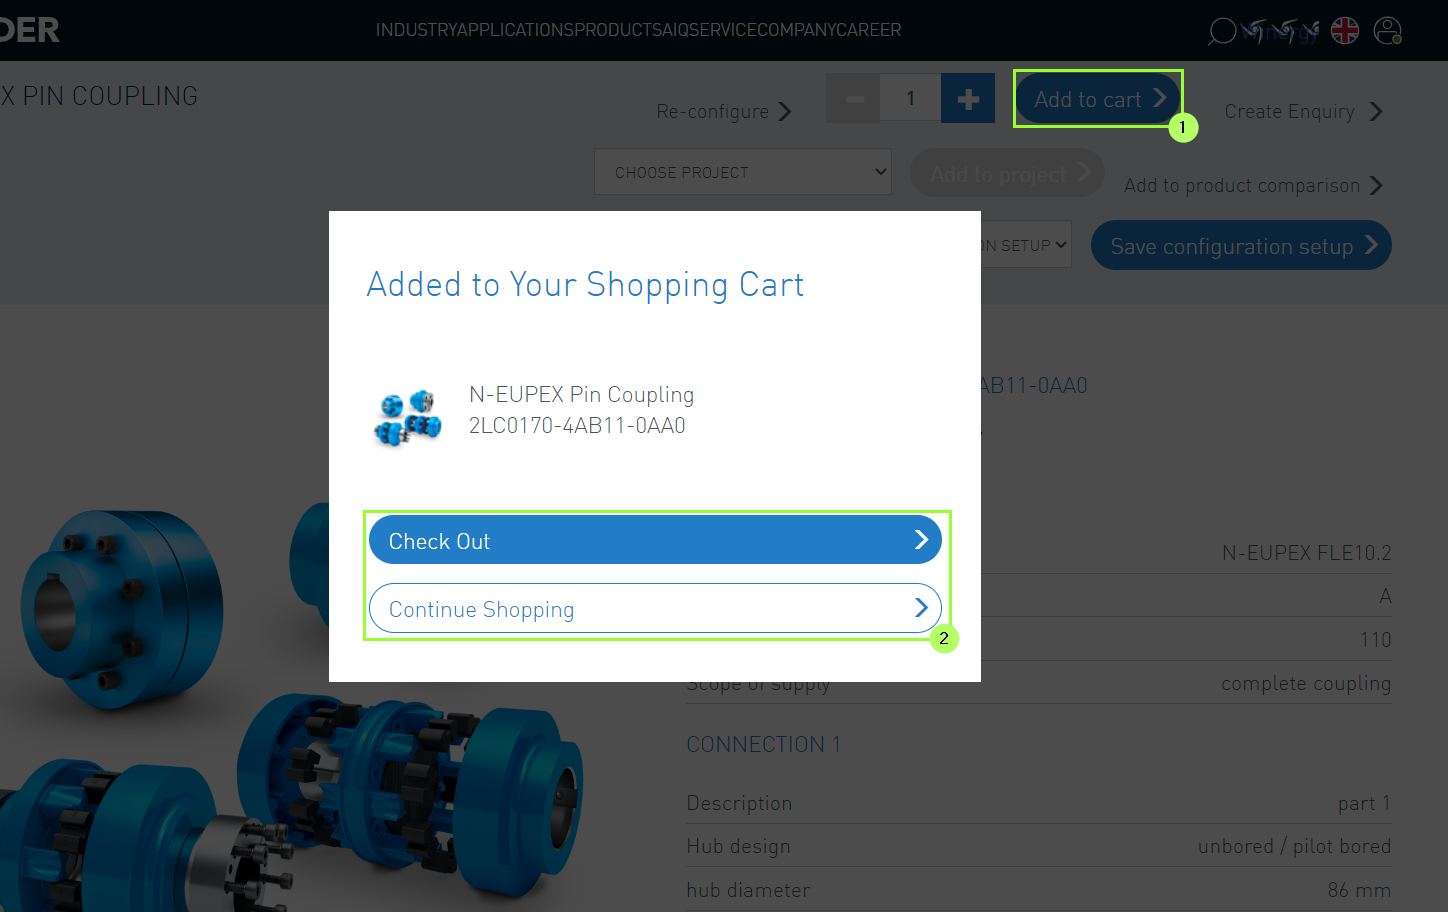
Después de seleccionar o configurar un producto, se puede añadir al carrito de compras (1).
A continuación, se presentan las siguientes opciones para elegir (2):
Realizar pedido
Seguir comprando
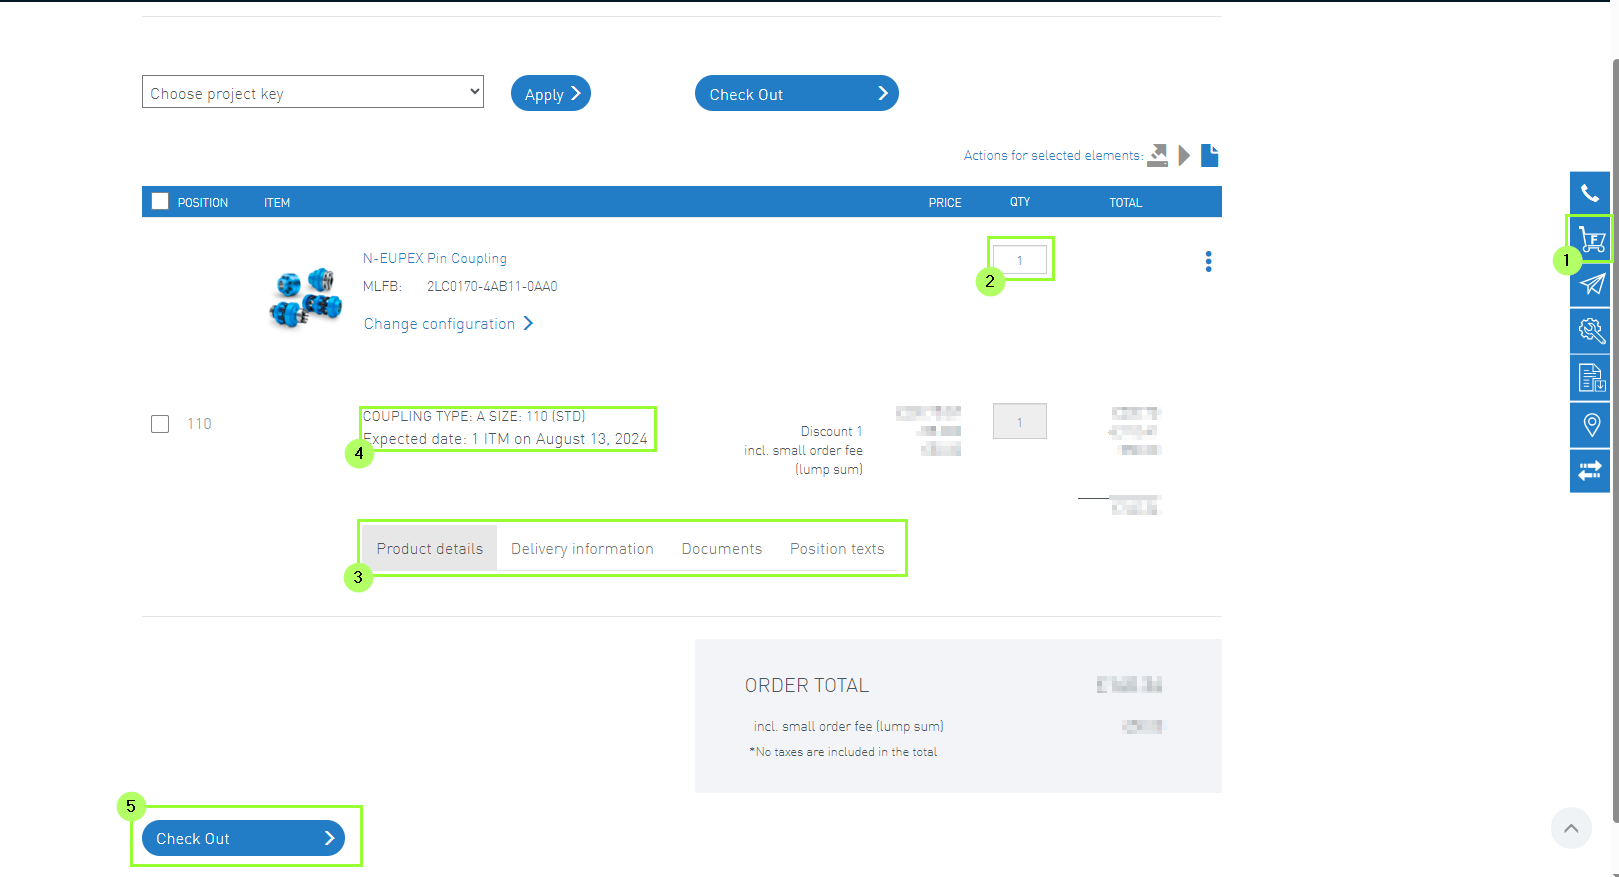
2. Carrito de compras
El carrito de compras se encuentra en la pestaña correspondiente de la barra lateral (1).
Al principio, se debe seleccionar la cantidad correcta (2).
Aquí también se puede consultar información adicional específica del producto y del pedido (3), como el tiempo de entrega estimado (4).
A continuación, se puede acceder al proceso de pago (5).
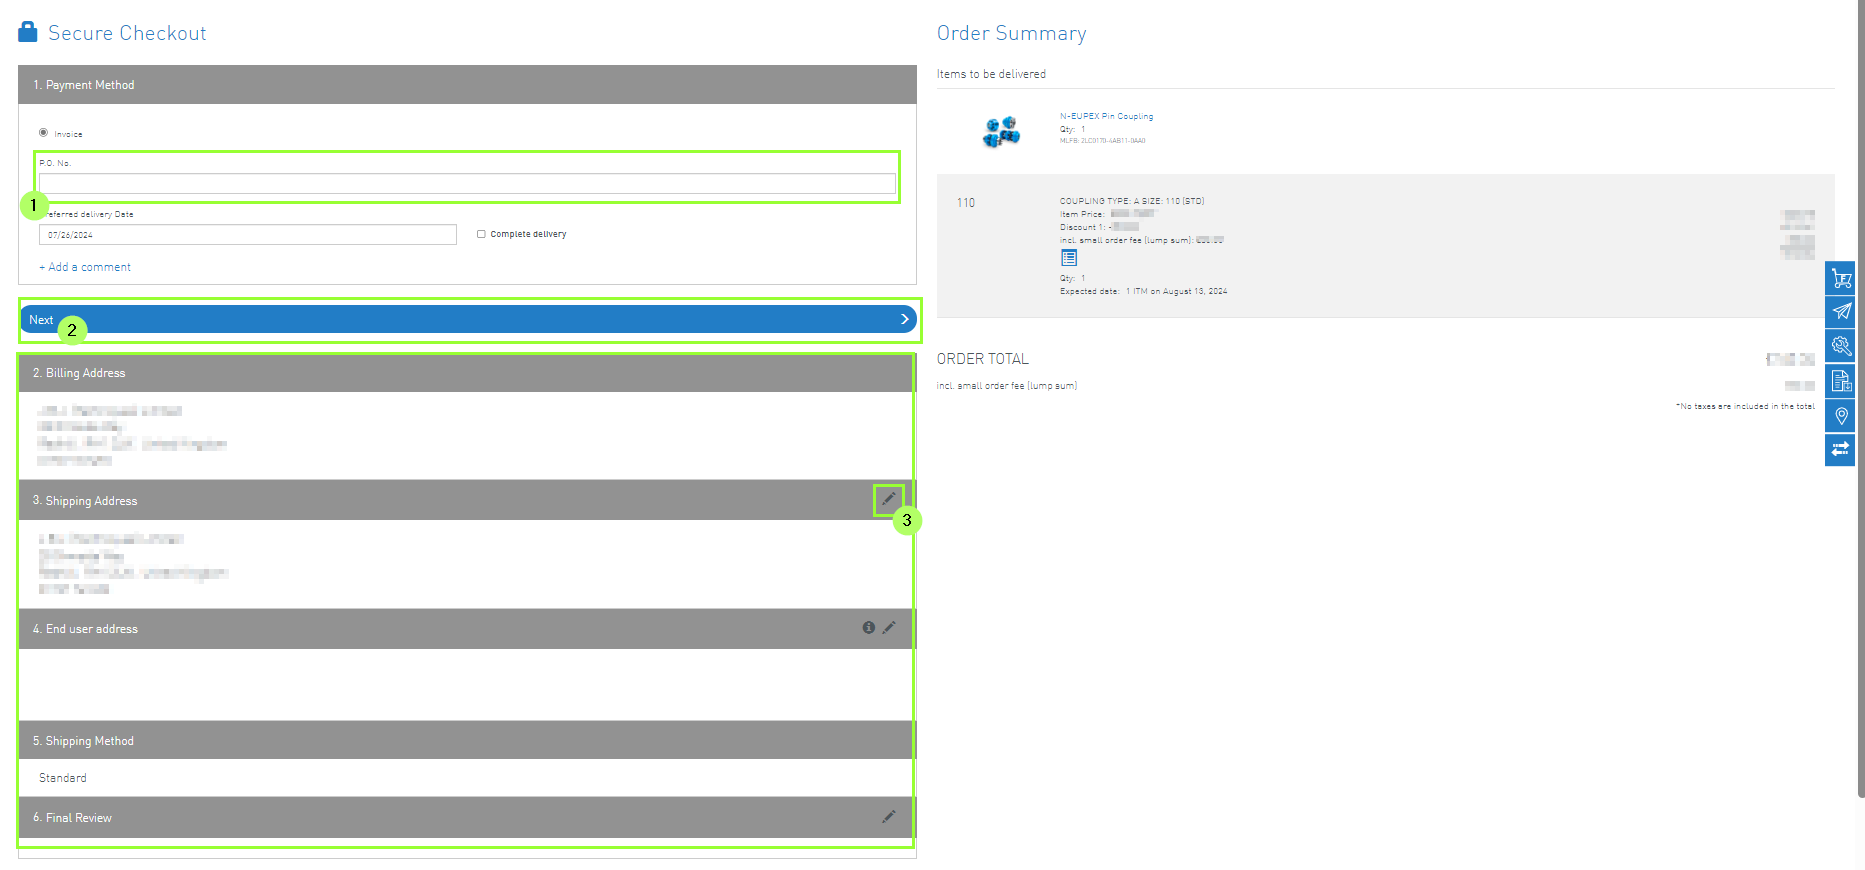
3. Finalización de la compra (Check Out)
En el proceso de pago seguro, se requieren los siguientes pasos:
(1) Indique el número de pedido.
(2) Ingrese los datos deseados.
(3) Cualquier cambio se puede realizar utilizando el icono del lápiz.
A continuación, se puede finalizar el pedido.
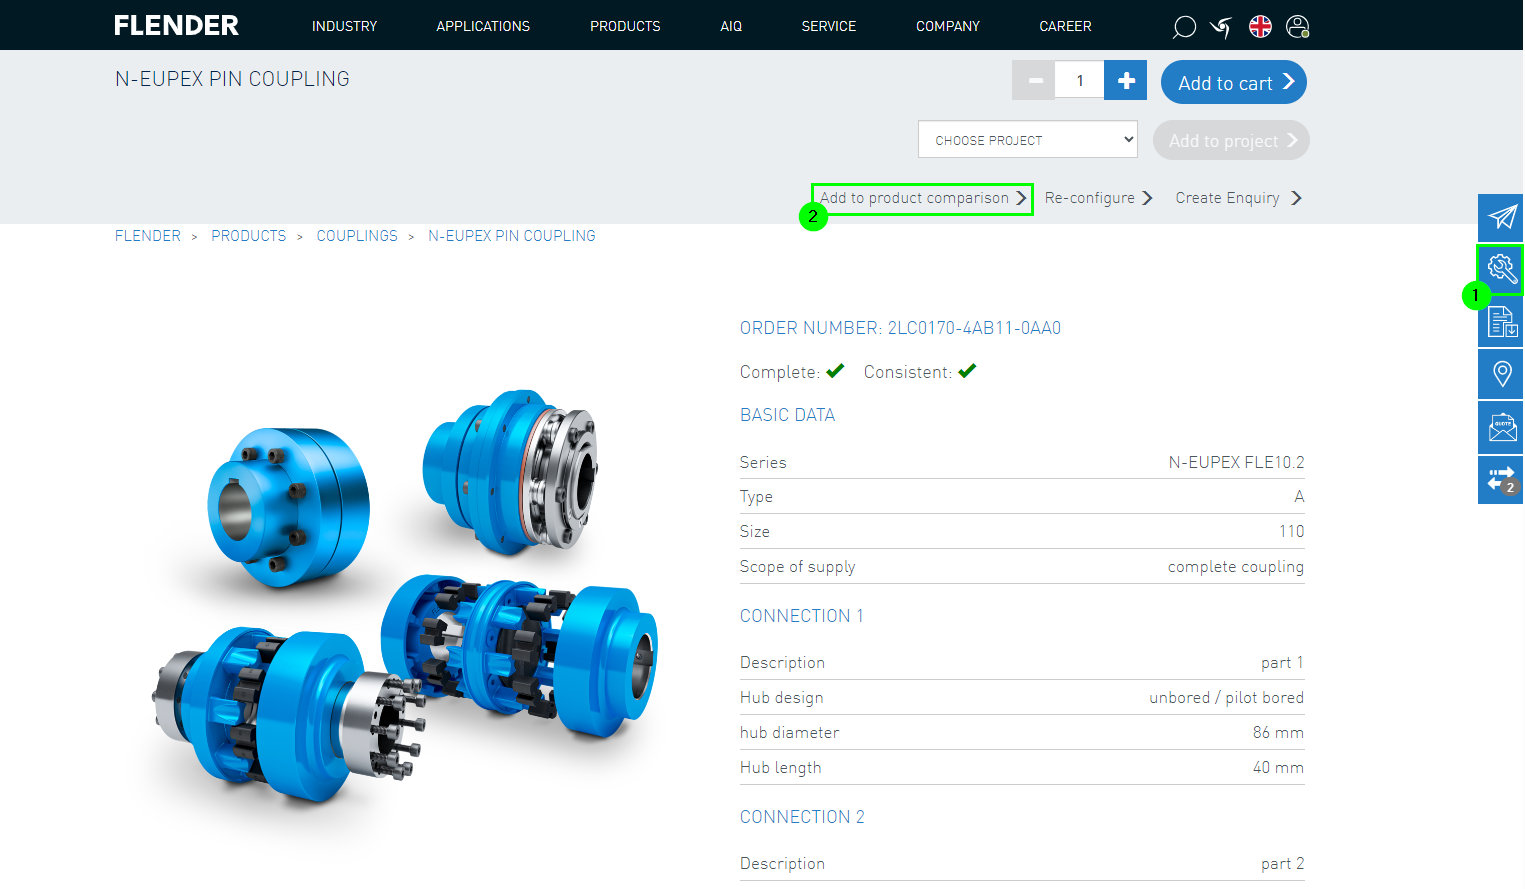
Si desea comparar dos o más productos, puede utilizar la función de comparación de productos en nuestro sitio web.
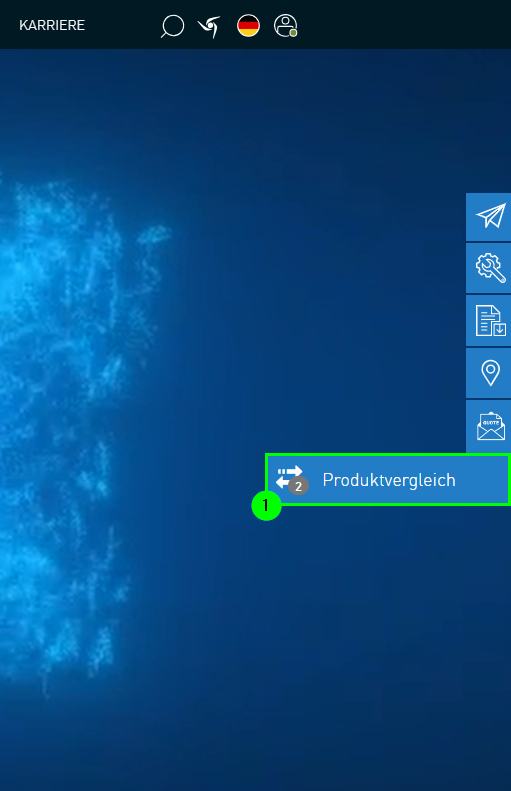
1. Acceso a la comparación de productos
Puede acceder a la "Comparación de productos" a través de la barra lateral en el lado derecho (1). Esto le llevará directamente a la página de comparación.
El pequeño número junto al icono en la barra lateral indica que, en este ejemplo, se han añadido dos artículos a la comparación de productos.
2. Añadir productos a la comparación de productos
Hay 2 maneras de añadir productos Flender a la comparación de productos.
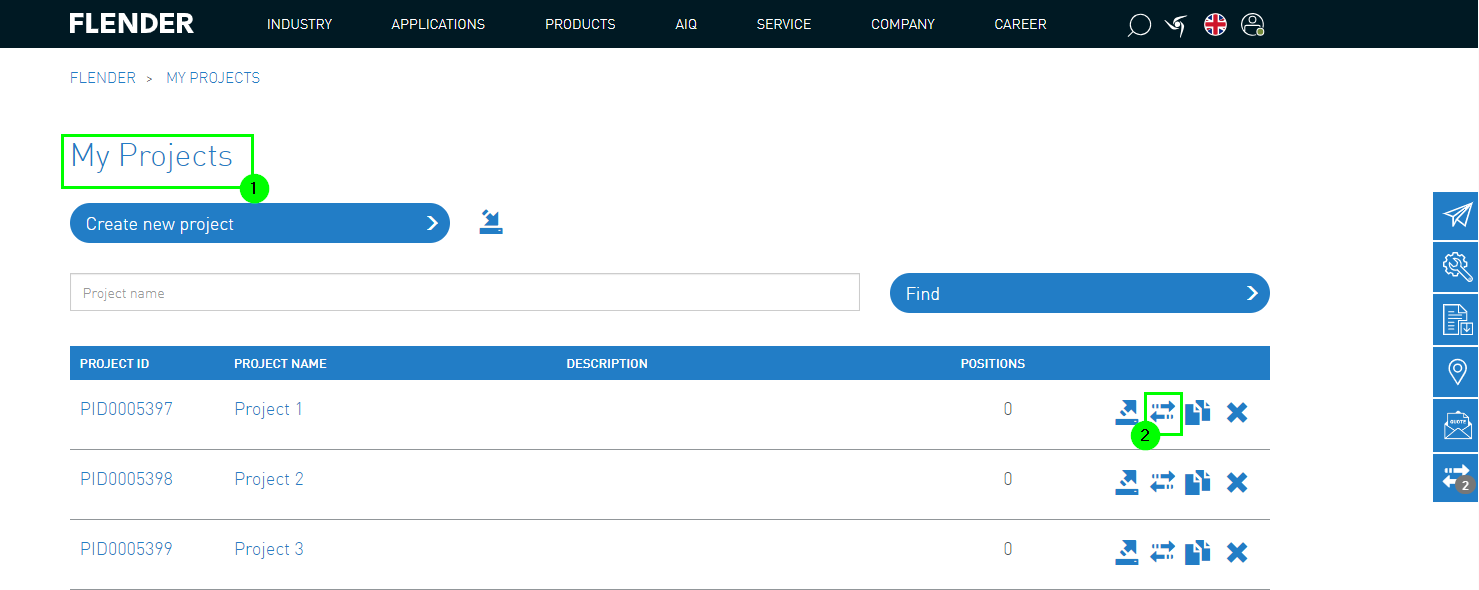
1. Primera opción: My Projects
(1) Acceda a My Projects a través del menú de usuario
(2) Añada proyectos o productos individuales a la comparación de productos
2. Segunda opción: Configuración
(1) Configure el producto deseado
(2) Añada el producto configurado a la comparación de productos
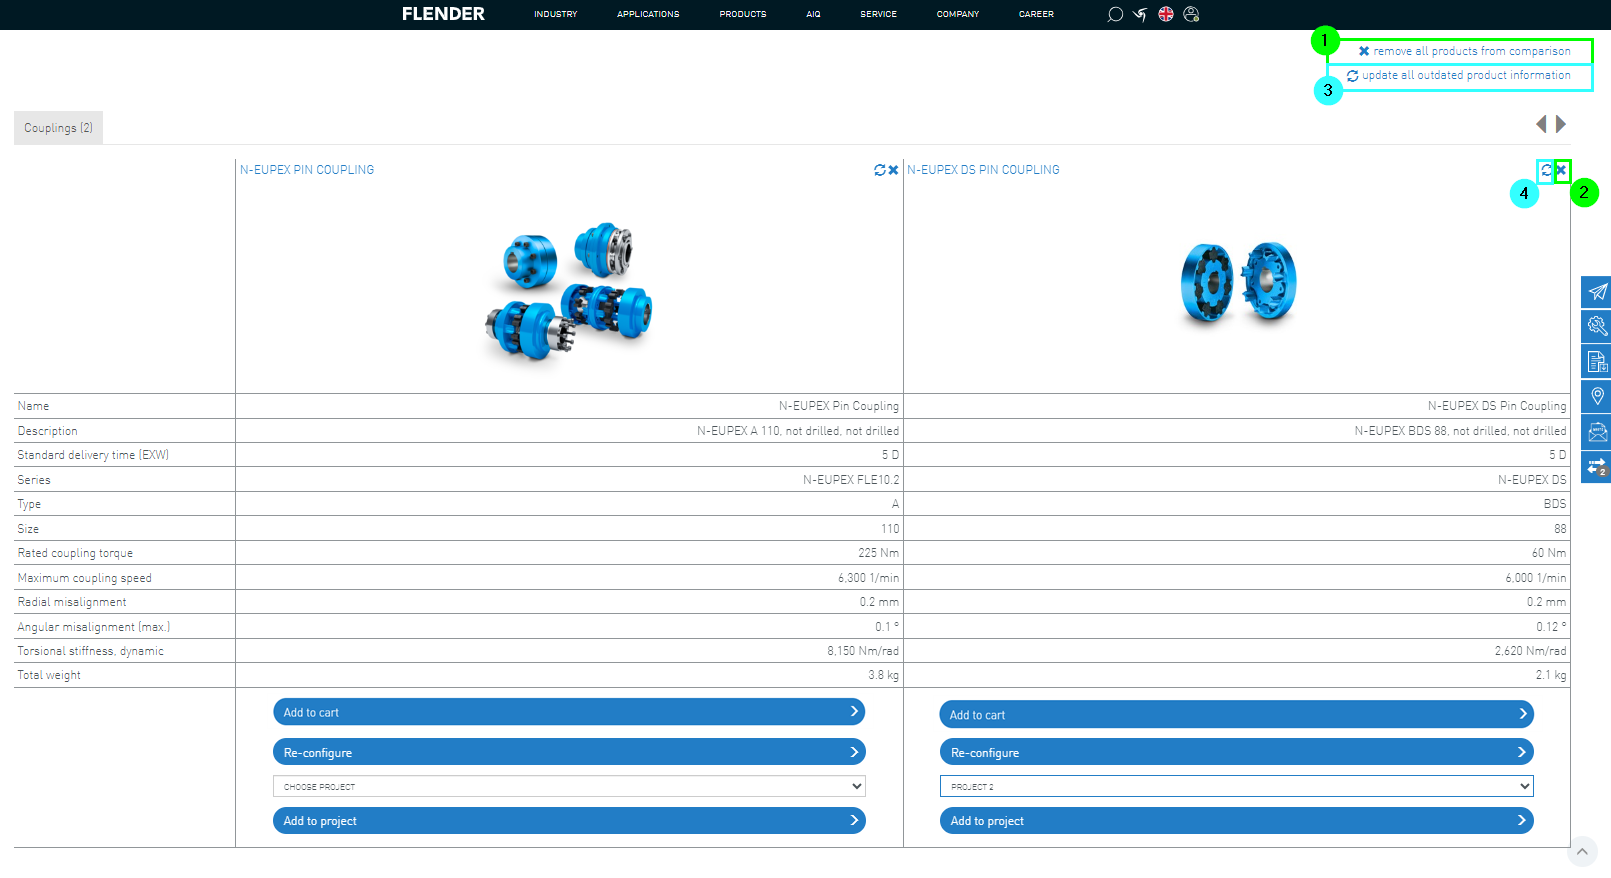
3. Vista de la comparación de productos
Una vez que haya añadido todos los productos a la comparación, ya sea a través de “My Projects” o del configurador, puede acceder a la
“Comparación de productos” desde la barra lateral derecha (ver capítulo 1. Acceso a la comparación de productos).
En la comparación de productos, se muestran y comparan los datos de los productos añadidos.
Los productos permanecen en la “Comparación de productos” hasta que los elimine manualmente.
Eliminar productos de la comparación de productos:
Eliminar todos los productos utilizando el icono “X” (1)
Eliminar productos individuales de la comparación utilizando el icono “X” dentro de la posición (2)
Actualización de la comparación de productos:
Si un producto permanece mucho tiempo en la comparación de productos, es posible que la información mostrada esté desactualizada.
Para mantener la información actualizada, puede actualizar toda la comparación de productos (3) o productos individuales (4).
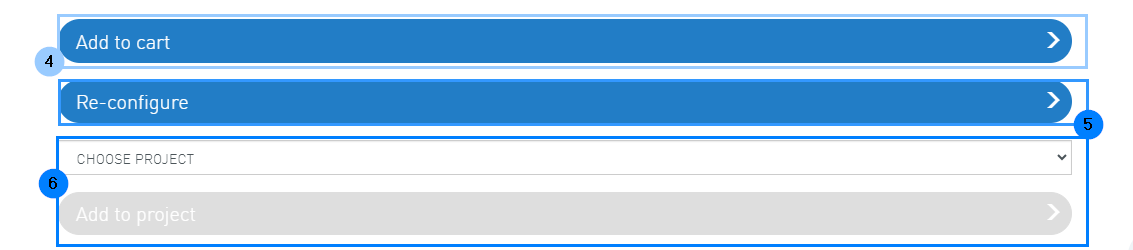
Después de comparar los distintos productos, se pueden añadir al carrito de compras (4), volver a configurar (5) o asignar a un proyecto (6).
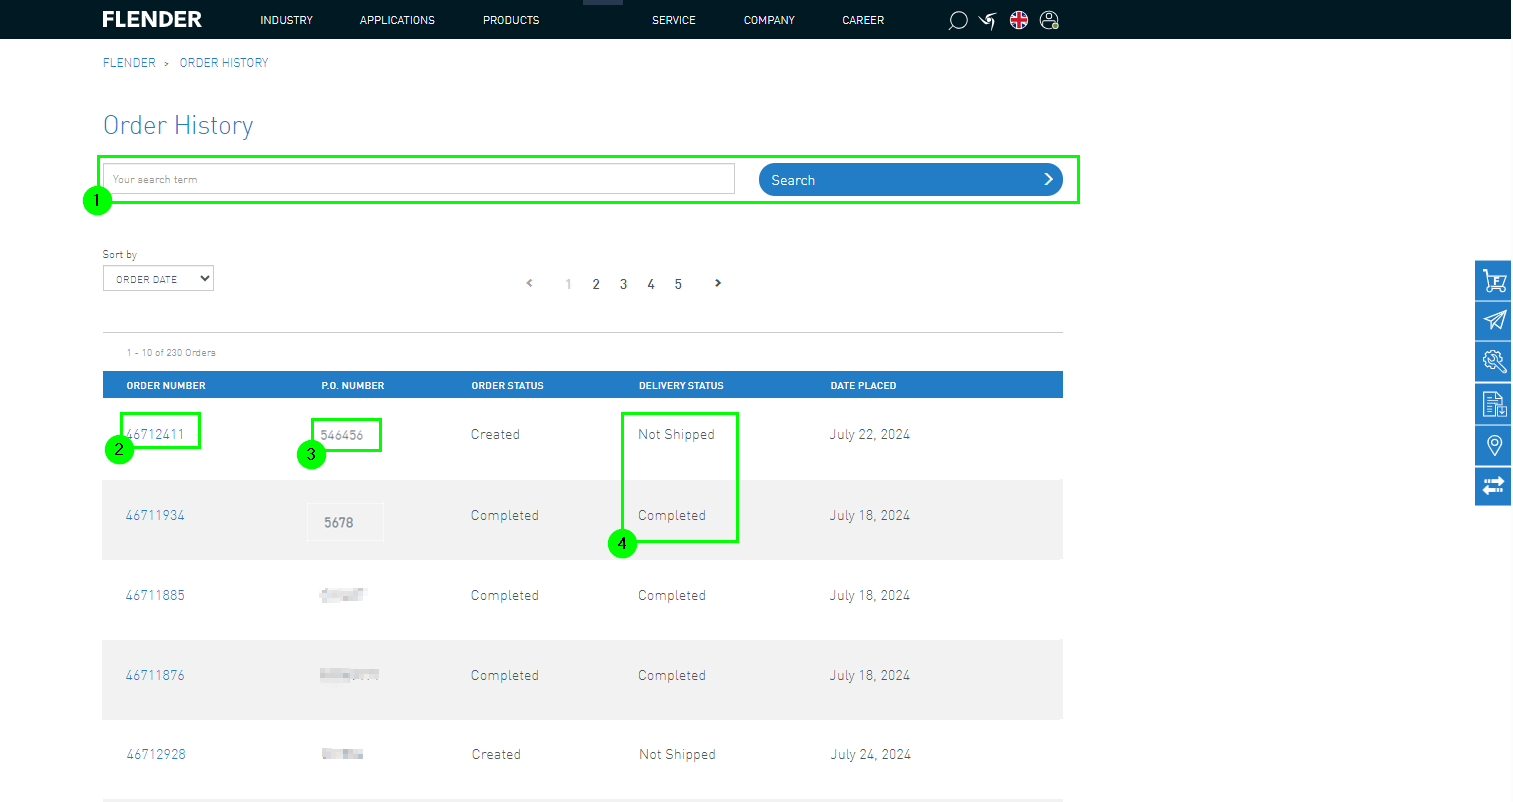
La visión general de pedidos permite obtener una visión general de los pedidos, los detalles de los pedidos y la información de entrega.
Para comprobar el estado actual de los pedidos existentes y ver los detalles de los pedidos anteriores, existe la visión general de pedidos.
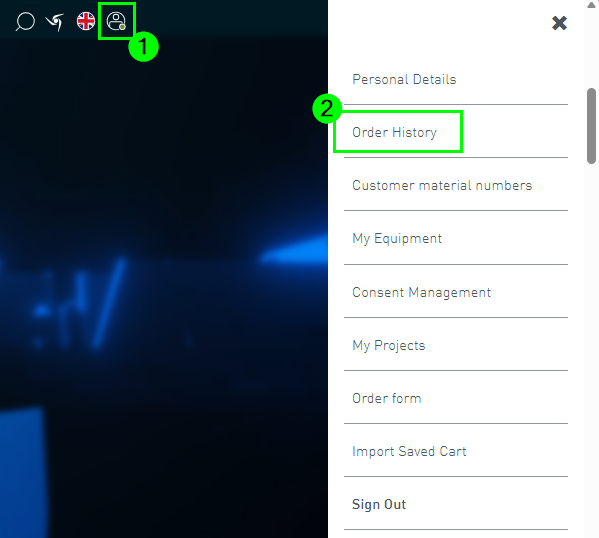
Para ello, debe seleccionar la visión general de pedidos (2) en el menú de usuario (1).
La visión general de pedidos incluye todos sus pedidos realizados a Flender en los últimos 365 días o los últimos 1000 pedidos.
No importa cómo se haya realizado el pedido a Flender (a través de Flender Mall, Mail2EDI, correo electrónico o similar).
1. Vista general de pedidos
La visión general de pedidos ofrece una función de búsqueda (1) para encontrar pedidos específicos.
Además, se muestra el número de pedido de Flender (2), el número de pedido del cliente (PO) (3) y el estado de la entrega (4).
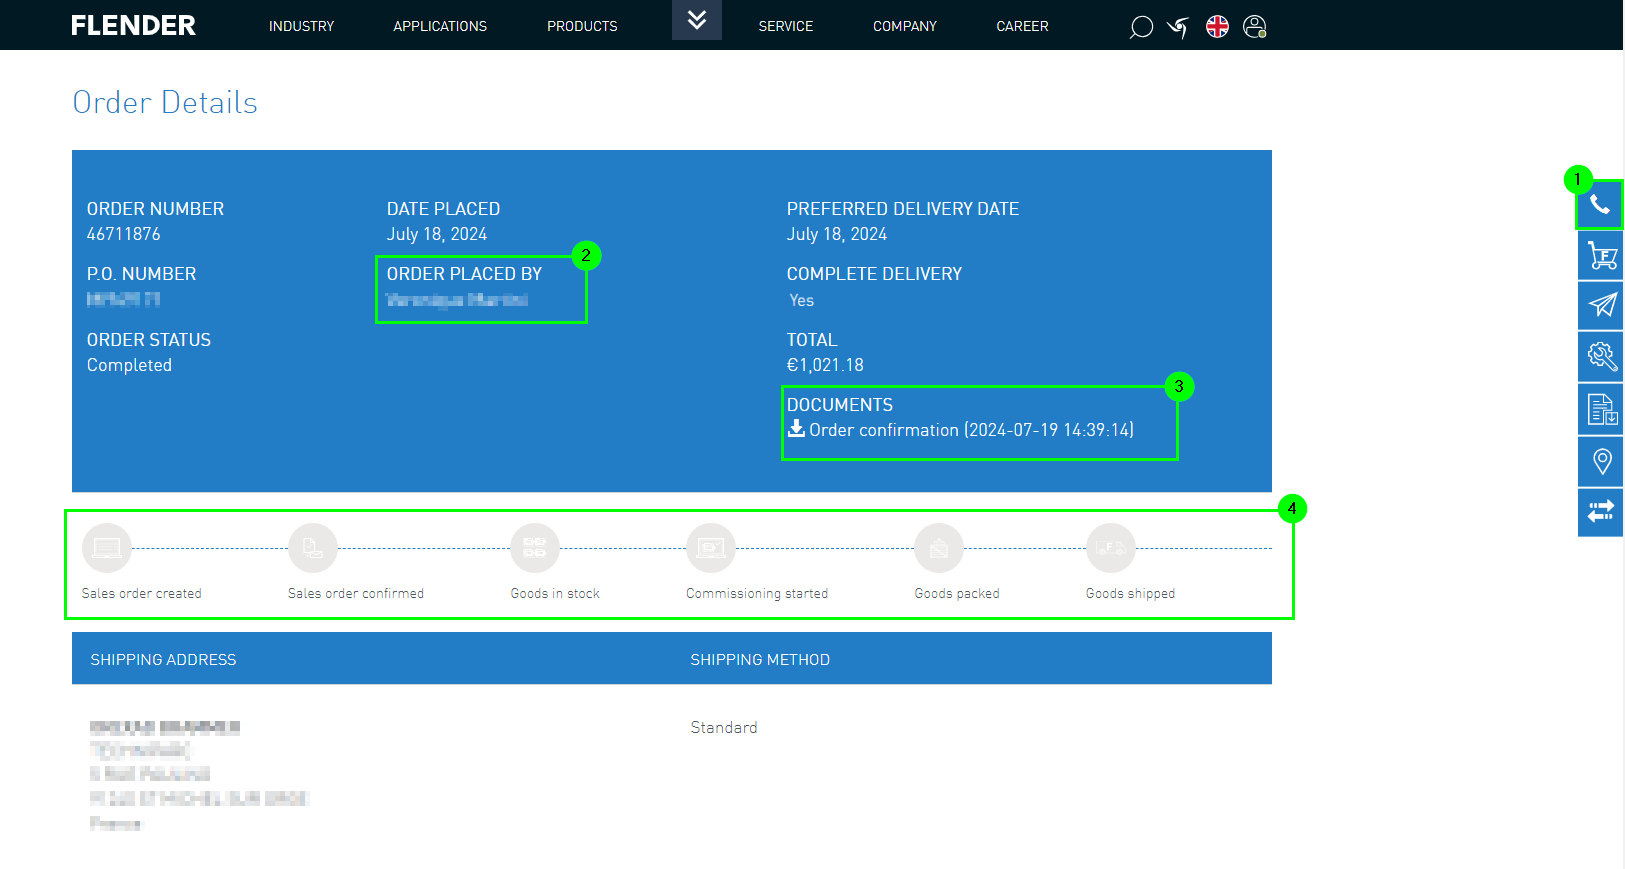
2. Detalles del pedido
Para ver los detalles de un pedido, haga clic en el número de pedido dentro de la visión general de pedidos (2).
2.1 Datos principales
De los datos principales se puede obtener la siguiente información.
Para ver su persona de contacto asignada de FLENDER, haga clic en el botón de teléfono (1).
También se muestra la persona que realiza el pedido en nombre del cliente (2).
Tiene la posibilidad de descargar documentos relacionados con el pedido (3).
Además, se muestra el estado actual del pedido (4).
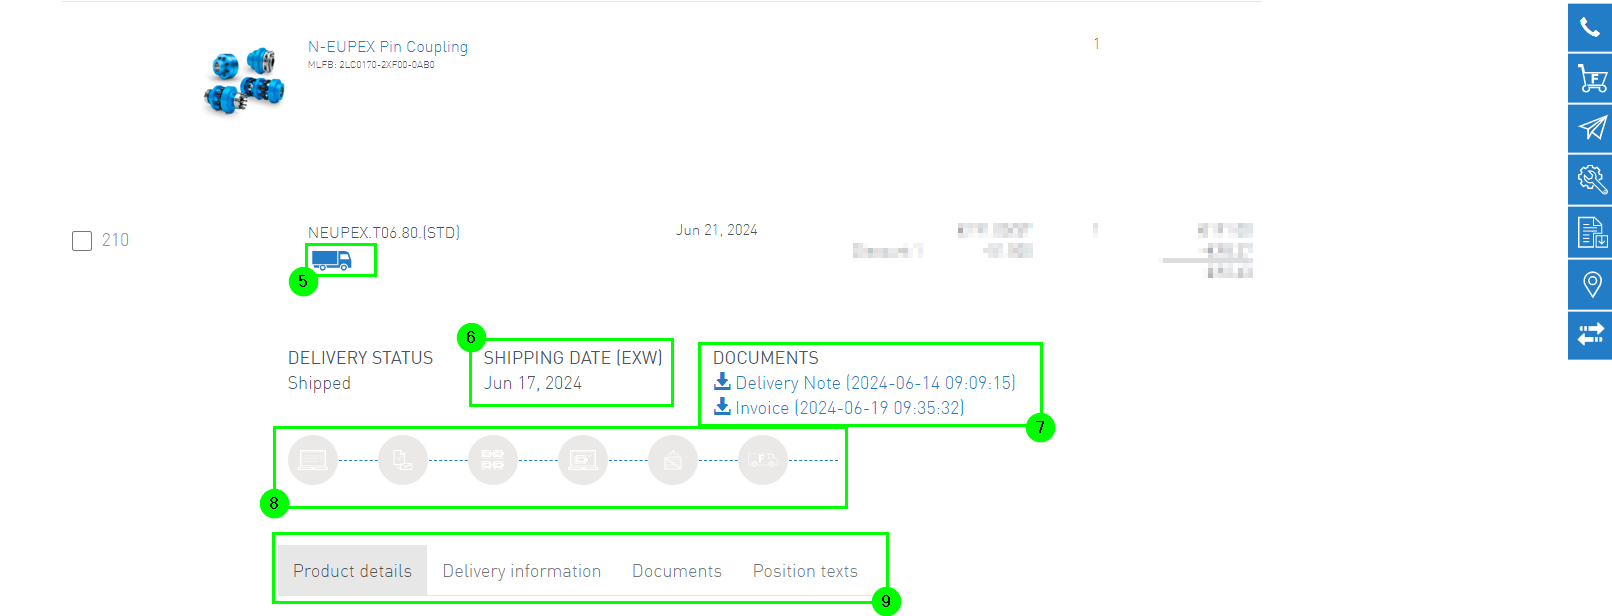
2.2 Datos de las posiciones
En los datos de las posiciones se muestran los siguientes datos:
Debajo del icono del camión es posible realizar el seguimiento de la entrega (5)
En los pedidos completados se indica la fecha de entrega (6)
En los pedidos completados, se pueden descargar otros documentos, como el albarán de entrega o la factura.
Vista del estado del pedido.
Se muestran (o minimizan) más detalles de la posición haciendo clic en las funciones debajo de la barra de progreso (10).
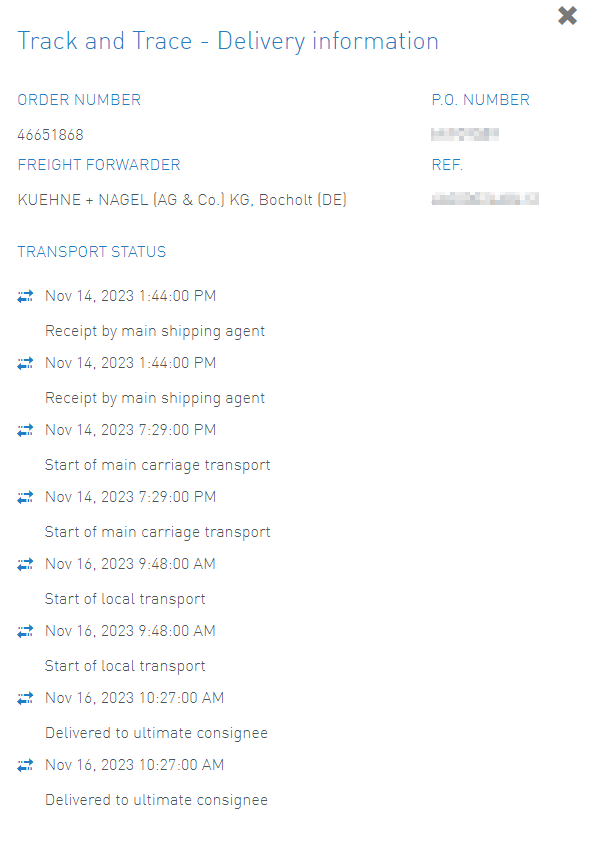
3. Información de entrega y seguimiento de entregas
Al hacer clic en el icono del camión, aparecerá una ventana emergente.
Aquí podrá seguir las distintas etapas de la entrega.
1. Acceso a la interfaz de configuración
1.1. Acceso a la interfaz de configuración - Barra lateral
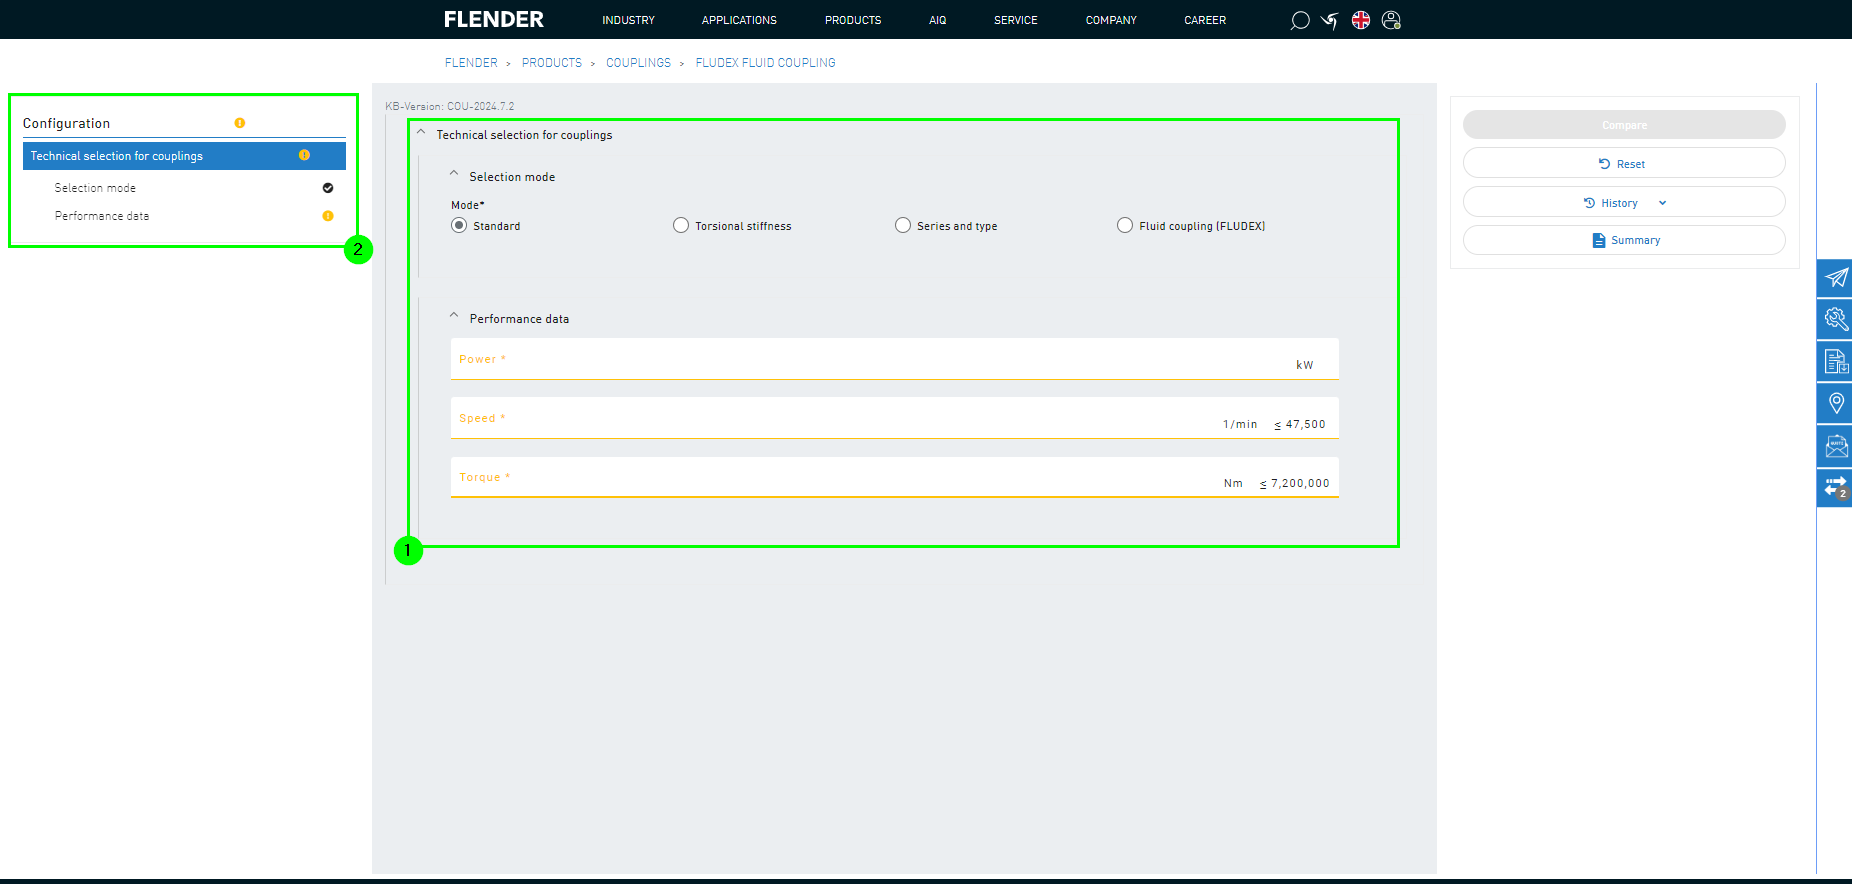
La función de configuración se puede acceder a través de la barra lateral (1) de Flender Mall.
A continuación, se puede elegir entre selección directa y configuración individual (2).
1.2. Acceso a la interfaz de configuración - Productos
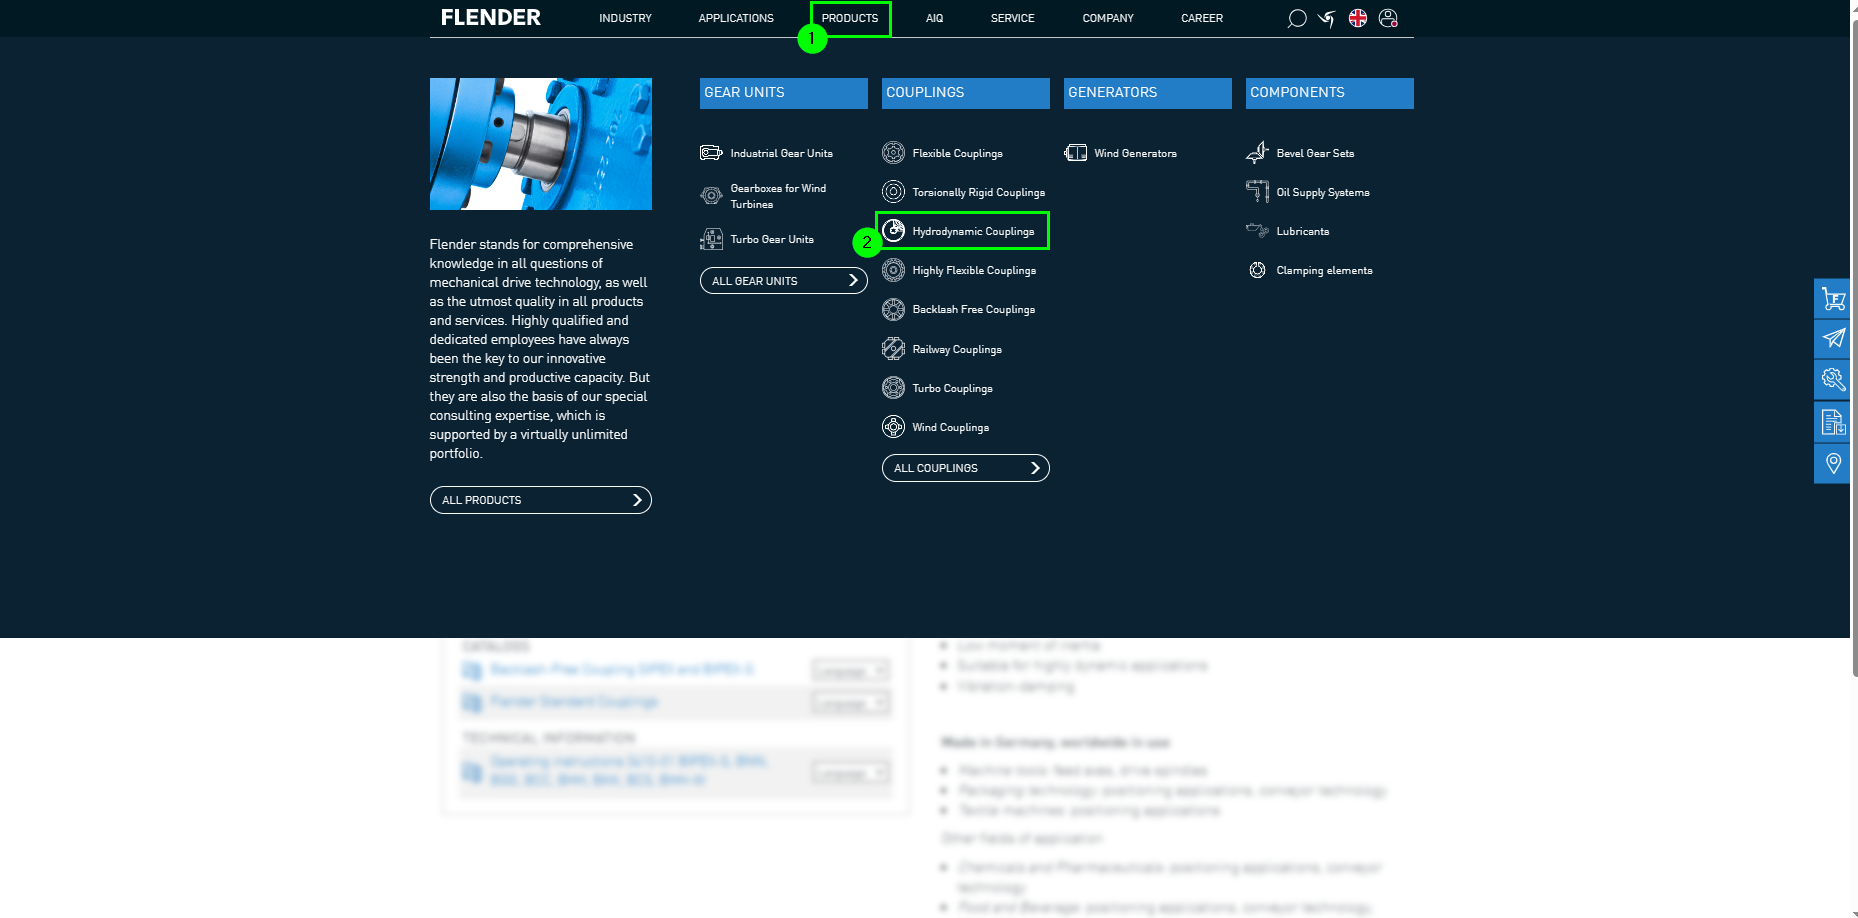
El acceso a la interfaz de configuración también se puede realizar desde la página de productos de Flender.
Para ello, es necesario hacer clic en la navegación de productos en el encabezado (1).
Después, se puede seleccionar el producto deseado (2).
Luego se accede a la vista general de productos (1). Aquí también se puede elegir entre selección directa y configuración (2).
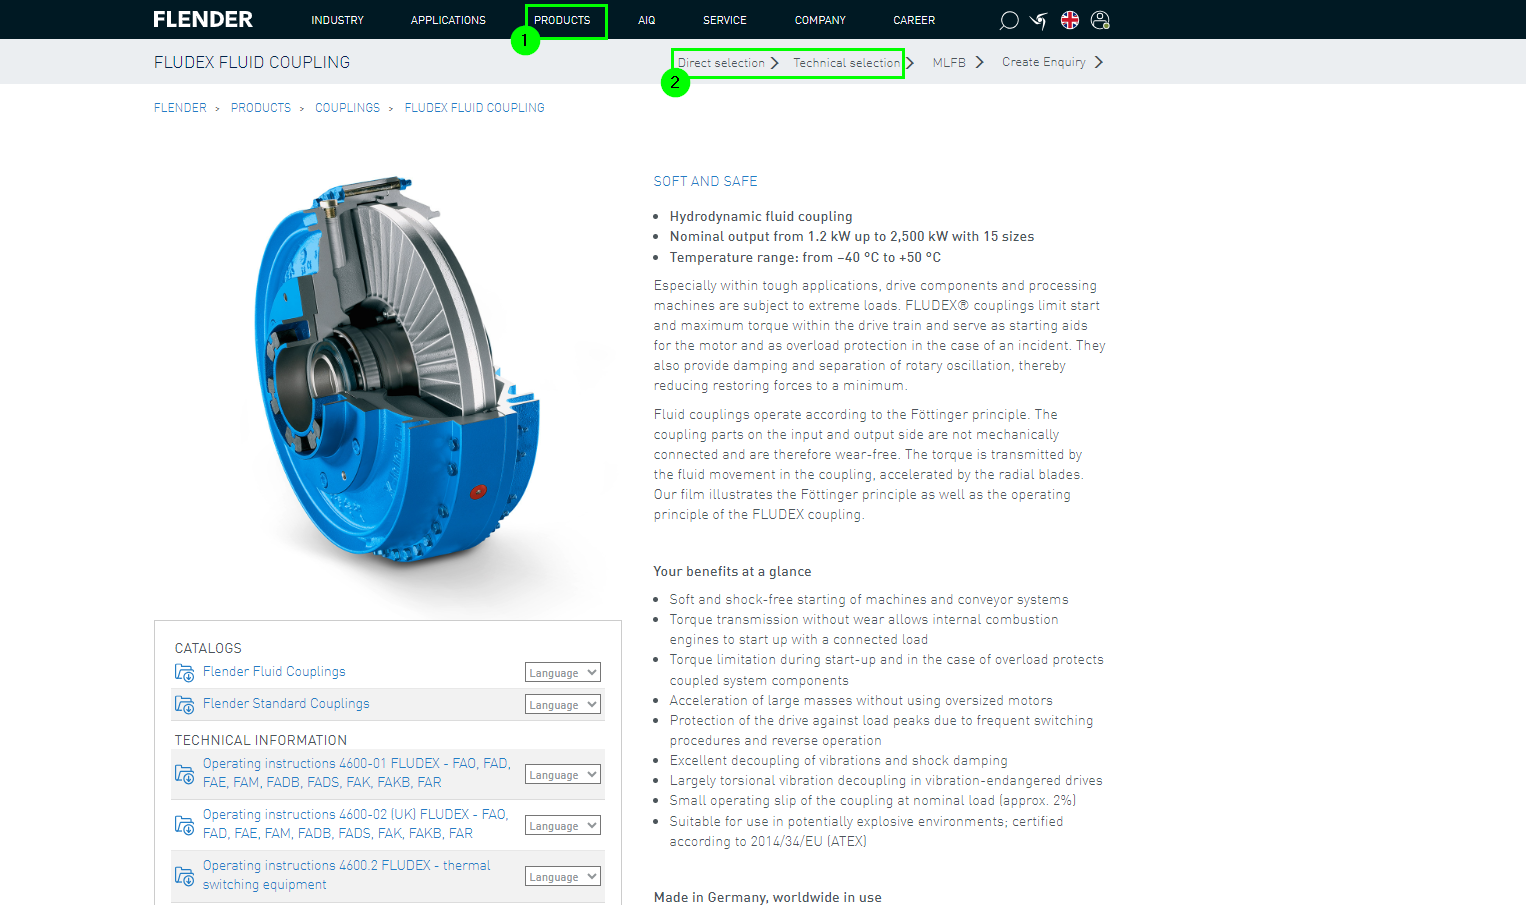
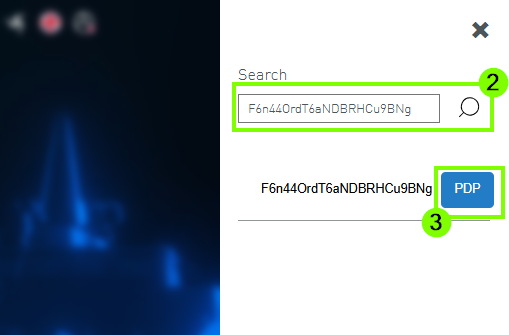
Si se conoce el MLFB o ConfigID, se pueden consultar los detalles del producto directamente mediante la función de búsqueda.
Para ello, acceda a la función de búsqueda (1) e introduzca el MLFB / ConfigID deseado (2). En el siguiente paso se puede acceder a la página de detalles del producto (PDP) (3).
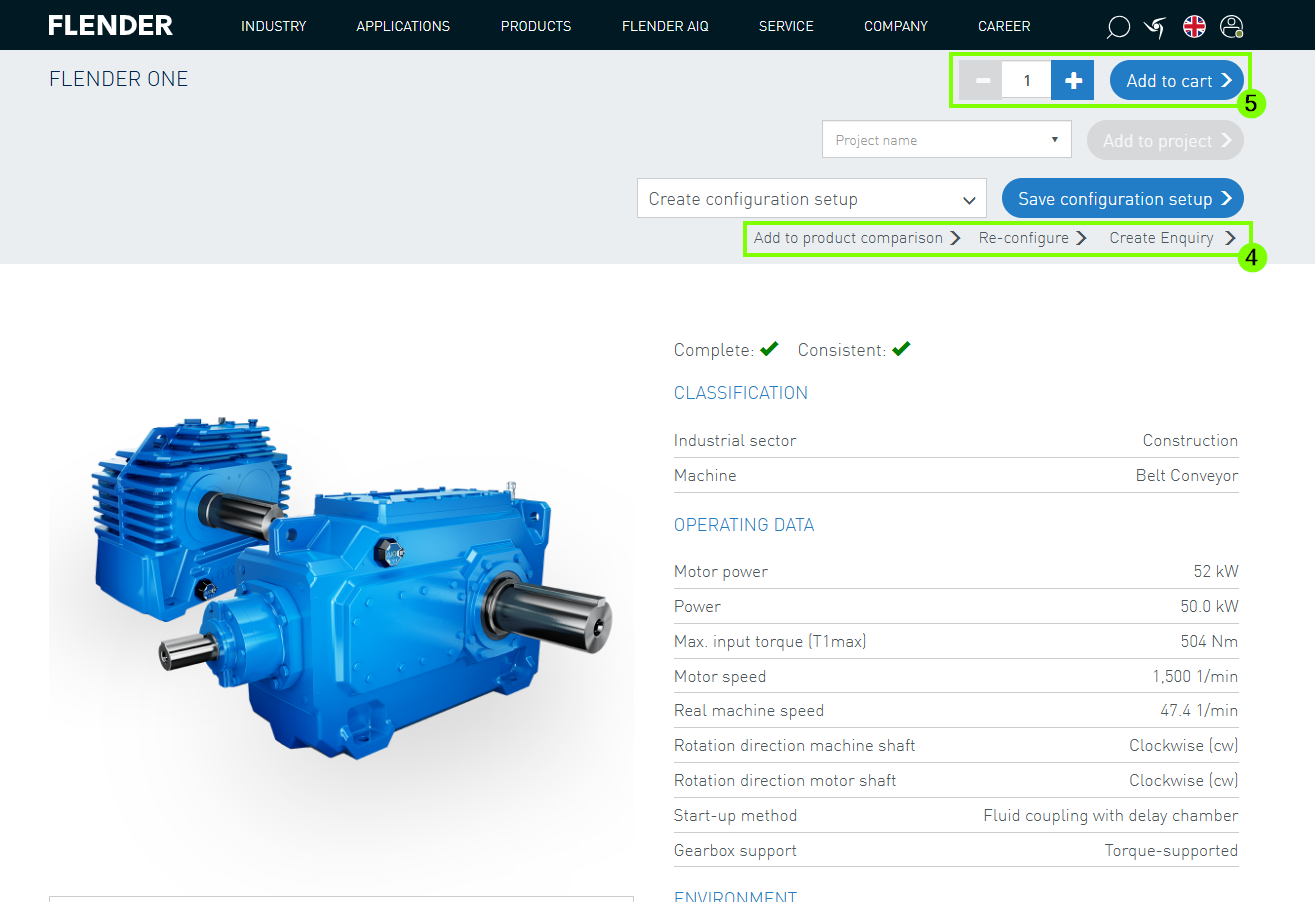
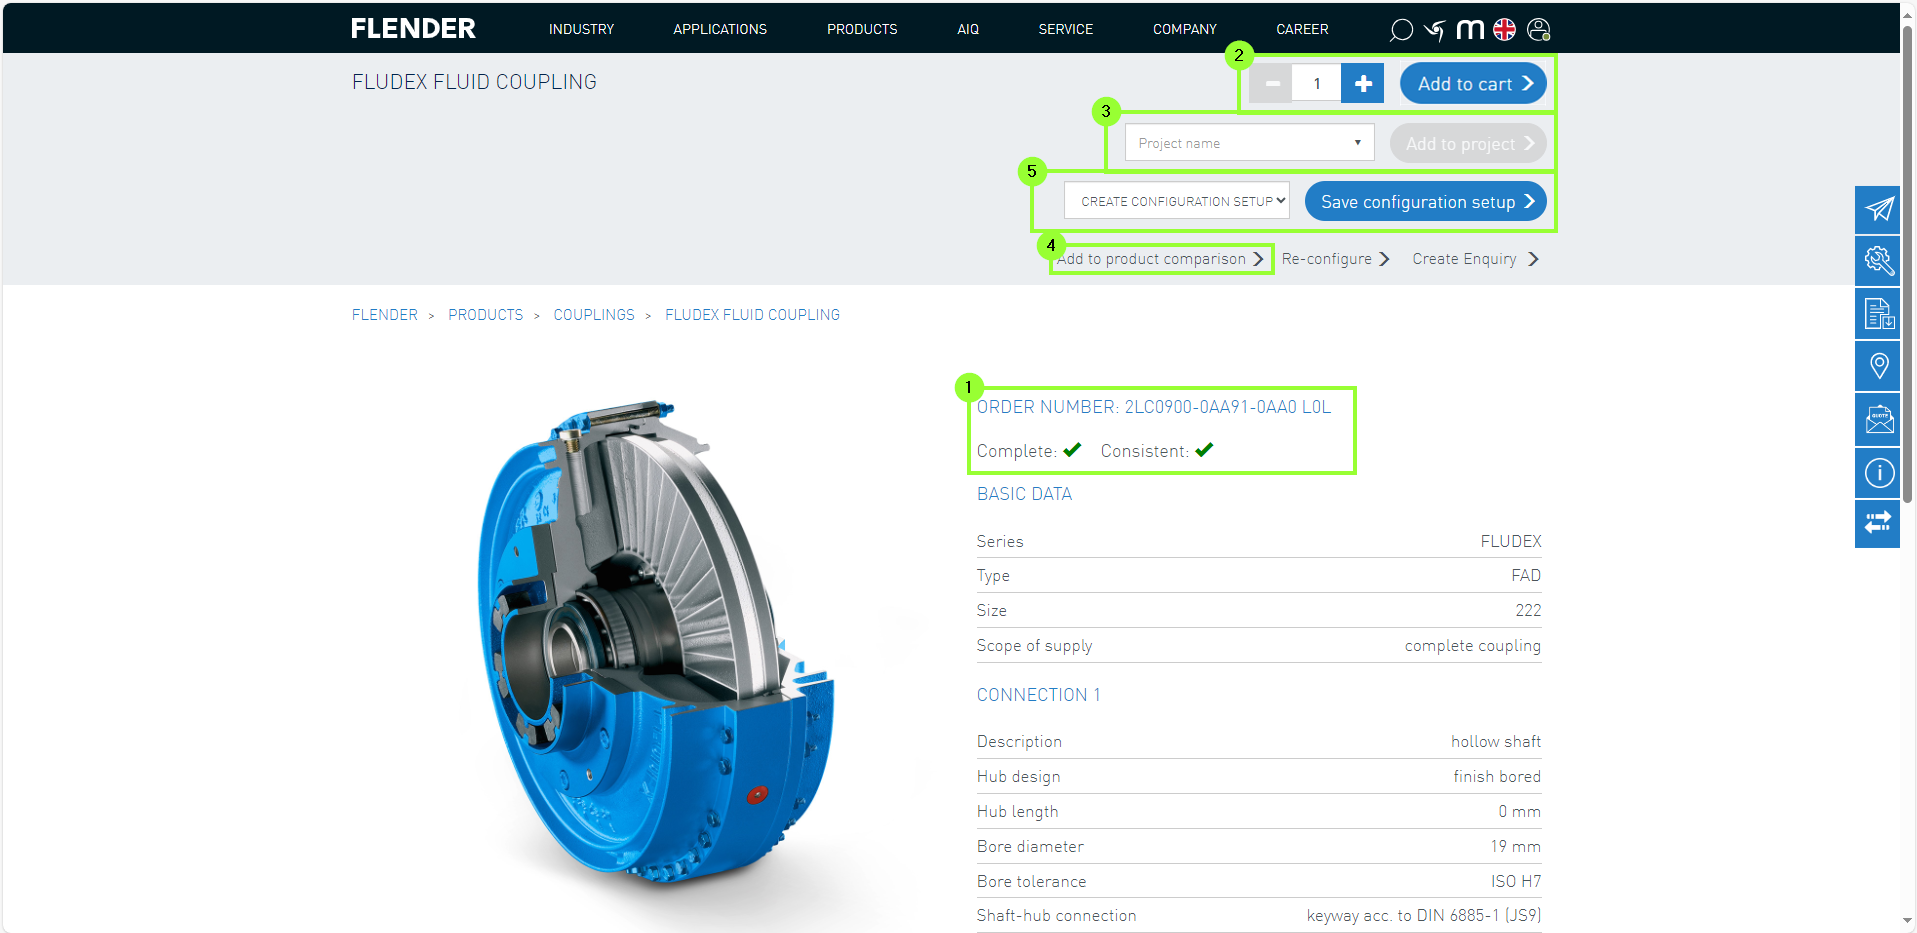
Después de iniciar sesión correctamente, están disponibles funciones como “Añadir a la comparación de productos” o “Reconfiguración” (4). Alternativamente, el producto se puede añadir directamente al carrito de compras (5).
2. Configurar
Independientemente de si elige selección directa o configuración, llegará a la misma interfaz de usuario mostrada.
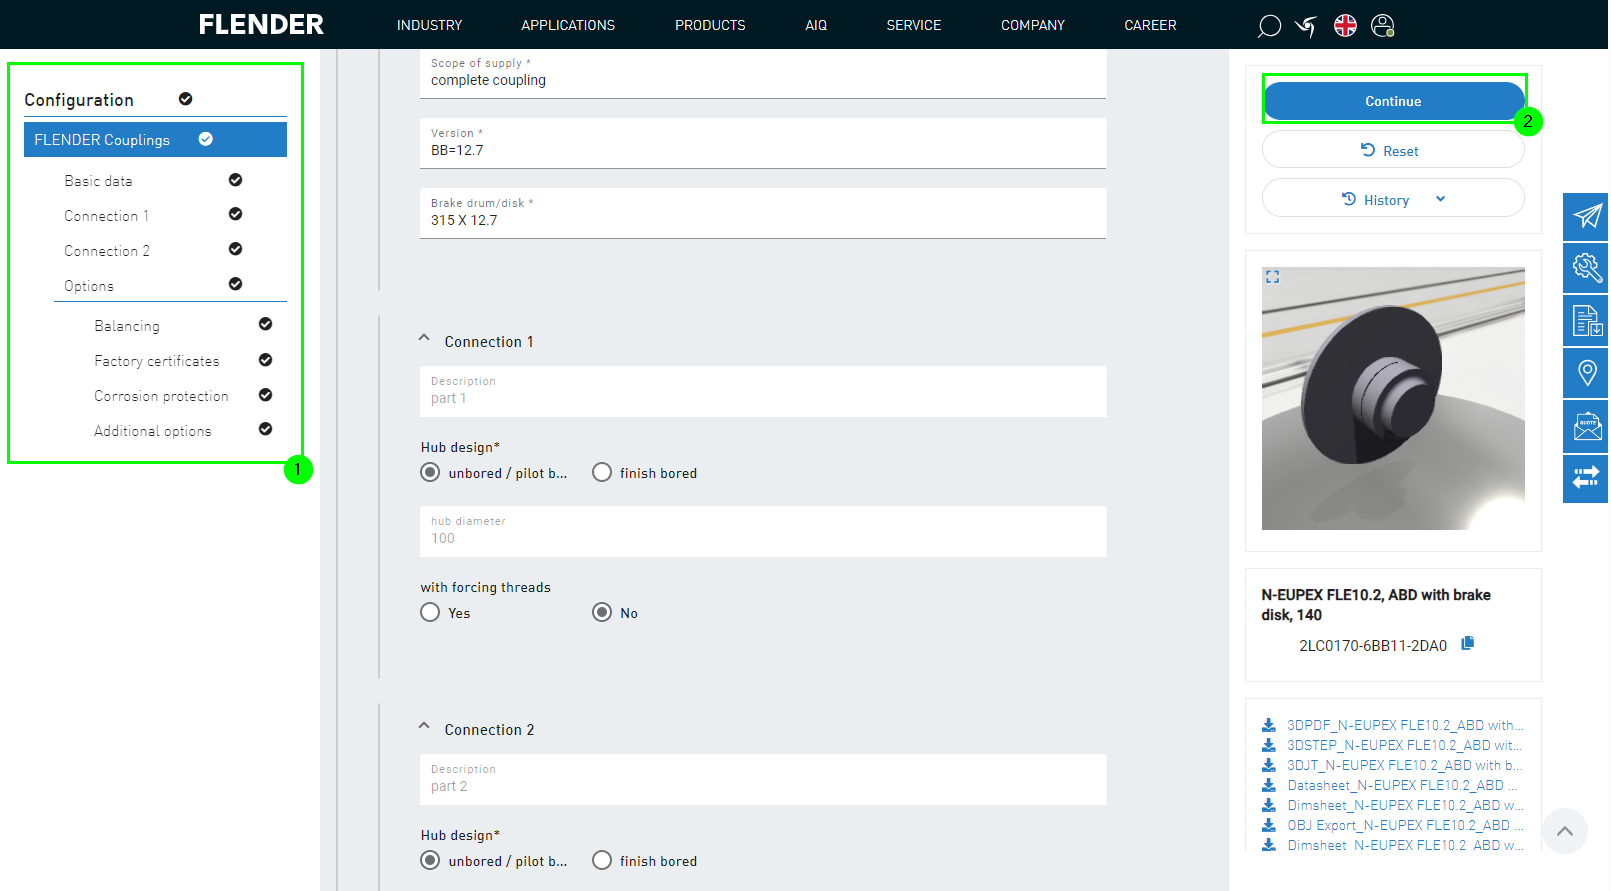
En la vista de configuración deben introducirse todos los parámetros y variables (1).
Si aparecen signos de exclamación naranjas en la vista de configuración, la configuración está incompleta (2).
Cuando todos los valores están completos, esto se visualiza con marcas negras (1).
Los avisos importantes se simbolizan con el icono de anuncio (2).
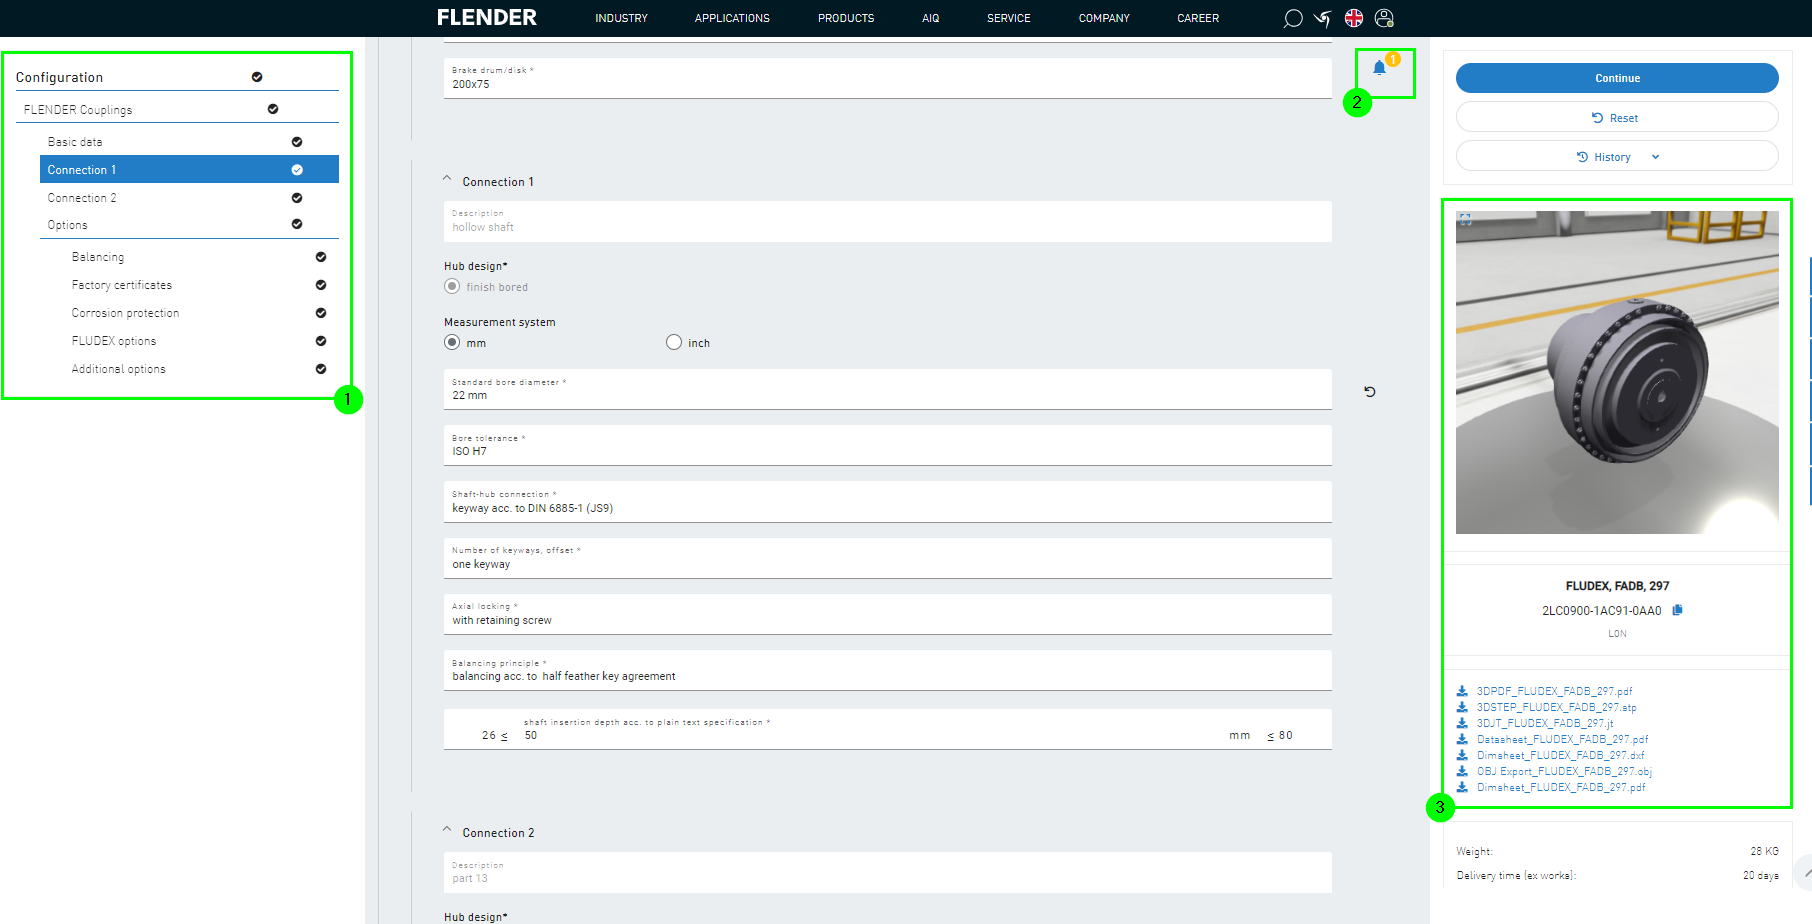
En el lado derecho hay documentos adicionales disponibles para descargar, o el producto configurado se puede visualizar en 3D.
Haga clic en "Siguiente" para realizar otras acciones.
A continuación, se accede a la siguiente interfaz de usuario:
Se debe prestar especial atención a si la configuración es completa y coherente (1).
En el lado derecho se pueden ver los parámetros esenciales del producto.
Además, allí se pueden descargar documentos relacionados con el producto.
También existe la opción de añadir el producto configurado al carrito de compras (2), asignarlo a un proyecto después de seleccionarlo (3) o compararlo con otros productos (4).
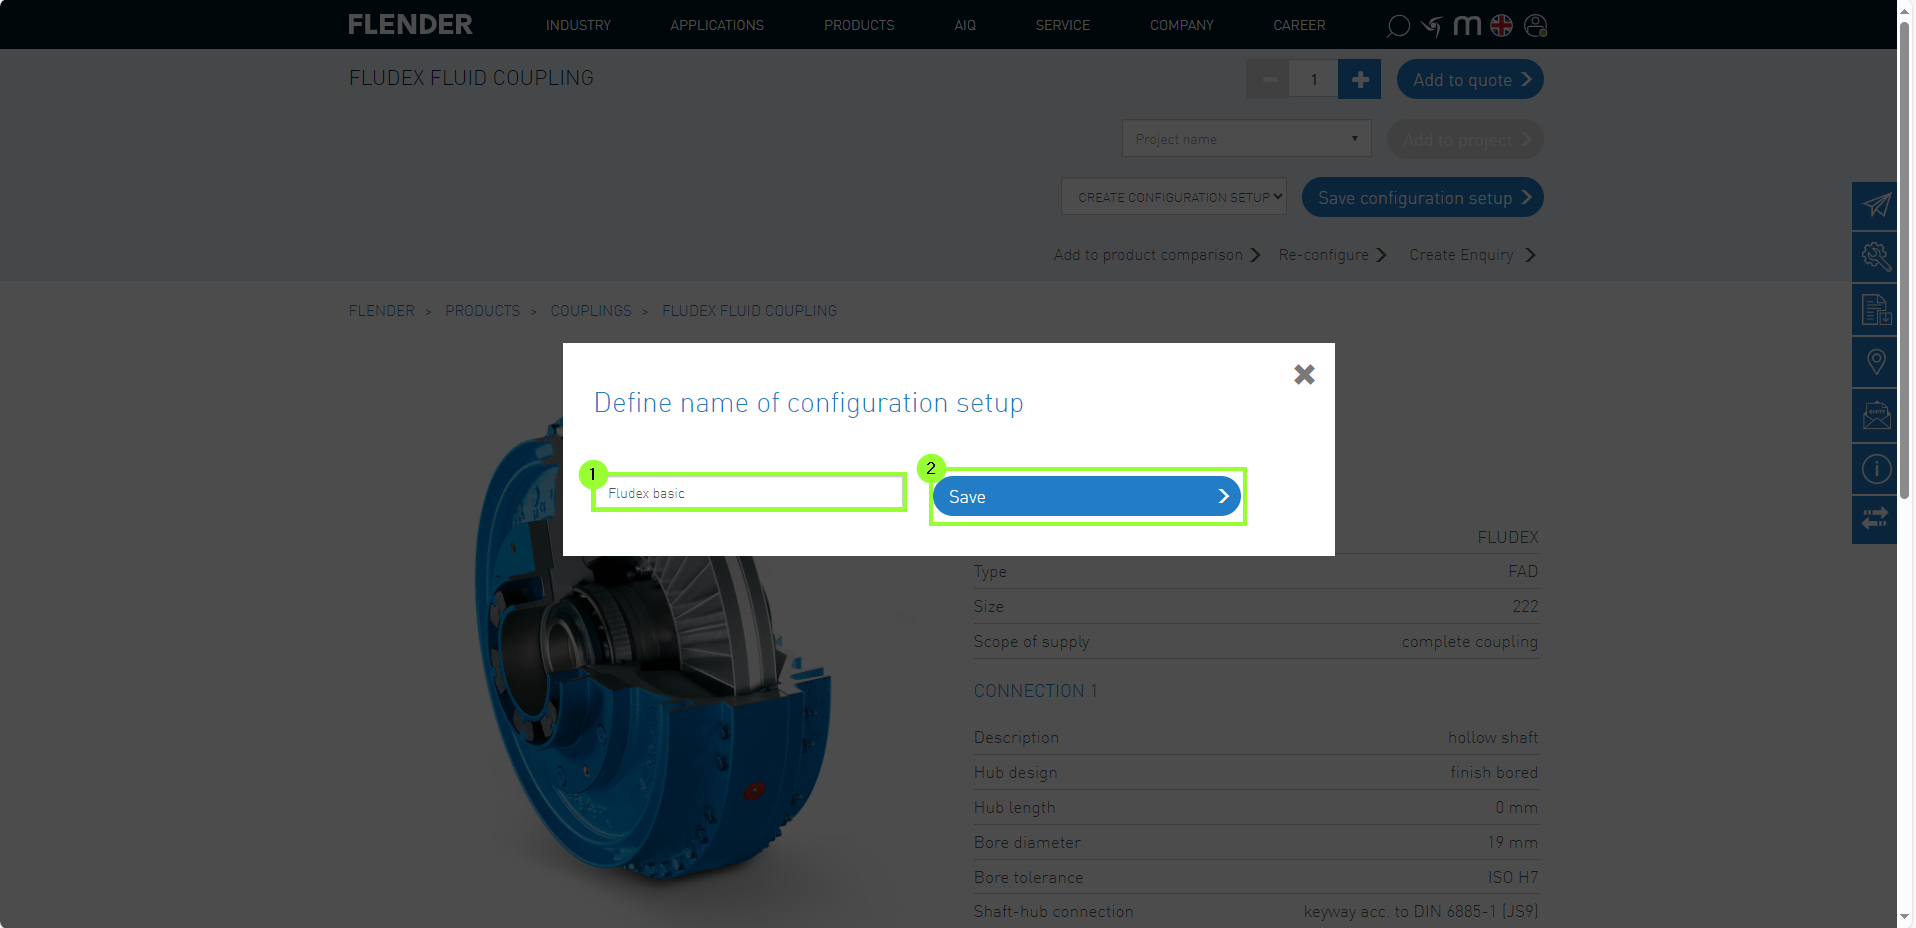
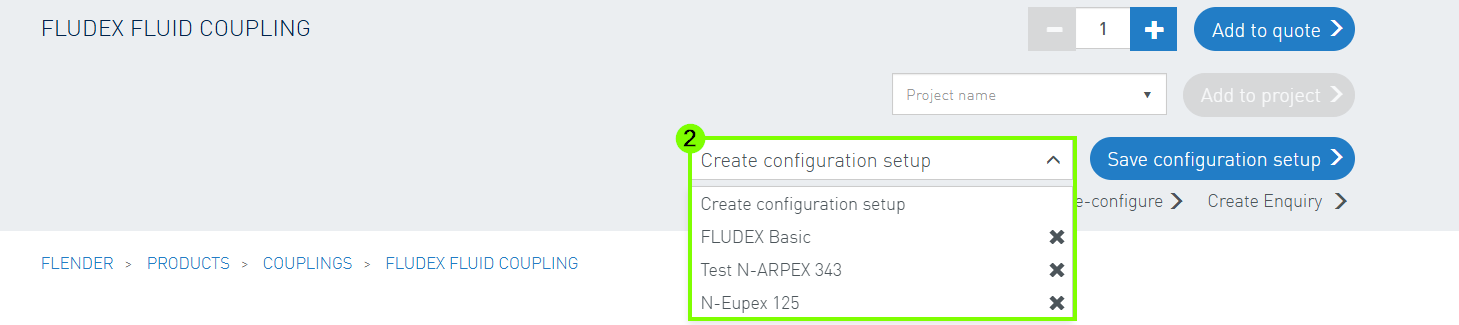
Además, es posible guardar la variante de configuración actual (5).
En el siguiente menú se puede introducir una denominación libremente elegida (1). Esta se guardará en los datos del cliente al seleccionar "Guardar" (2).
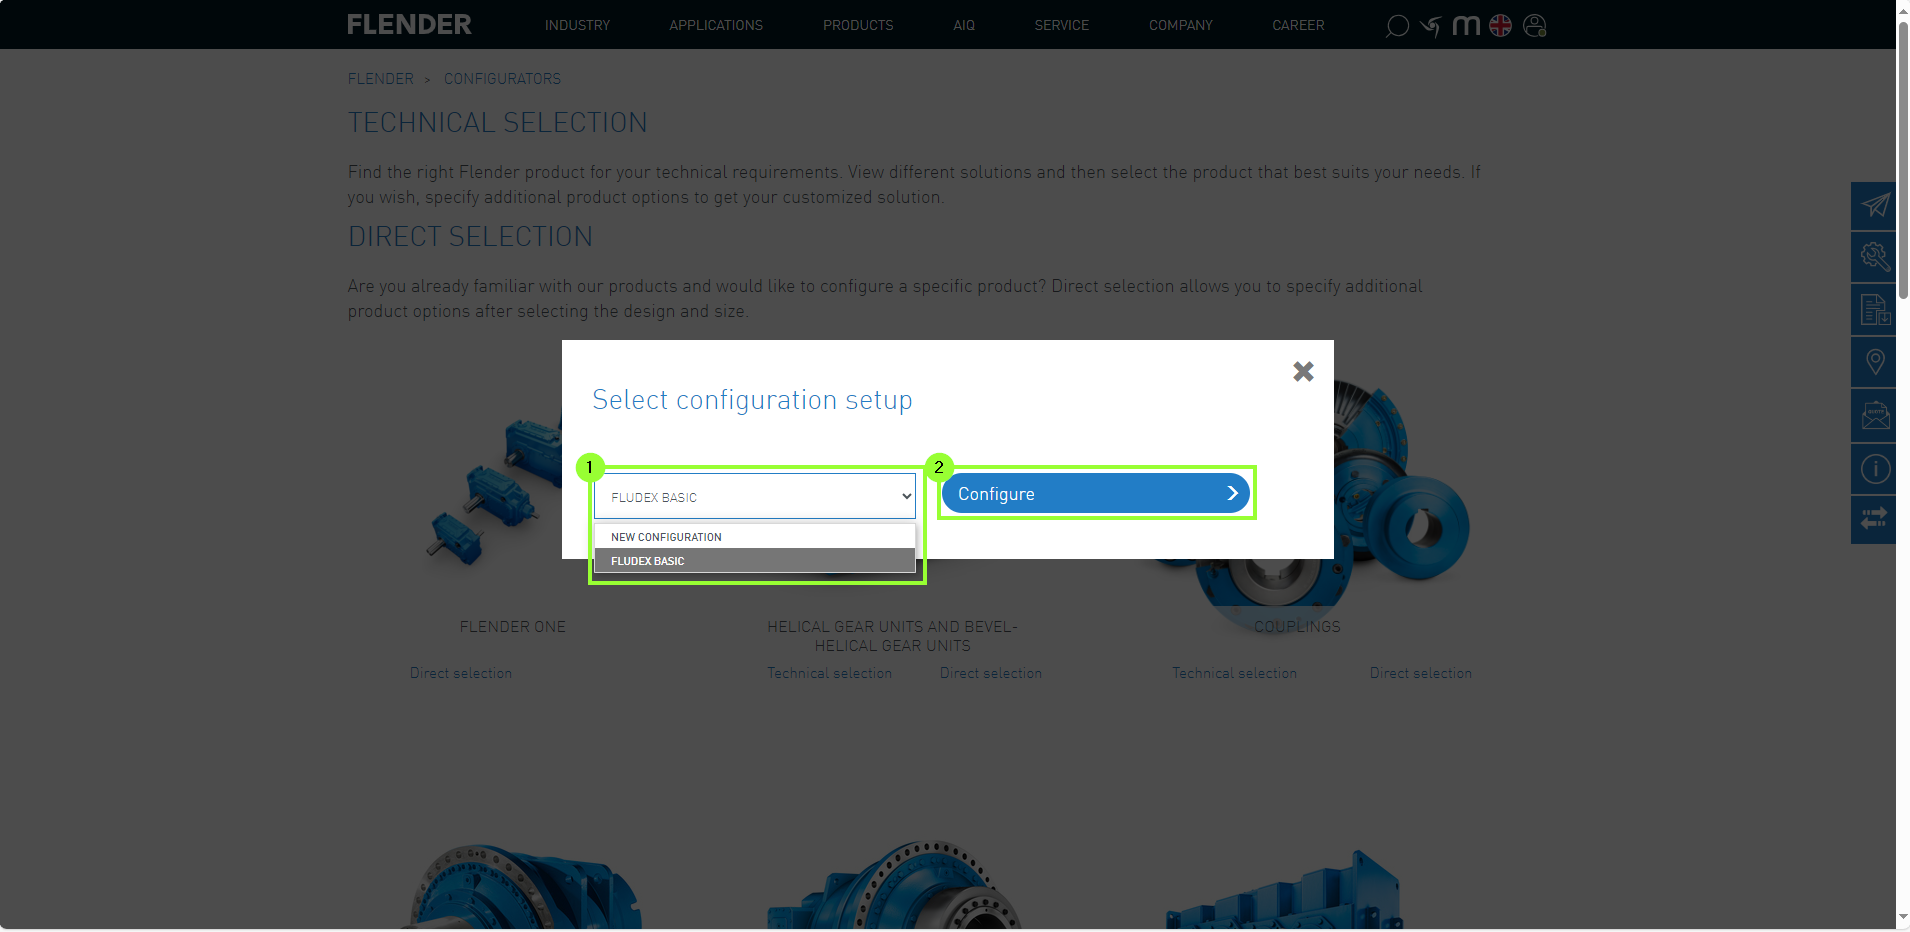
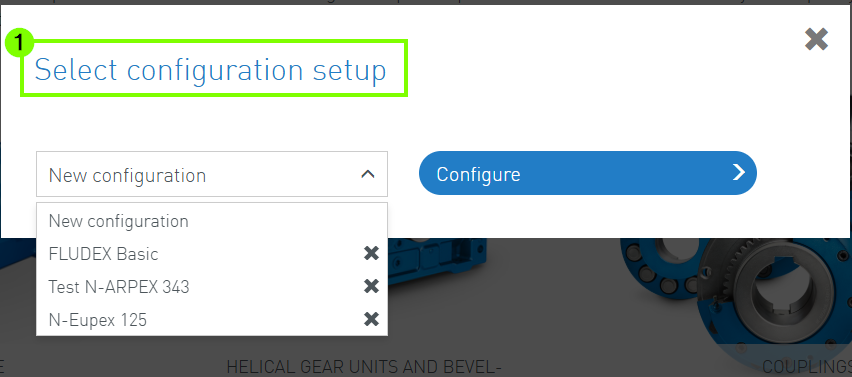
3. Acceso a variantes de configuración guardadas
Las configuraciones guardadas se pueden abrir mediante la selección directa para comenzar con la configuración guardada.
A través del menú desplegable se puede seleccionar la variante deseada (1) para luego pasar al configurador mediante “Configurar” (2).
4. Eliminar variantes de configuración
Si ya no se necesita una variante guardada, se puede eliminar fácilmente utilizando el icono “X” (1). Después, se requiere la confirmación de la eliminación (2).
Una variante puede eliminarse directamente al crear una nueva configuración (1) o al guardar una configuración (2).
My Projects es una función que permite recopilar una lista de productos sin tener que agregarlos directamente al carrito de compras.
Una gran ventaja de My Projects es que le permite colaborar eficientemente con sus compañeros.
Por defecto, los proyectos son visibles para todos sus compañeros. Usted tiene la opción de crear proyectos privados, que solo estarán accesibles para usted.
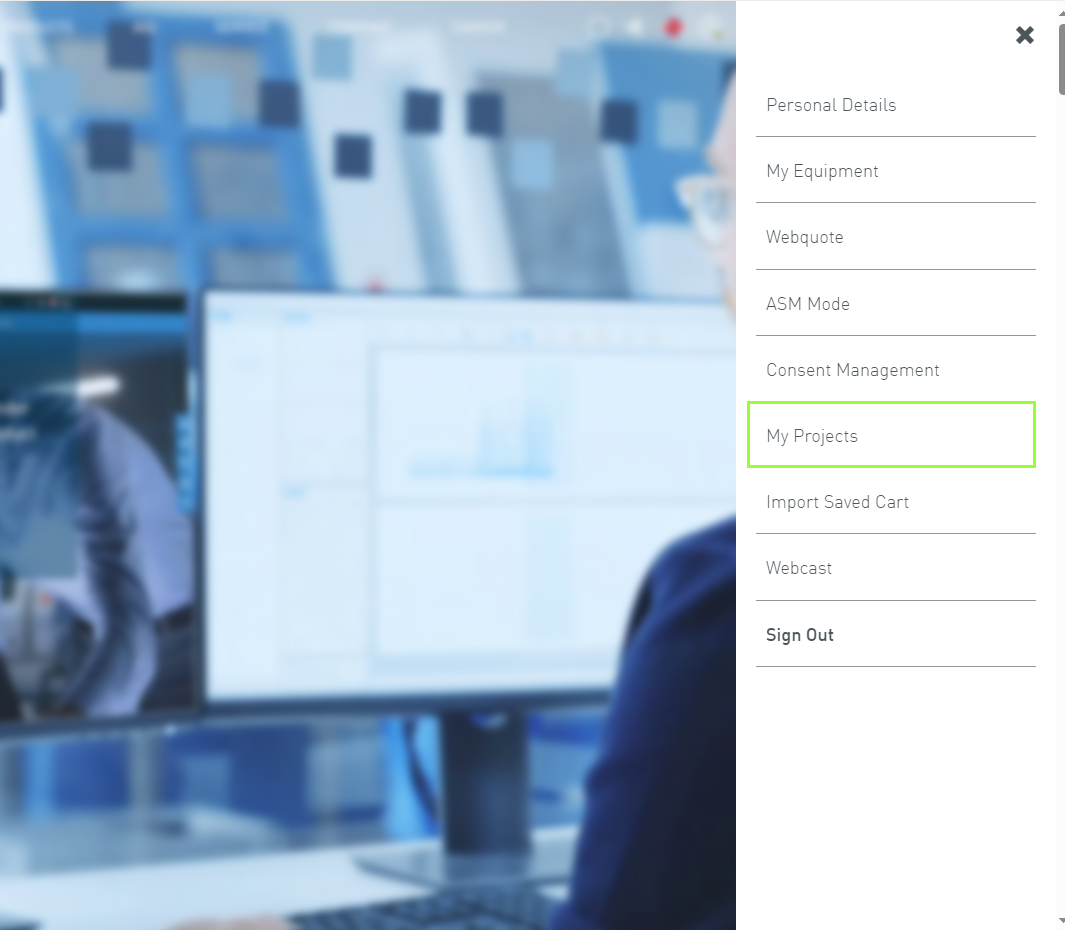
Para acceder a esta función, navegue hasta el menú "My Projects" después de hacer clic en el menú de usuario.
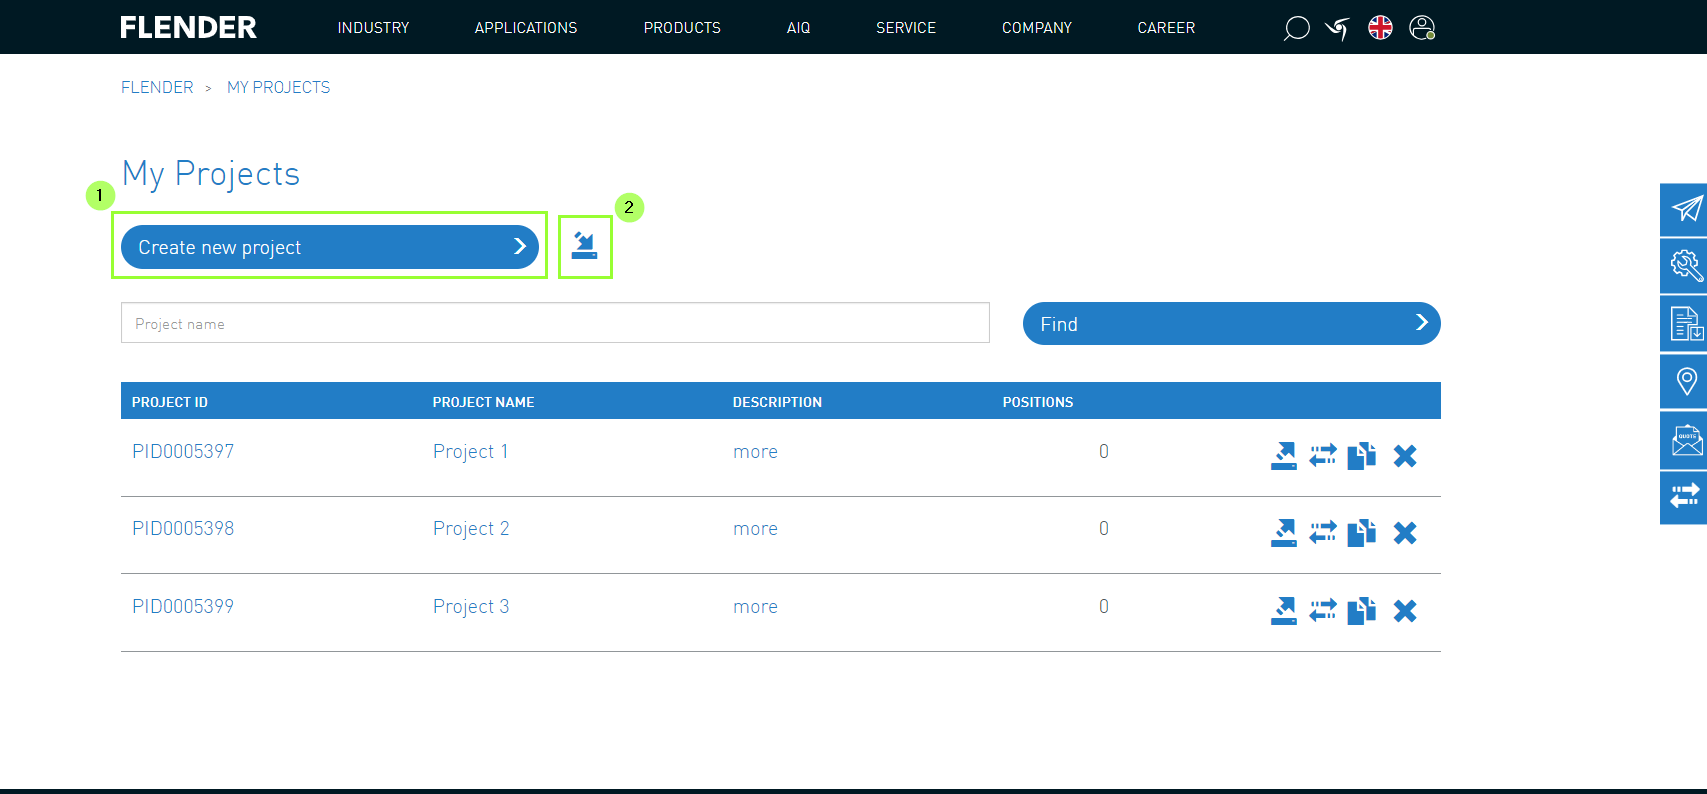
1. Creación de proyectos
Al crear un nuevo proyecto, hay dos opciones disponibles.
Creación manual (1)
Importación de proyectos ya existentes (archivo de texto con extensión CSV, XLS, XLSX) (2)
2. Añadir productos al proyecto
Procedimiento: Añadir productos al proyecto
Seleccionar/configurar producto Flender
Seleccionar proyecto (1)
Añadir producto al proyecto (2)
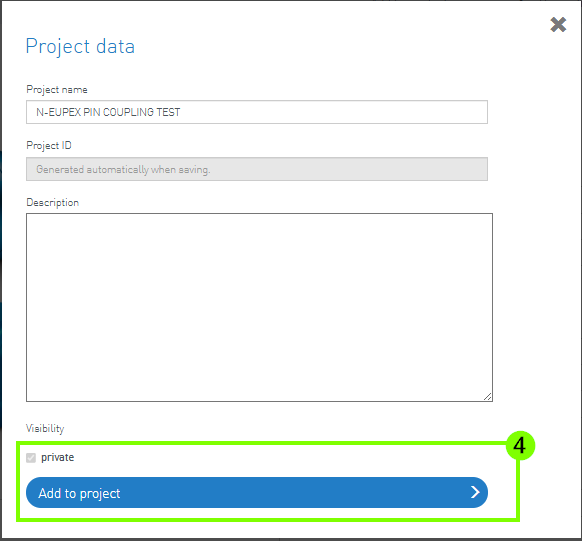
Alternativamente, se puede crear un nuevo proyecto desde la página de detalles del producto (3).
Para ello, introduzca los datos necesarios y guarde el proyecto. (4)
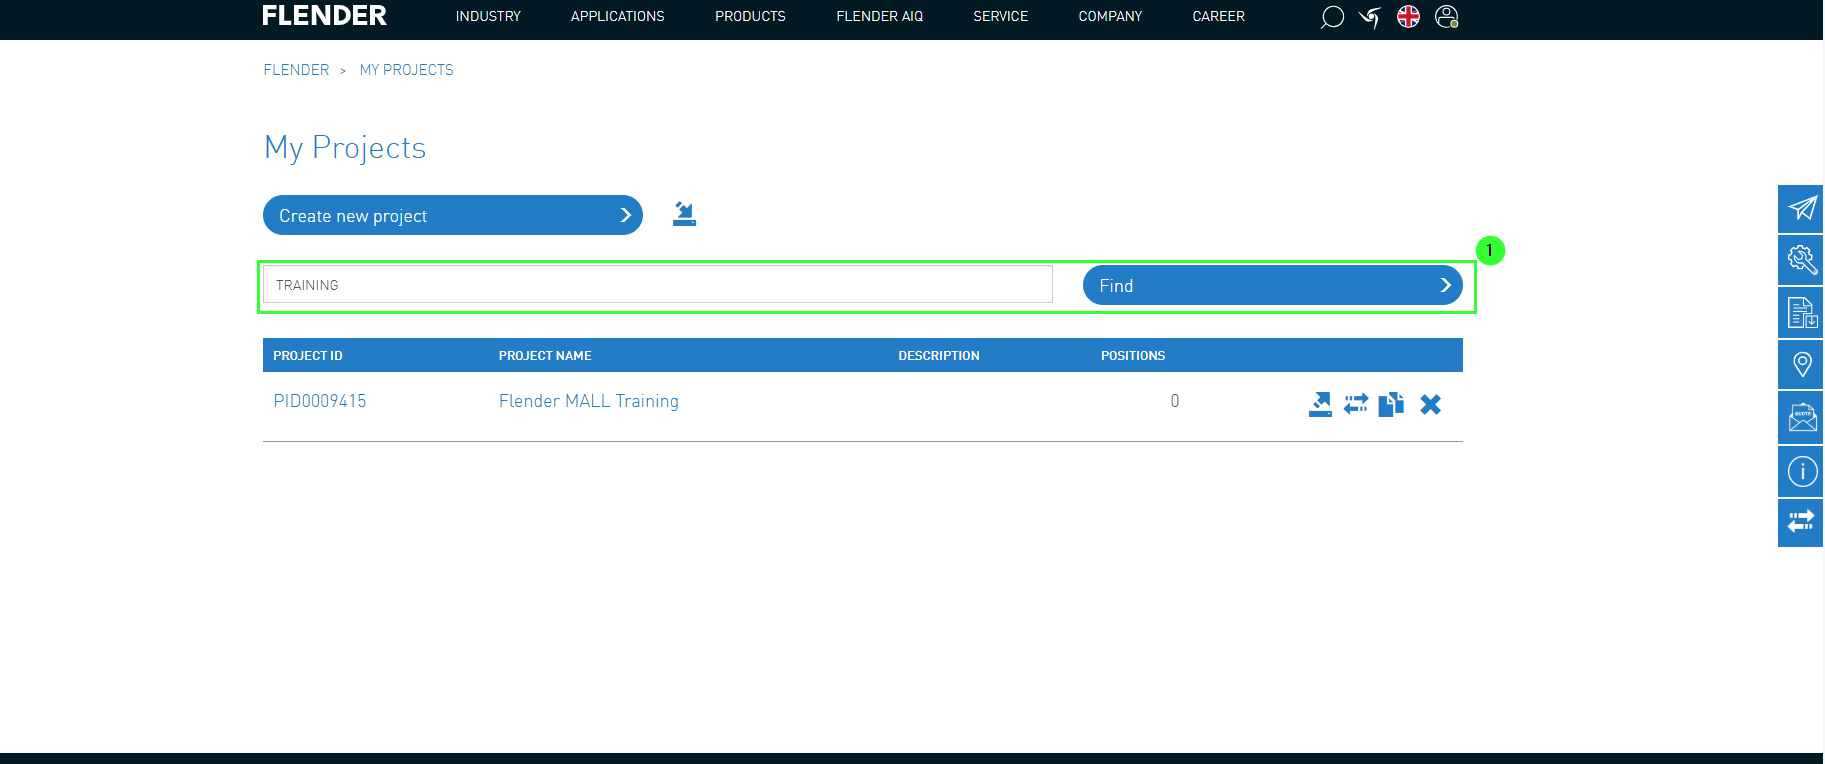
Los proyectos ya creados aparecen aquí (1) ordenados alfabéticamente y se pueden encontrar rápidamente mediante la función de búsqueda.
3. Contenido del proyecto
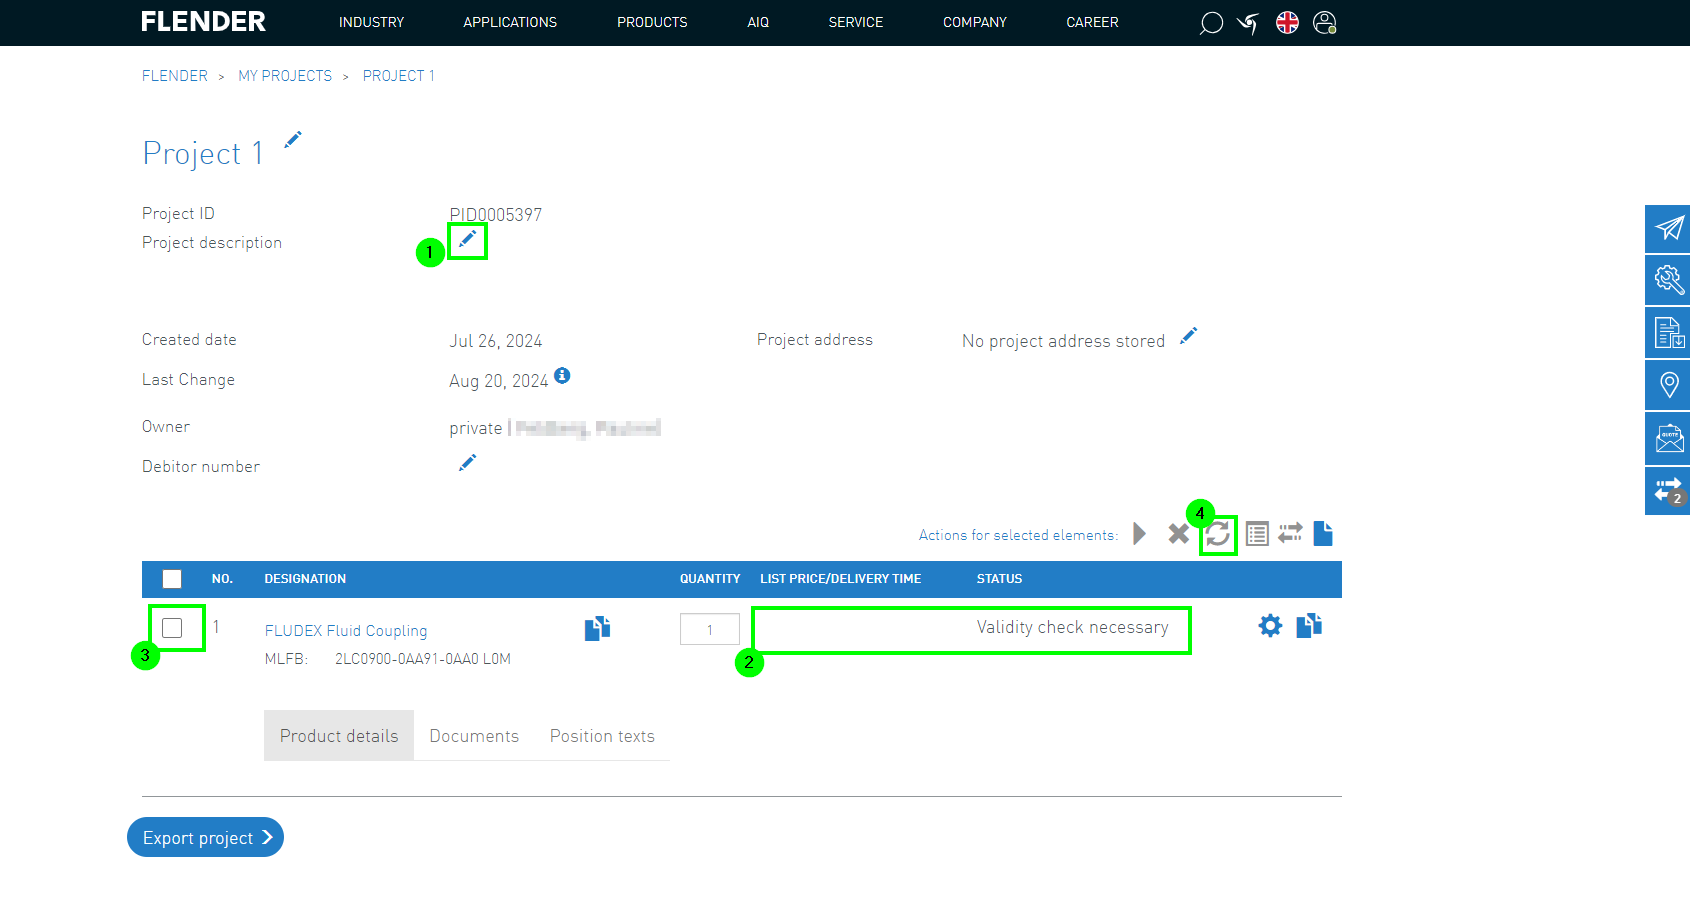
Al hacer clic en un proyecto dentro de la lista, se muestra su contenido y, si es necesario, se puede editar con el icono del lápiz (1). Sin embargo, es importante tener en cuenta que la configuración del producto debe validarse al abrir el proyecto. Por eso, es necesario comprobar el estado (2).
Para ello, deben seleccionarse las posiciones individuales del proyecto (3)
y luego actualizarse (4).
Además, se muestran los detalles de producto de cada posición.
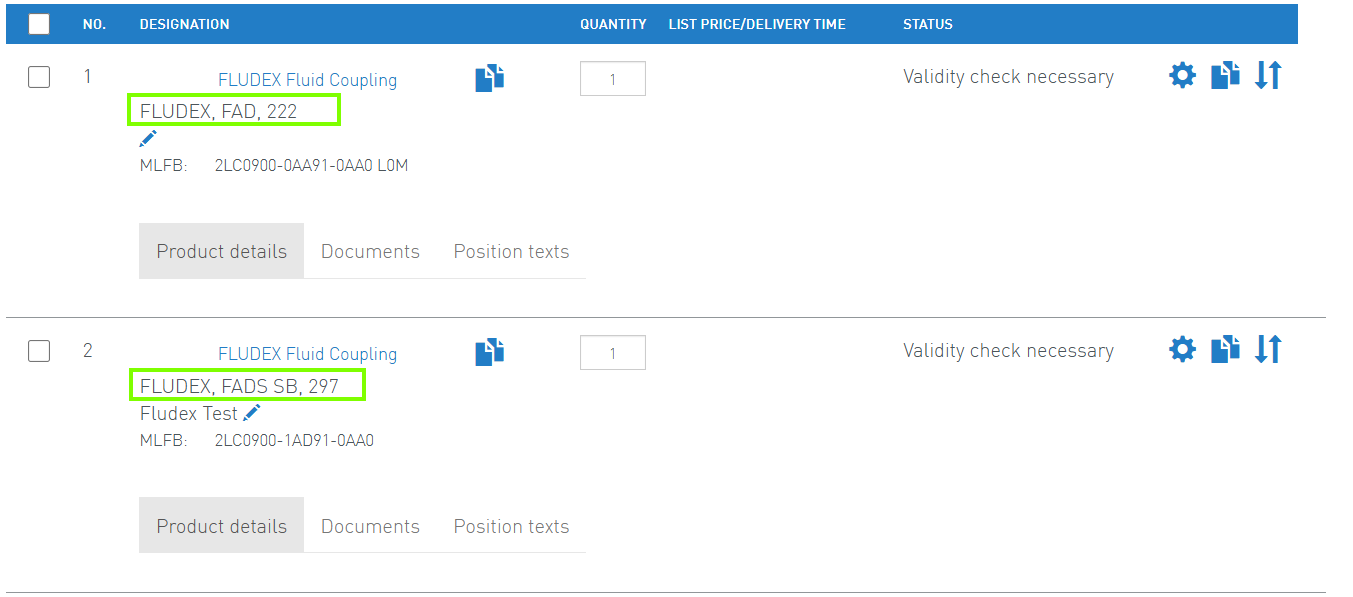
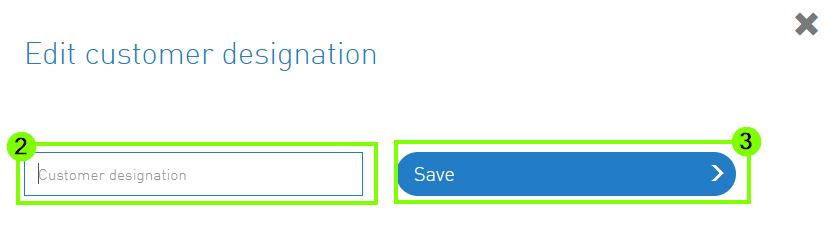
Además, se pueden añadir informaciones o denominaciones individuales o complementarias a los productos. Para ello, primero seleccione el icono del lápiz (1), escriba el texto deseado (2) y luego guarde (3).
4. Exportar proyecto
Después de crear un proyecto en Flender Mall, también existe la posibilidad de exportarlo.
Para ello, siga estos pasos:
(1) Haga clic en el botón "Exportar"
(2) Seleccione el formato deseado
(3) El archivo exportado estará disponible en Descargas
Otras funciones de My Projects son:
(4) Añadir a la comparación de productos
(5) Clonar proyectos
Una vez exportados los proyectos seleccionados, el archivo descargado estará disponible.
Un ejemplo de archivo XLS exportado se muestra en la imagen siguiente.
Aquí se indican los números MLFB o, en el caso de reductores FlenderOne, la ConfigID.
My Equipment le ofrece una plataforma integral para la gestión de sus productos Flender.
Aquí tiene algunas de las funciones principales que tiene a su disposición:
Gestión de productos Flender adquiridos
Consulta de datos de pedidos para equipos
Acceso a listas de repuestos
Agregar repuestos a MyProjects o al carrito de compras
Descarga de dibujos técnicos
Para poder utilizar las funciones de My Equipment, se requieren permisos de acceso específicos.
Si está interesado en usar "My Equipment" pero no encuentra esta opción en su menú de usuario,
no dude en contactarnos a través del formulario de contacto.
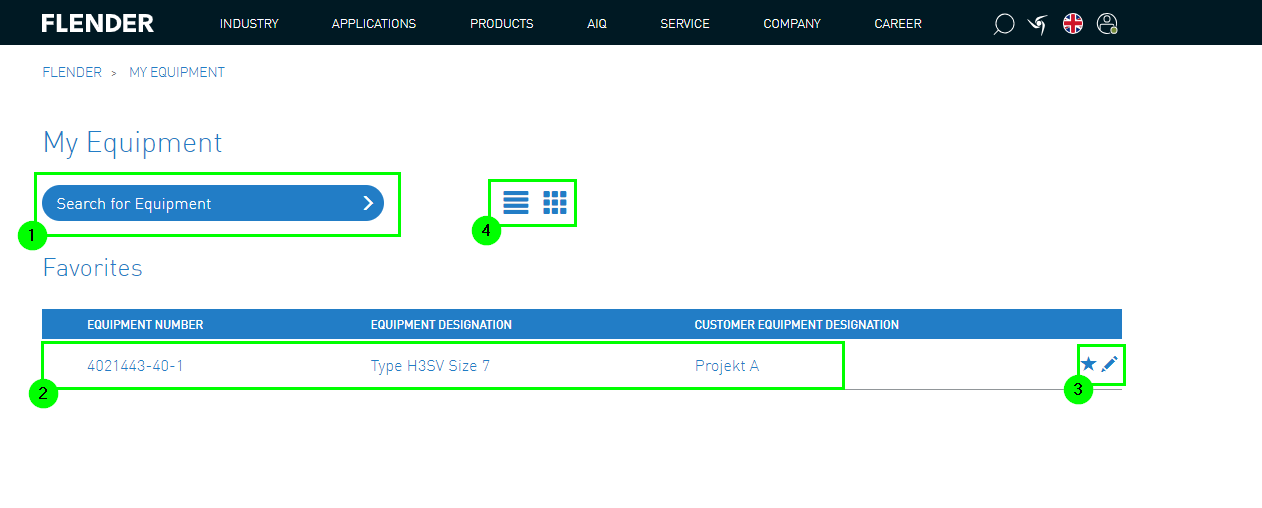
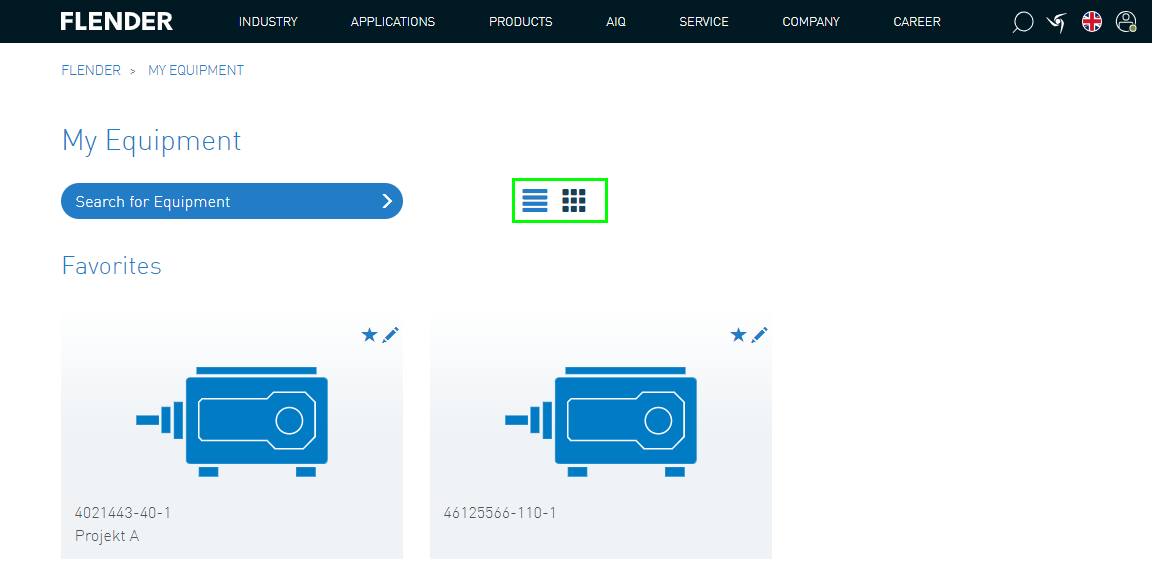
1. Lista de equipos
A través del menú de usuario "My Equipment" se accede a la lista de equipos.
Allí se pueden buscar los diferentes números de repuesto (1).
La lista de equipos mostrada contiene todos los números marcados como favoritos y la siguiente información (2):
Número de equipo
Nombre del equipo
Nombre del equipo del cliente
Se puede cambiar el nombre del equipo del cliente usando el icono del lápiz.
Además, quitando el icono de estrella, el equipo se elimina de favoritos (3)
Hay dos maneras de mostrar la lista de equipos (4).
Además de la vista de lista, los diferentes equipos también se pueden mostrar como mosaicos independientes:
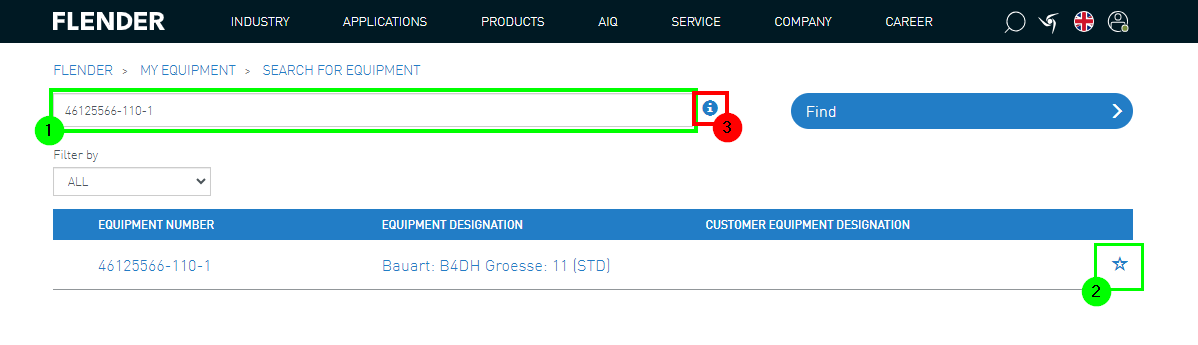
2. Búsqueda de equipos
En la barra de búsqueda puede ingresar el número de equipo correspondiente (1).
El equipo aparecerá en la lista, donde puede guardarlo como favorito en la lista de equipos usando el icono de estrella (2).
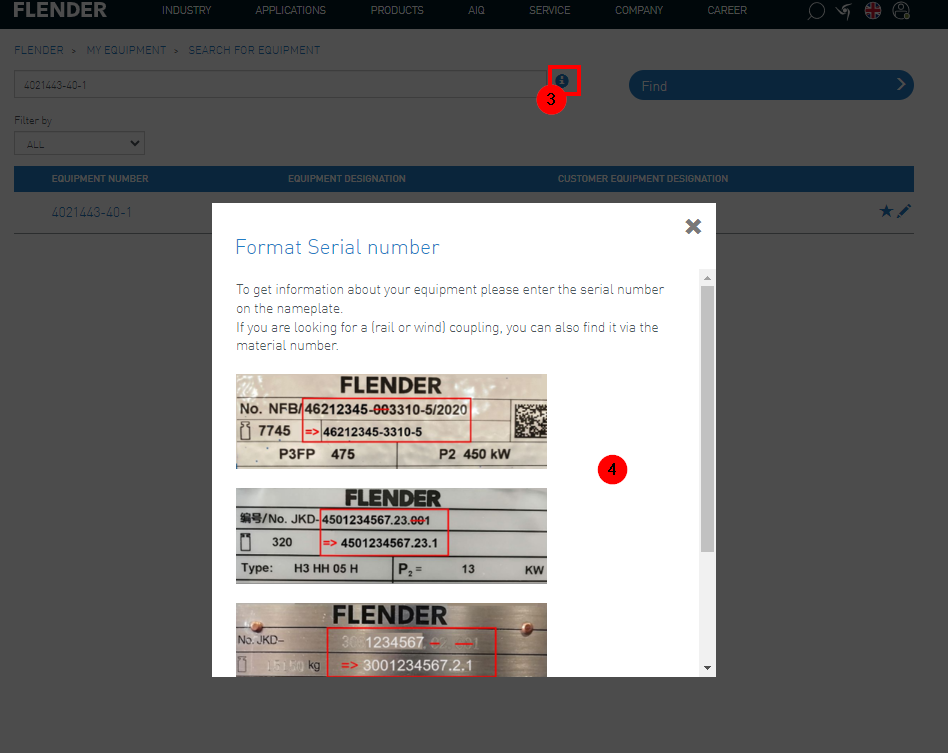
Para obtener más información puede hacer clic en el botón de información (3).
A continuación se le proporcionará información útil.
Al introducir el número de serie, se mostrarán todos los números de equipo (4).
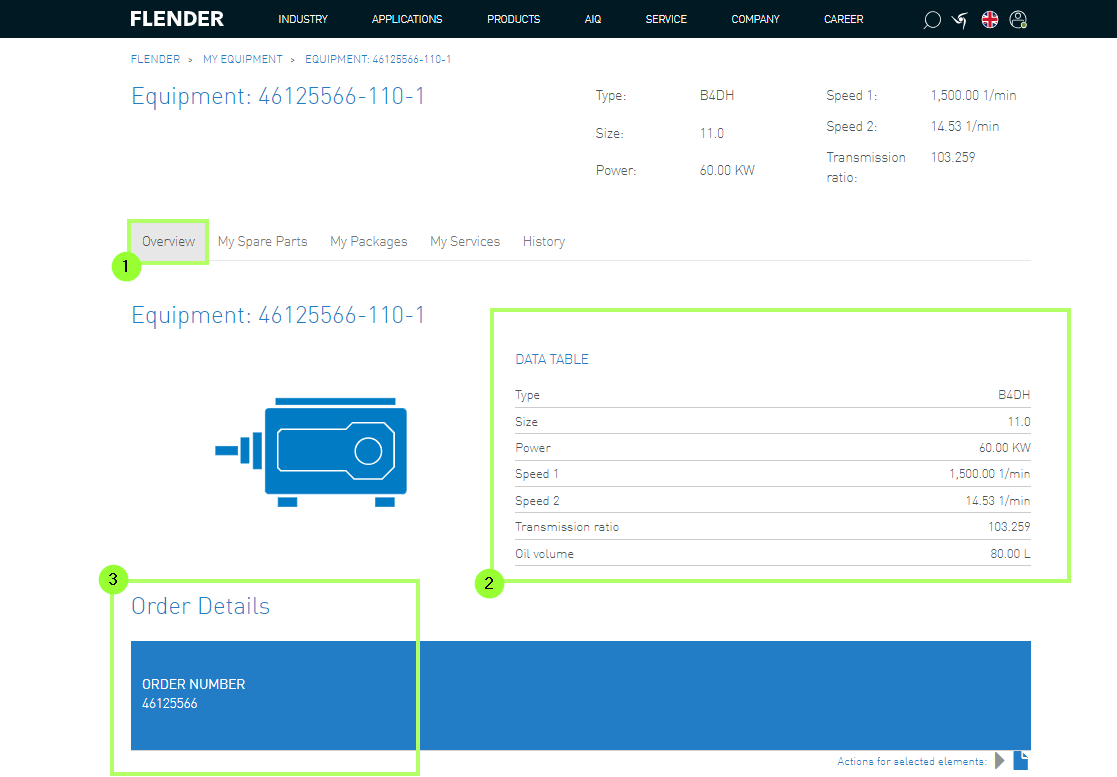
3. Detalles del equipo
Al hacer clic en el número de equipo en el resultado de búsqueda o en la barra de favoritos, se pueden consultar los detalles del pedido.
Los detalles se dividen en 3áreas de información:
3.1 Equipo - Resumen
En el resumen (1) se muestran los datos principales del producto (2).
Además, se muestran los detalles del pedido, como el número de pedido (3).
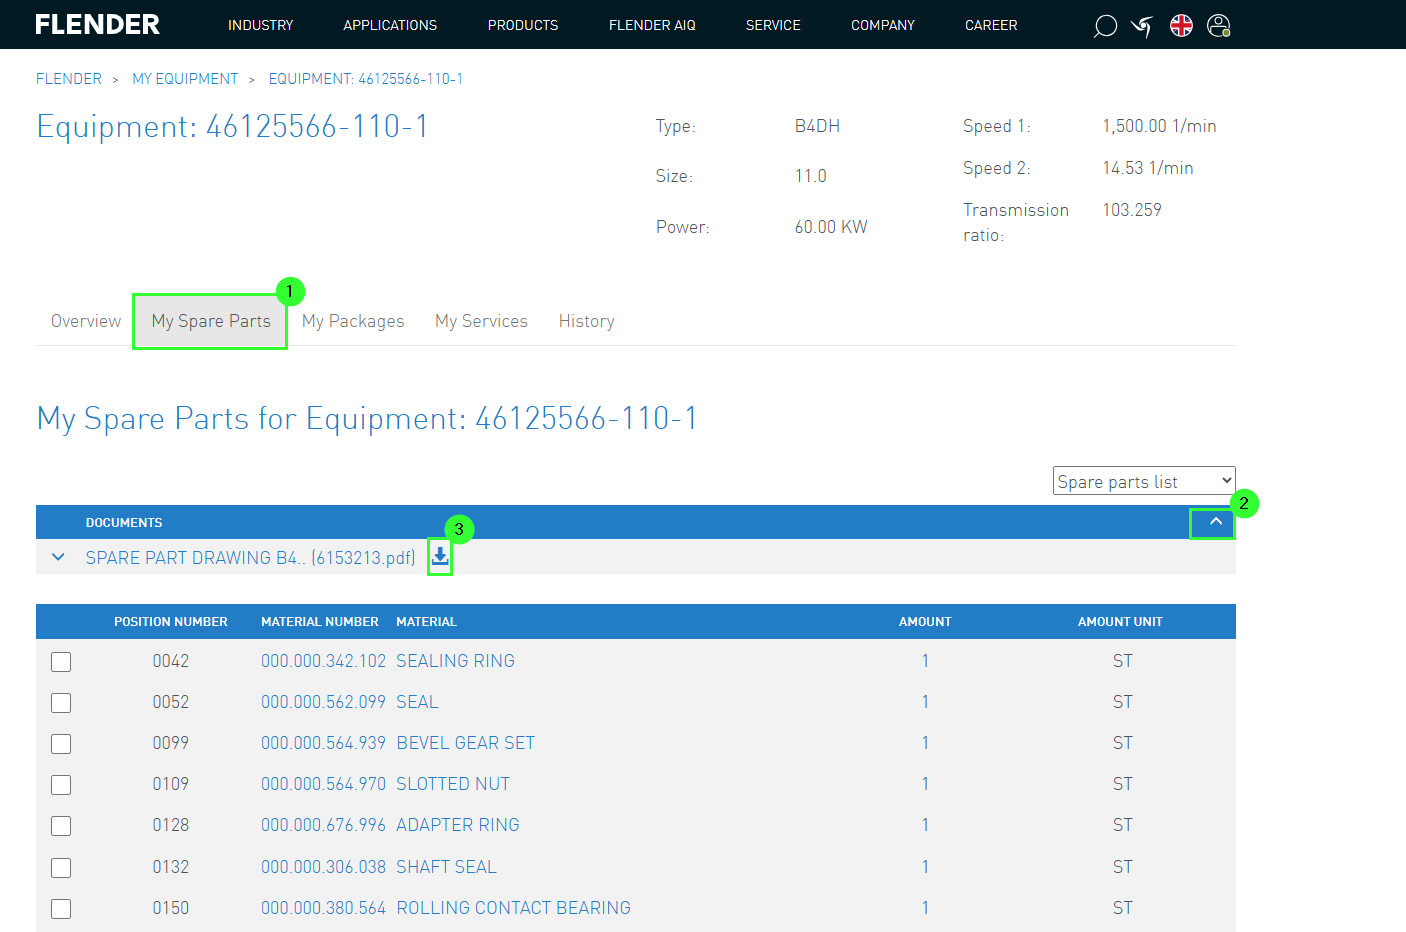
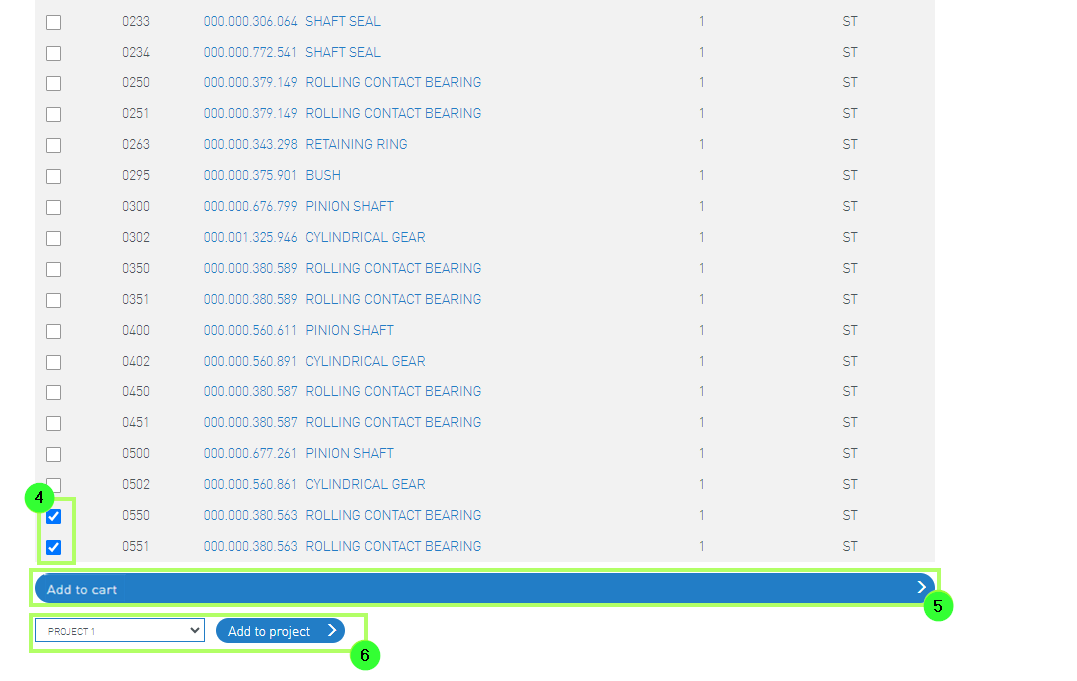
3.2. Equipo - Mis repuestos
Aquí se enumeran todos los repuestos del producto Flender (1).
Bajo la flecha (2) se pueden descargar los documentos de los repuestos (3)
Puede seleccionar las piezas deseadas (4) y agregarlas al carrito de compras (5) o a su proyecto seleccionado en "My Projects" (6).
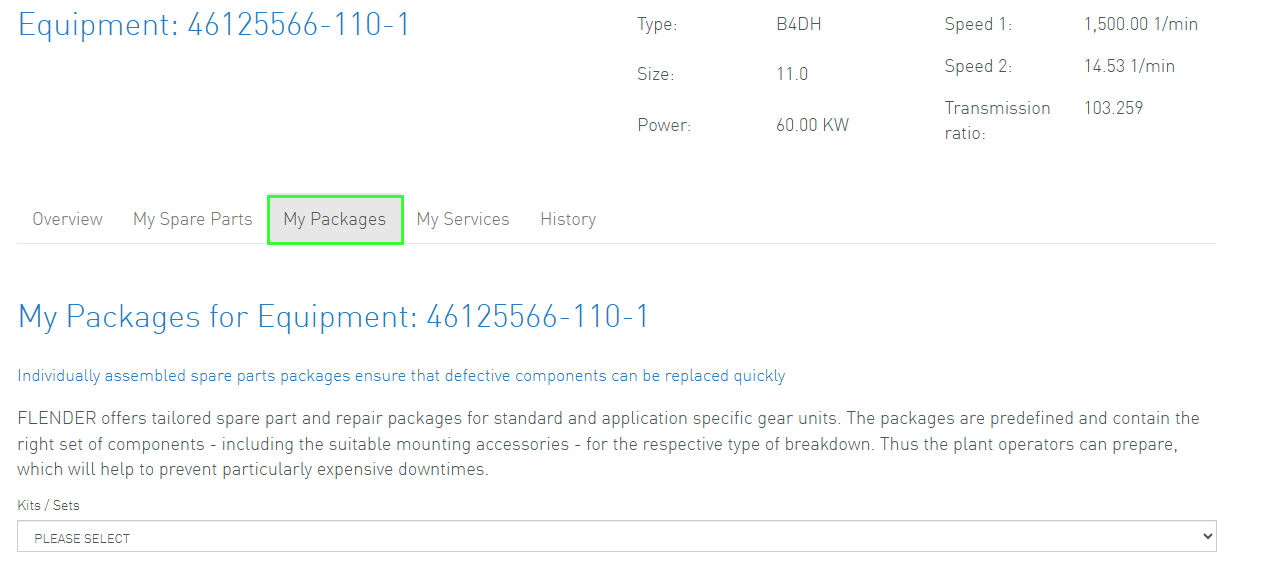
3.3. Equipo - Mis paquetes
A través de Mis paquetes, los clientes pueden pedir paquetes de reparación.
Los paquetes ofrecidos contienen los repuestos correspondientes para que los clientes puedan prepararse rápidamente
y facilitar el pedido de las piezas sometidas a mayor desgaste.
Aquí puede seleccionar los paquetes deseados (1) y
por ejemplo, agregarlos al carrito de compras (2).