We (Flender GmbH) and certain third parties use cookies on this website. The details regarding the types of cookies, their purpose and the third parties involved are described below and in our Cookie Notice. Please click on “Allow all and continue” to consent to our usage of cookies as described in the Cookie Notice in order to have the best possible experience on our websites. You can also set your preferences or reject cookies (except for strictly necessary cookies).
Cookie Notice and further details
Registration for new users includes verifying the email address, creating a password, setting up multi-factor authentication (MFA), and entering all required information.
A step-by-step guide can be found under the “Login” feature.
Repeated incorrect password entries are a common cause for account lockouts in the Flender Mall. This lockout can be lifted by the E-Business team in our management system.
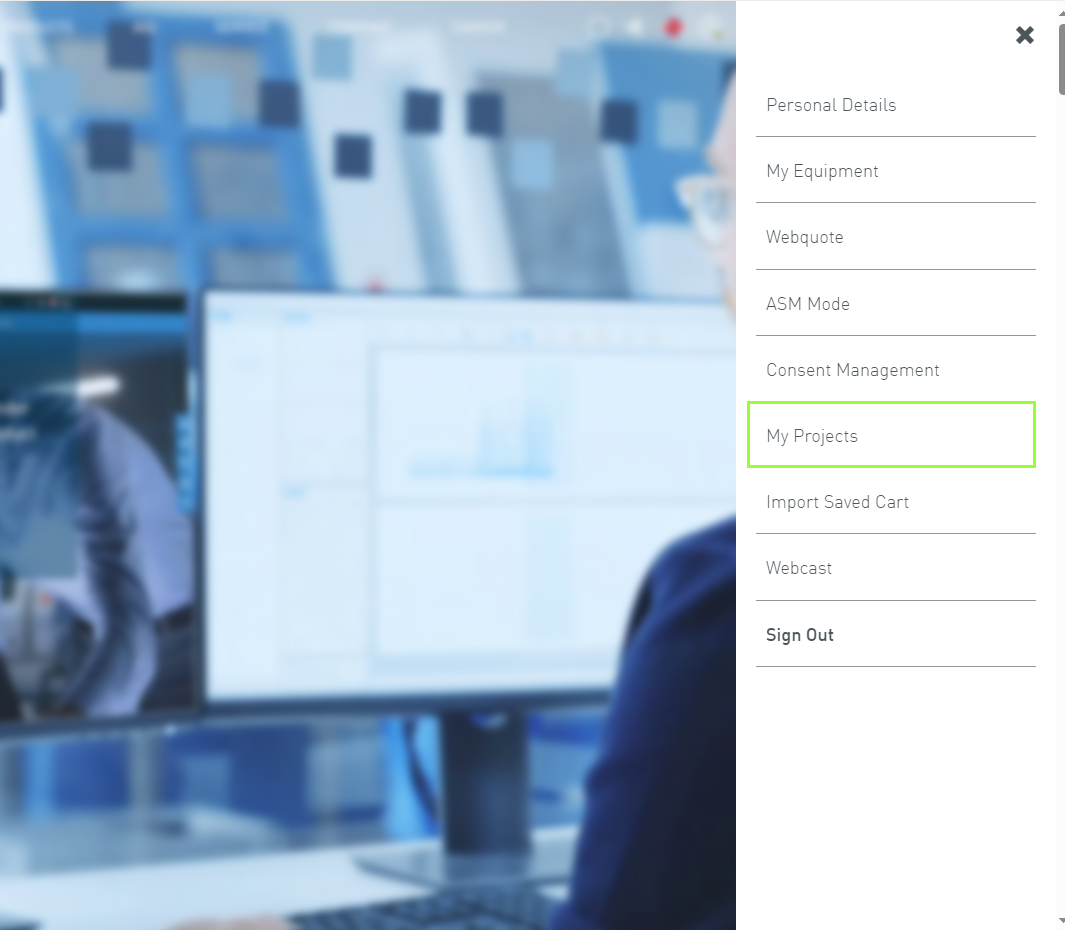
After logging in, the user menu is located at the top right of the website. To access it, click on the "Person Icon"
The color of the dot in the lower right corner indicates the user's login status. A green dot signals a successful login, while a red dot indicates that no login has occurred yet.
Depending on the access permissions, different functions can be accessed here.
Is it still unclear which Flender product is the right one?
By entering various requirements, you can view and compare different solution options.
Based on the requirements of the working machine (gear unit configuration) or the performance data and dimensions (coupling configurator), a customized solution is designed.
If you need a solution that perfectly fits your requirements, then Configuration is recommended.
Registration for the Flender Mall is carried out via multi-factor
authentication (MFA). Three procedures are distinguished:
1. Self-registration process
The following steps must be completed for self-registration.
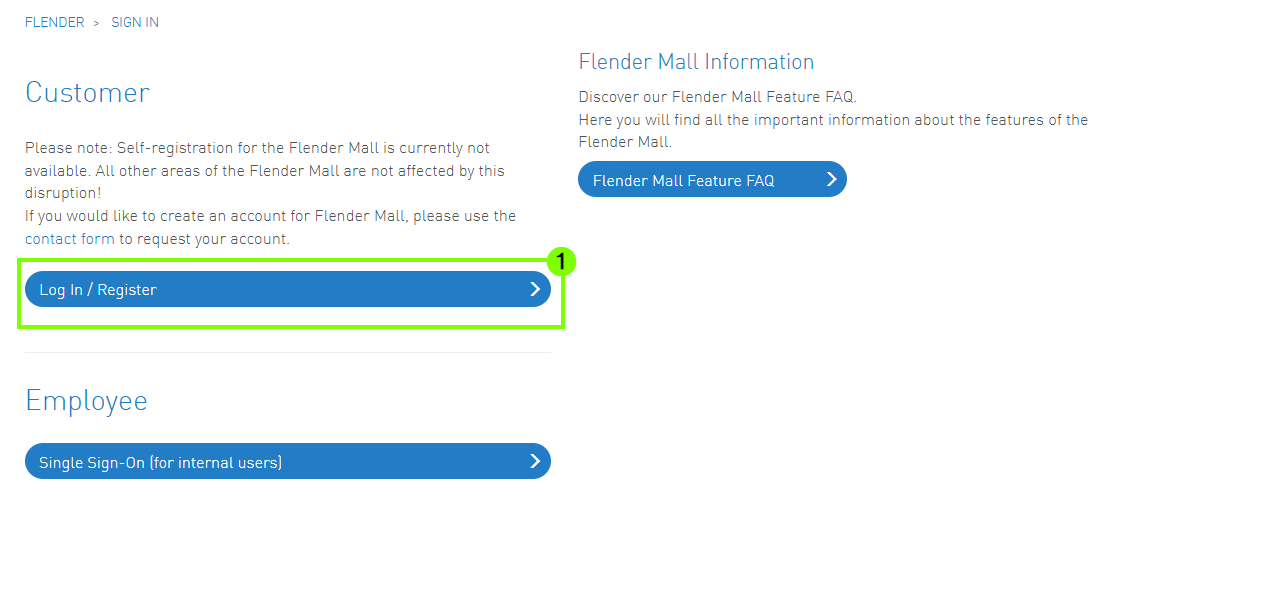
1. Open the login page Flender Mall - LogIn and select the option Login | Flender(1).
2. Then, within the login window, click on “Sign Up”
(2) to register for the Flender Mall as a new user.
3. In the next step, enter your email address
(3) and click on Continue (4).
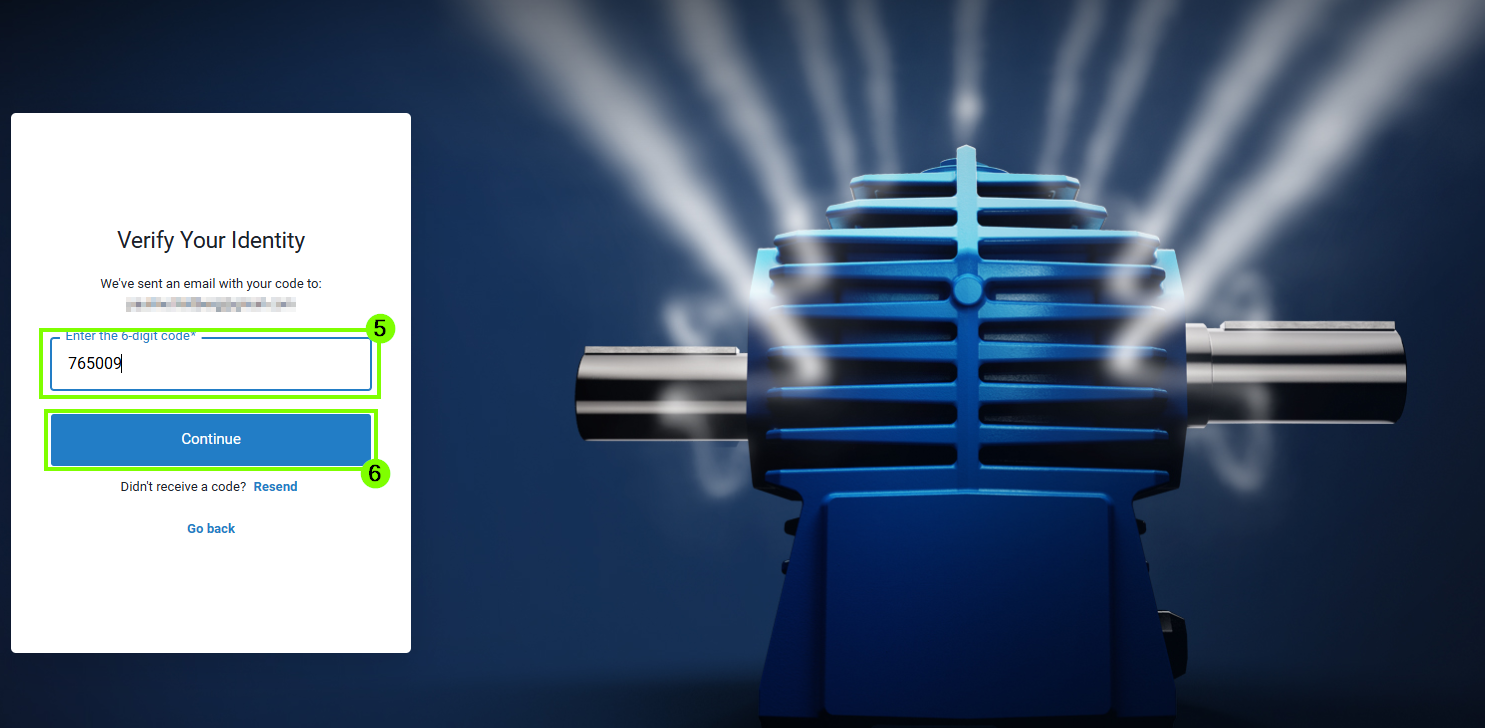
4. You will then receive an authentication code by email. Enter the
6-digit code in the designated field (5) and select
Continue (6).
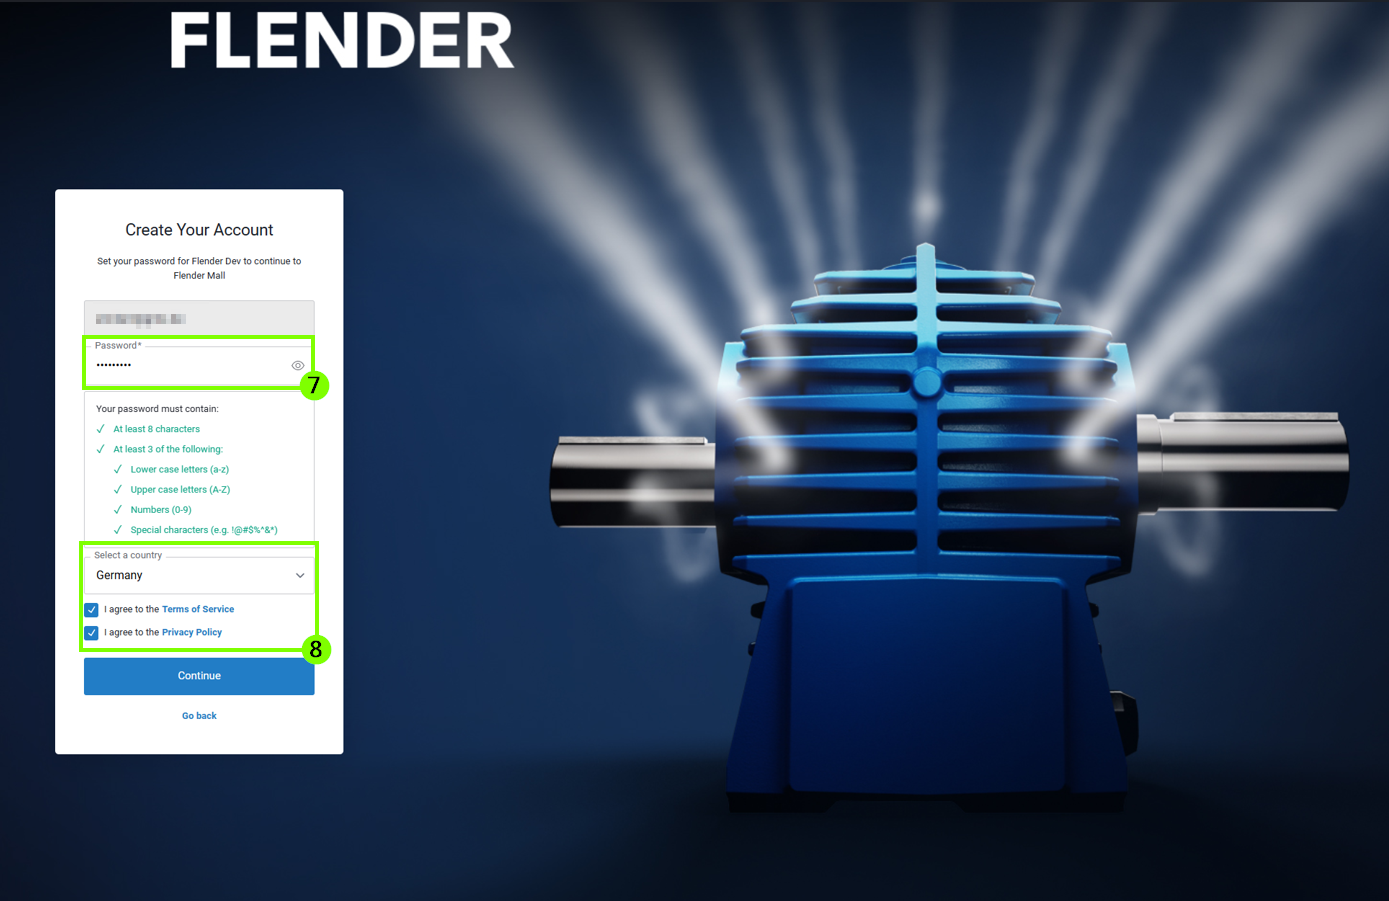
5. Afterwards, set a personal password (7). To
continue the process, the terms of service must be accepted
(8).
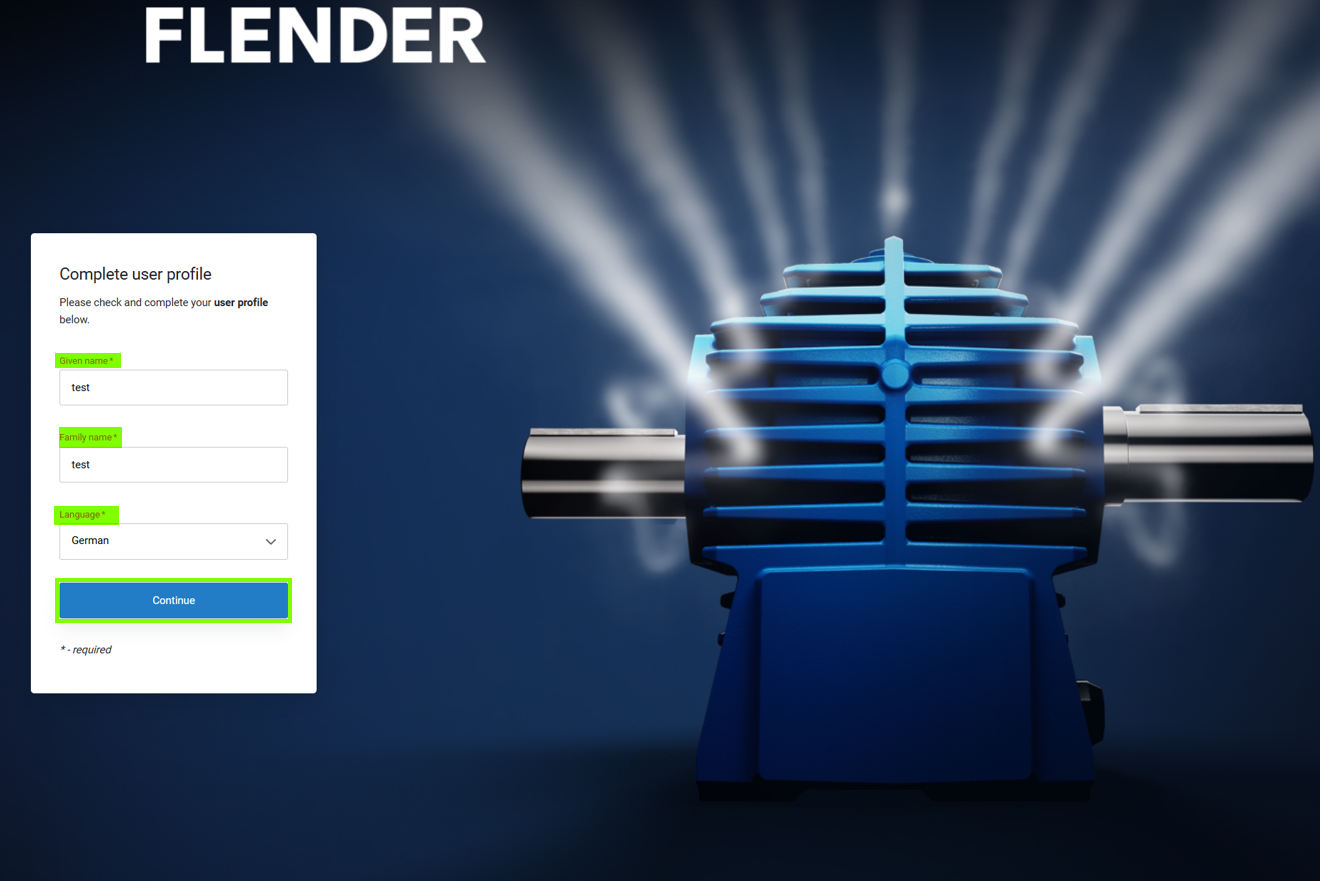
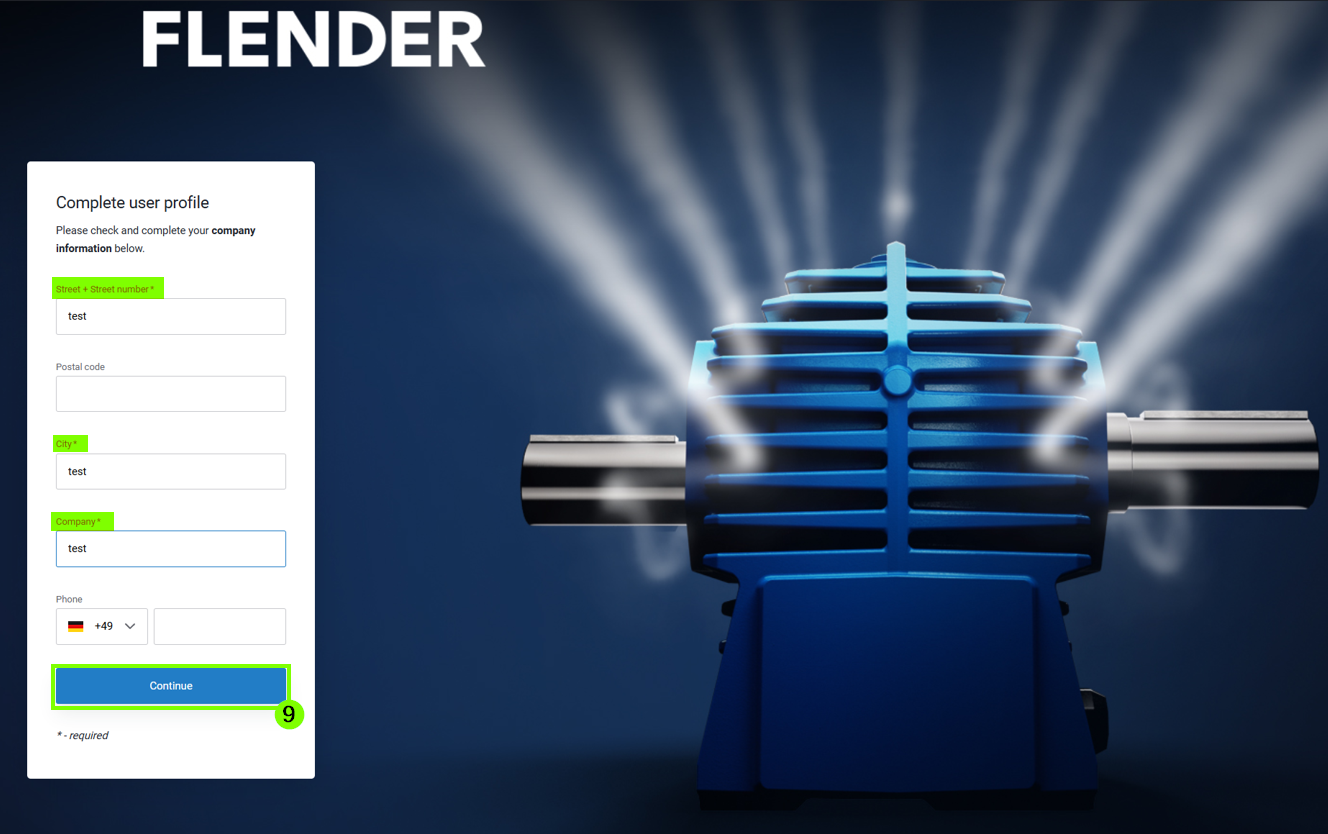
6.In the next step, you need to
complete your personal details. All mandatory fields marked with an
asterisk (*) must be filled in to proceed to the next step
(9).
7. There are various authentication options (10). For example, authentication can be performed using
fingerprint, facial recognition, or PIN. It is also
possible to use an authenticator app or a security key.
Further information can be found in Chapter 5 under "Instructions for authenticator App." In the following example, an authenticator app was
used.
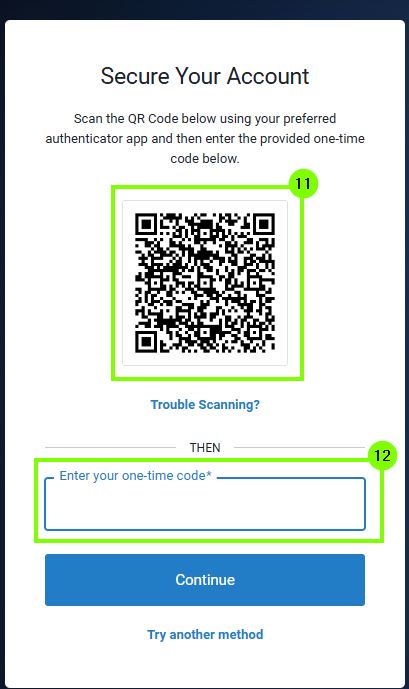
8.After selecting the authentication app, a QR code
(11) will appear, which must be scanned with the
app. The app will then display a code that can be entered
into the corresponding input field (12).
9. After entering the one-time code, the self-registration is
complete and the FlenderMall can be used. It should be noted
that the authentication remains stored for future logins and the option
should not be deleted.
2. Log in after successful registration
1. To do this, first open the login page Login | Flender
and select Customer Log-In (1).
2.Authentication then takes
place using the stored authentication option. In the
example shown, an authenticator app was used for authentication
(2). Now, the one-time password from the
stored authenticator app must be entered into the corresponding
field.
3. The authentication data can optionally be stored for 30 days
(3).
To complete the login, select "Continue" and use the FlenderMall.
3. Log in for existing Flender Mall customers
After the login procedure has been updated, the following steps are
required to log in for the first time with your existing Flender Mall
account.
First, open the Flender Mall login page. This can be done either by
clicking on the person icon or directly via the website.
Login | Flender.
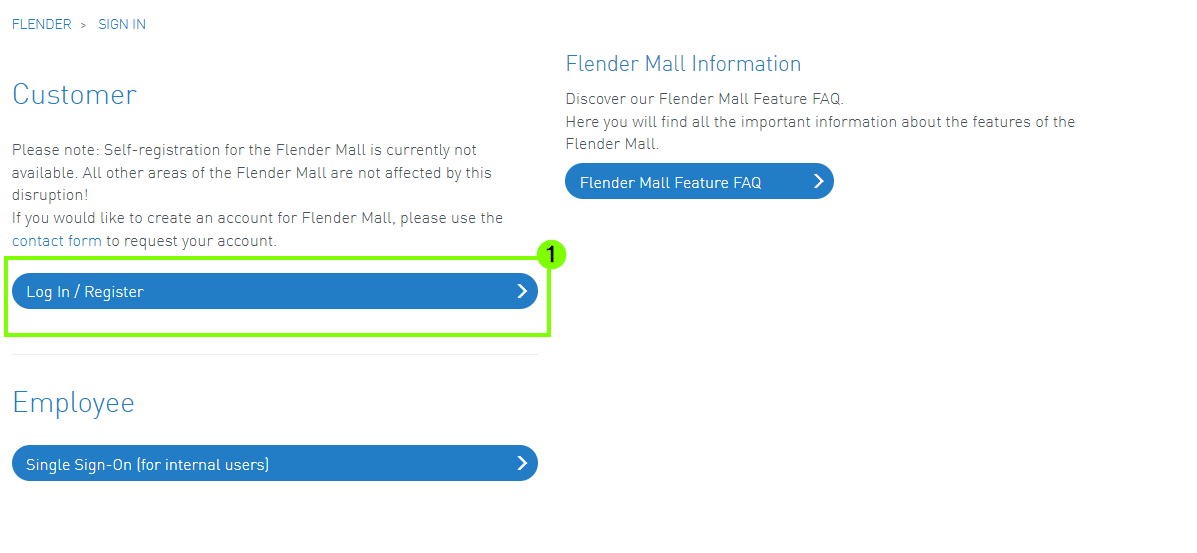
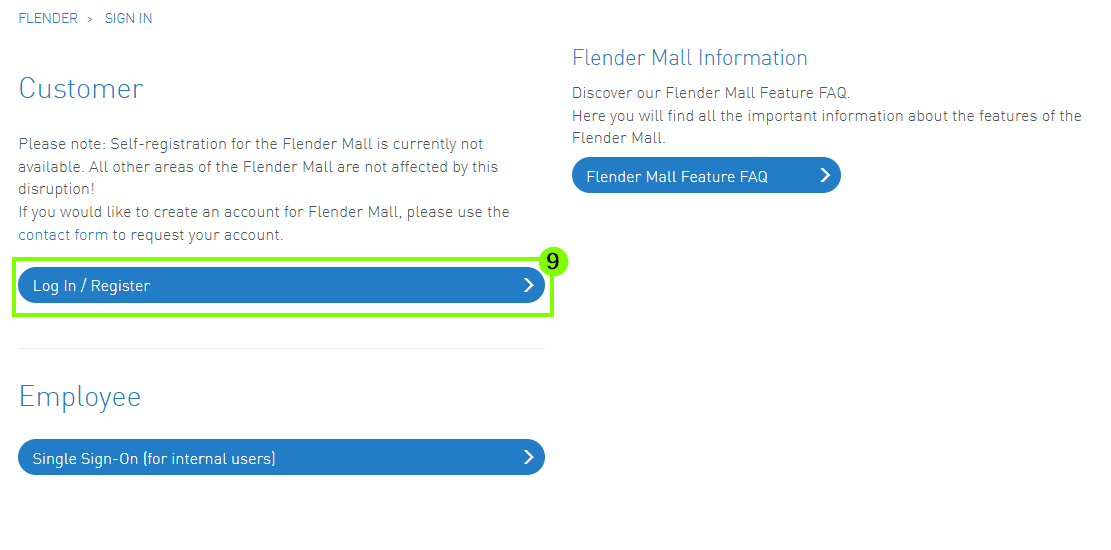
1. On the login page, first select the option “Log In / Register”
(1).
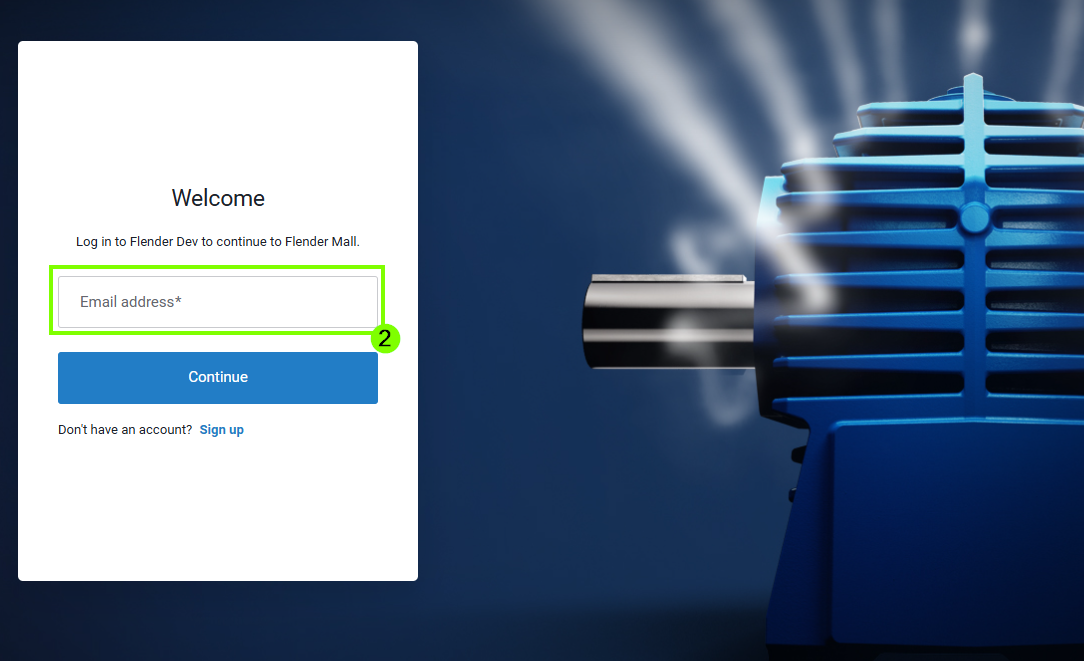
2. Next, in the login window, enter the email address registered with
Flender Mall (2).
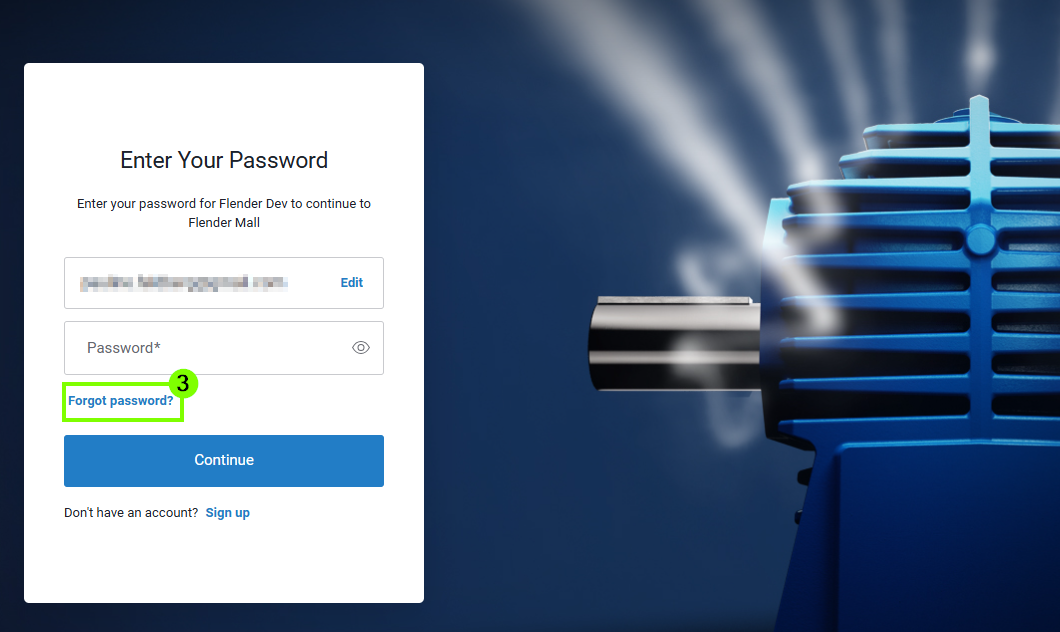
3. Due to technical changes, it is necessary to reset your password
during your first login. To do this, click on “Forgot password”
(3).
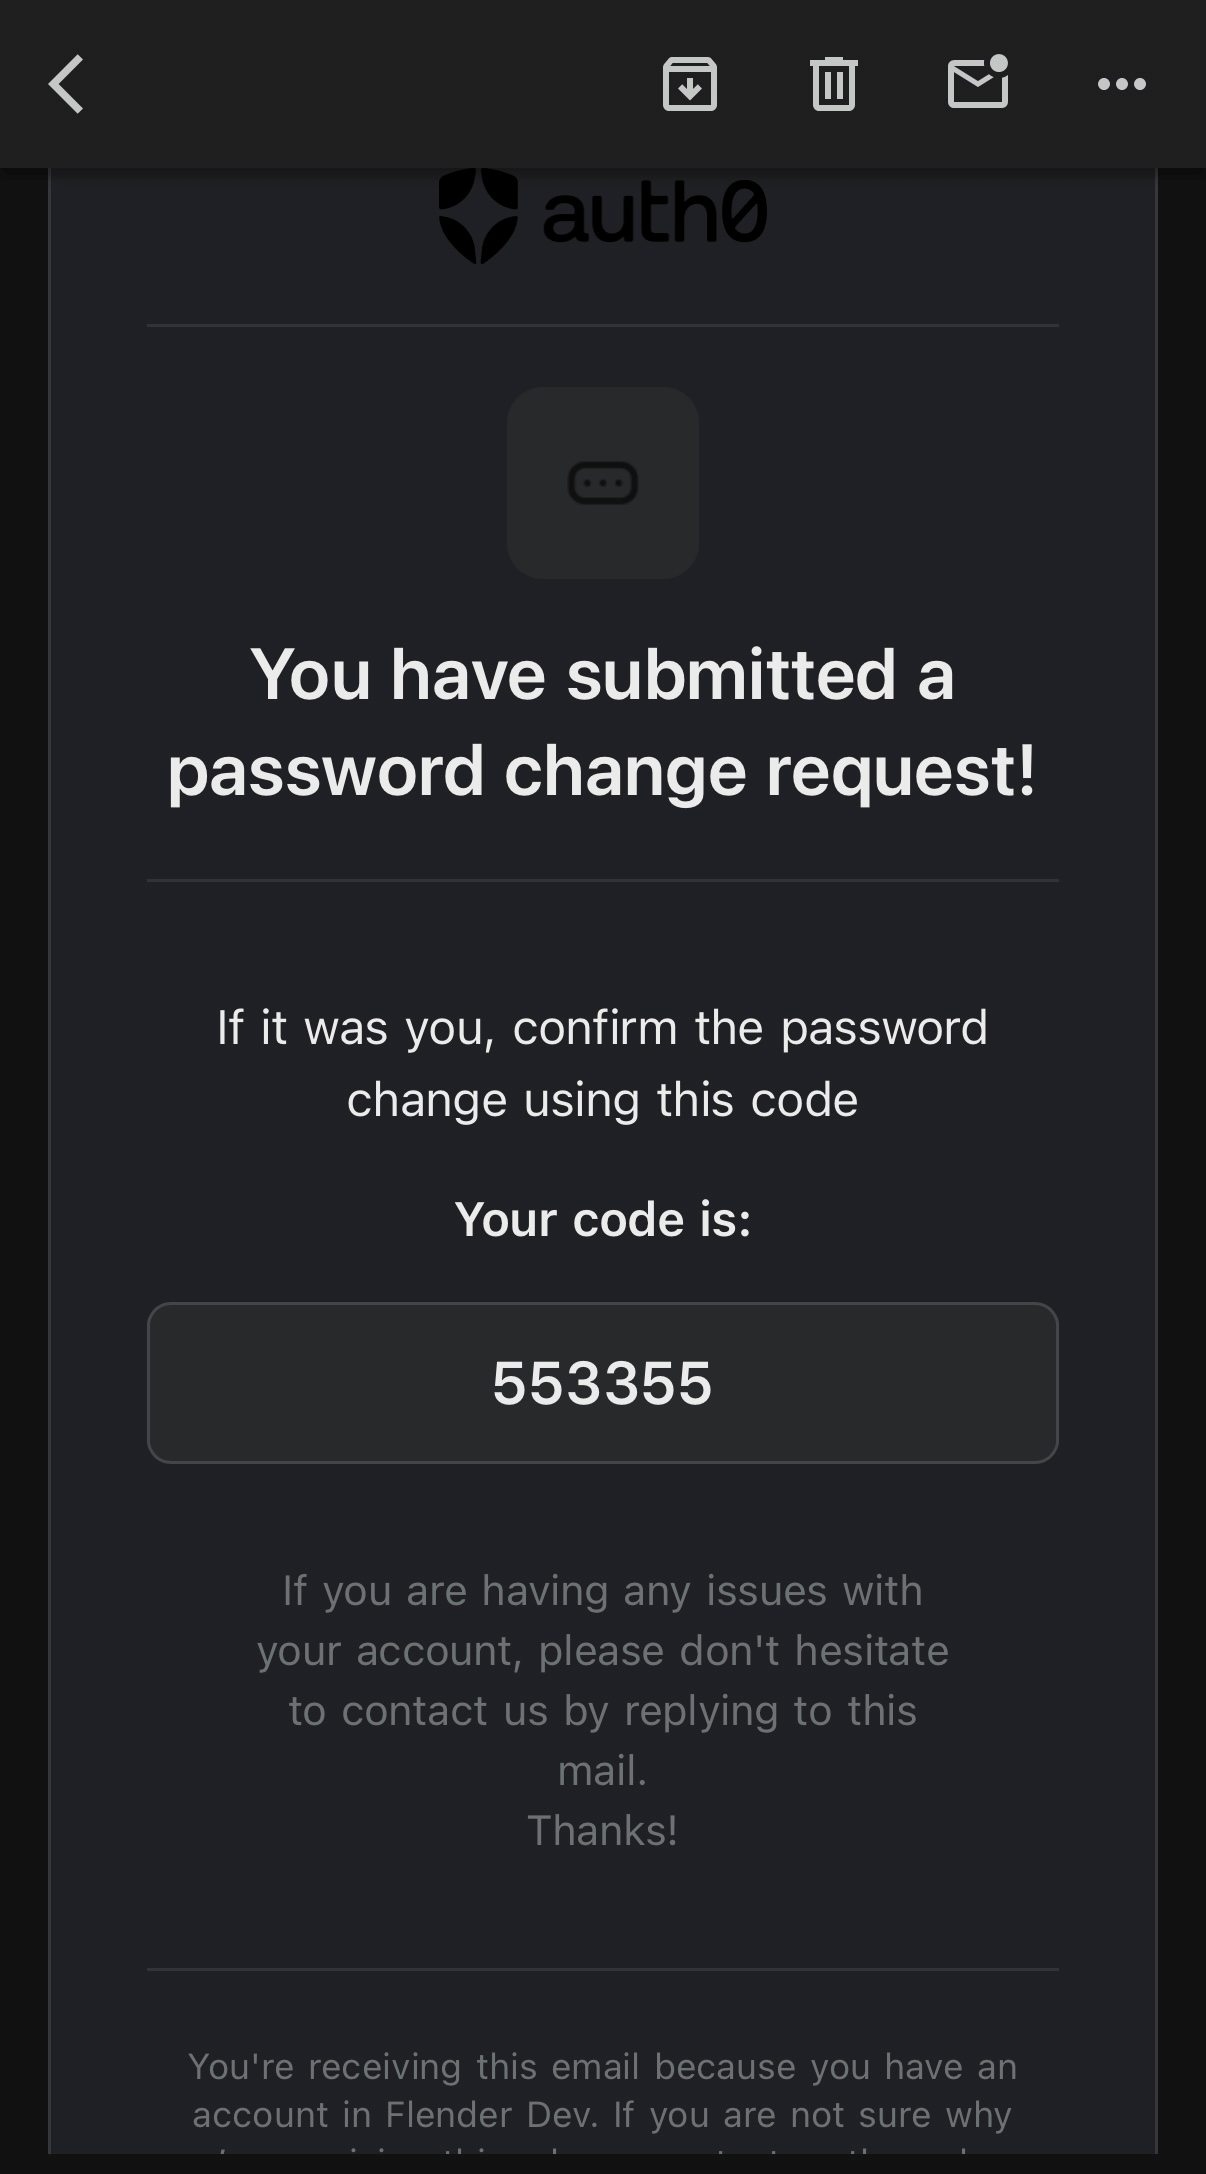
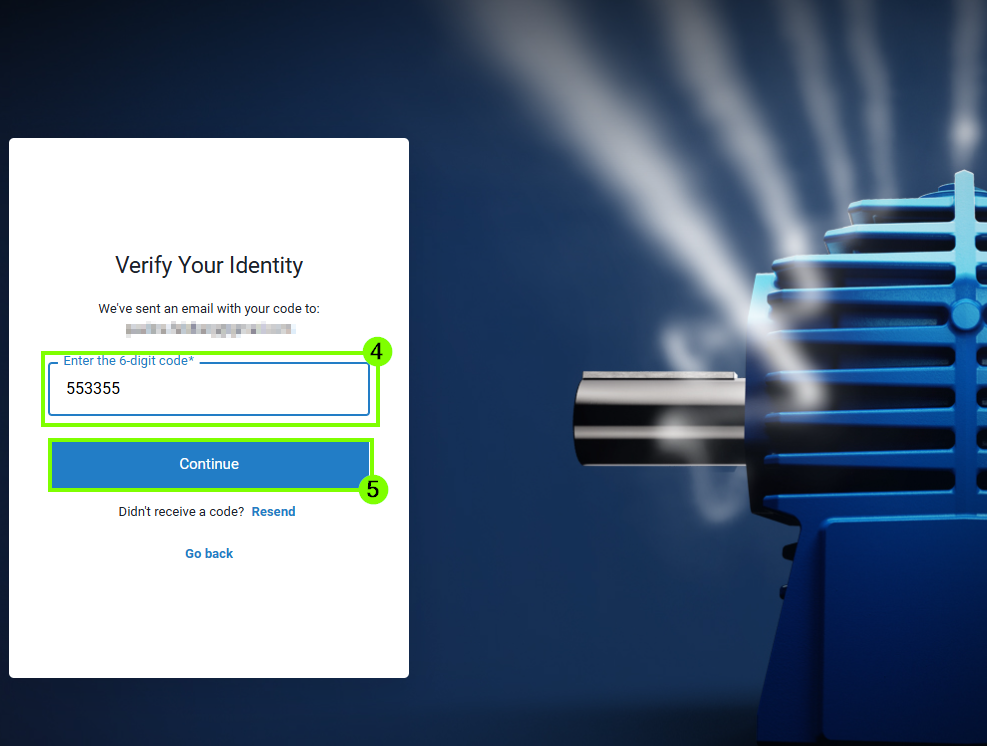
4. A verification code will then be sent to your registered email
address. Enter this 6-digit code in the designated field
(4) and then click “Continue”
(5).
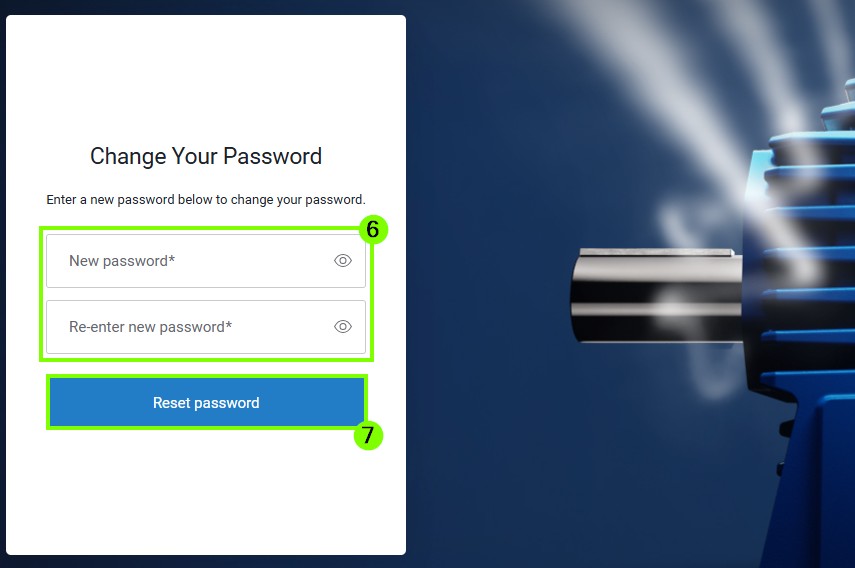
5. In the next step, create a new password and enter it again to
confirm
(6). Then click “Continue” (7) to complete
the process. Please make sure to follow the applicable
password guidelines when choosing your password.
6. The password has been set successfully. In the next step, you will
be automatically redirected back to the Flender Mall
(8).
7. To use the functions of the Flender Mall and complete the login
process, open the login page again and select the option “Log In /
Register”
(9).
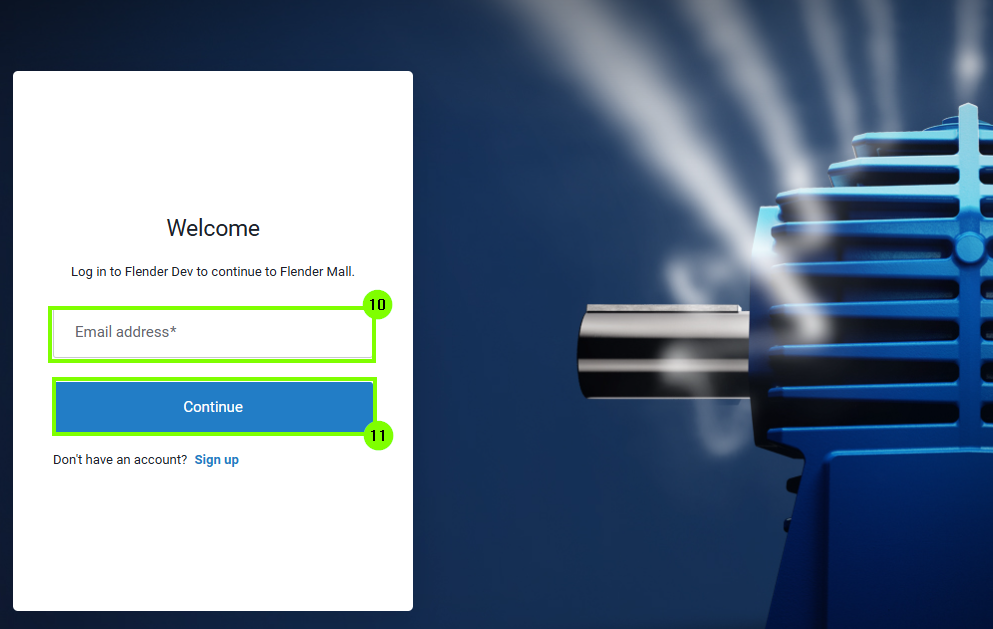
8. In the next step, enter your email address
(10) and click on “Continue”
(11).
9. Next, enter the password you created earlier
(12) and click on “Continue” (13) to
proceed to the next step.
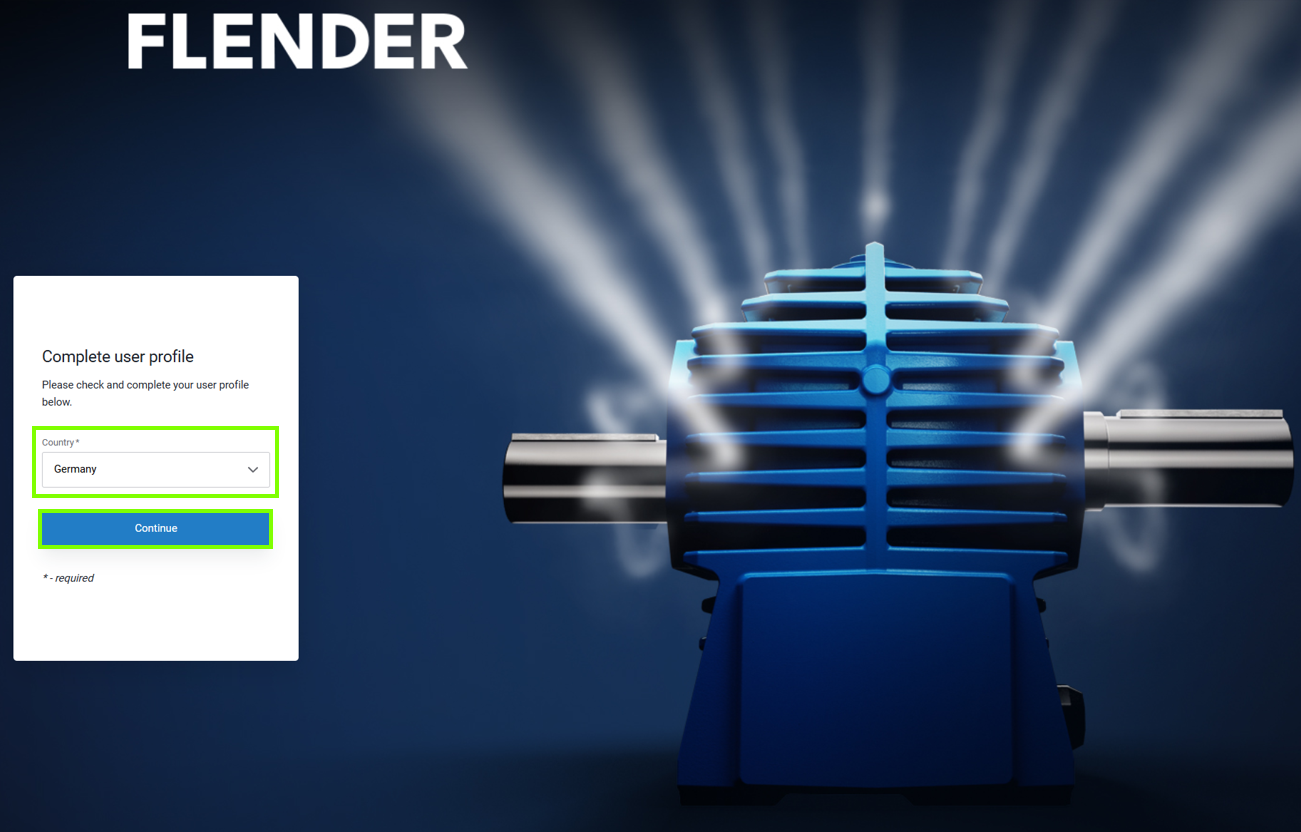
10. In the next step, enter your personal information and accept the
terms of use. All mandatory fields marked with an asterisk
(*) must be filled in to proceed to the next step by clicking "Continue"
(14).
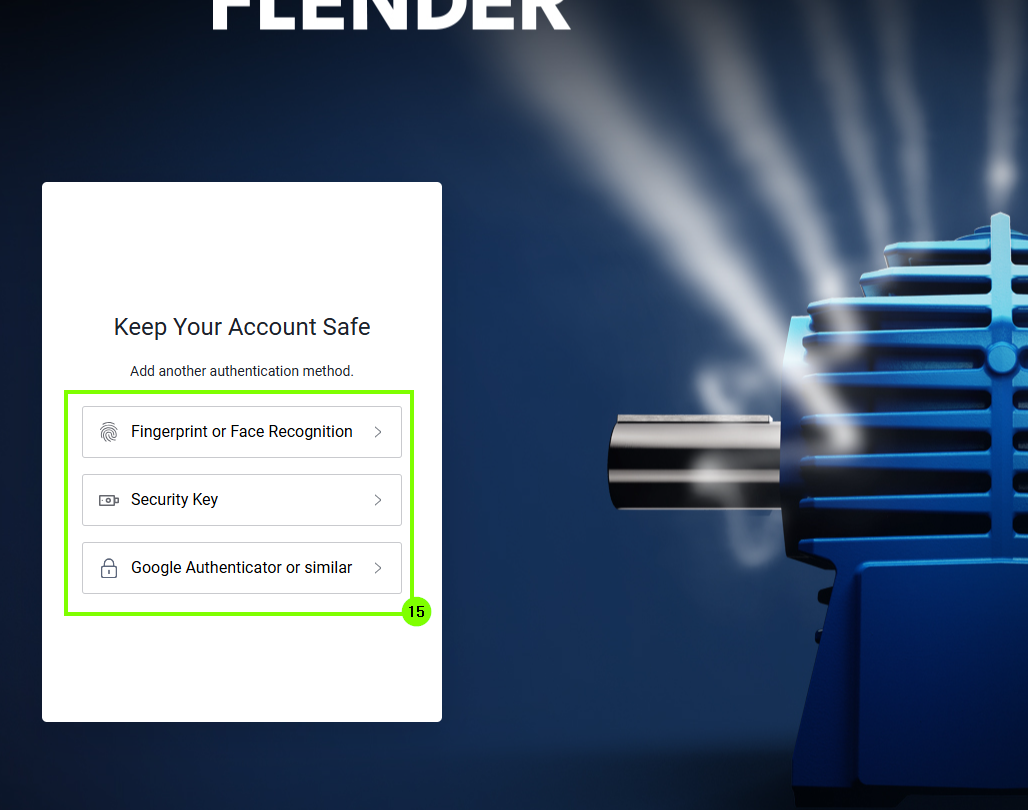
11. Now, select an authentication option (15). In
the example shown, authentication via app was chosen.
Further information can be found in Chapter 5 under "
Instructions for authenticator App."
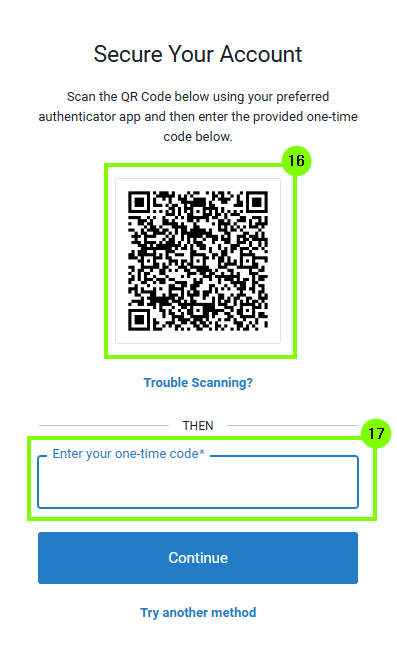
12. If you select the authentication app, a QR code
(16) will be displayed, which must be scanned with the
app. Then, enter the code generated by the app into the
corresponding input field (17).
13. After entering the one-time password, the FlenderMall can be used
with the existing permissions.
4. Access permissions
Users of the Flender Mall can be assigned different access permissions.
Administrator: Managing access permissions of
existing accounts within the company, managing delivery addresses that
are visible company-wide during checkout.
Customer: Placing orders, saving and managing
shopping carts, viewing order history with shipment tracking, and
downloading order-related documents.
Viewer: Adding products to the shopping cart, viewing
order history with shipment tracking, and downloading order-related
documents.
Basic: Adding products to the shopping cart and
saving shopping carts, without access to commercial information (e.g.,
price, delivery time), viewing order history with shipment tracking,
and downloading order-related documents.
Prospect: General role after self-registration
without any further permissions.
5. Instructions for authentication app
You can use various authentication apps for authentication. Instructions
for linking them can be found here.
Alternatively, there is the option to use an open-source authenticator
that does not require installation. An example of this is the
following solution:
Access the product detail page via search function
Create new project from product details page
MyProject exports include product information details
Configuration setups can be deleted
Bug fix: importing Excel/CSV files with Flender ONE configIDs in
MyProjects
Change of login method
Downloaded documents now include the product name in the file name.
Performance optimisation
If you want to order a product, you have five different ways to add products to your shopping cart:
1. Order Form
When should you use the order form:
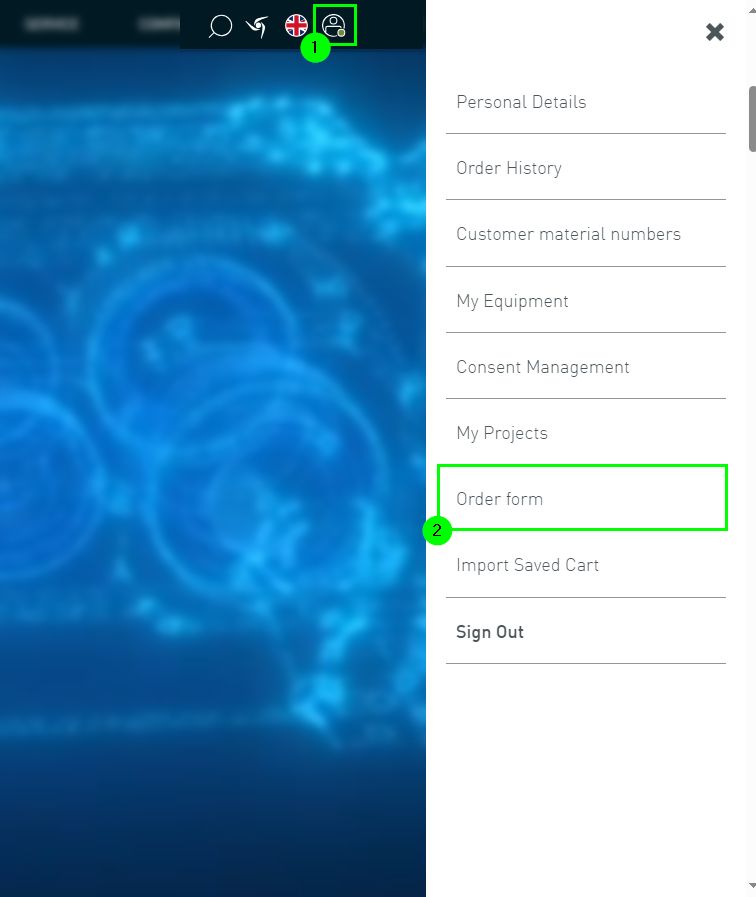
If you already know the MLFB/FFA number of the desired product
You can access the order form through the user menu (1) by calling up the order form (2)
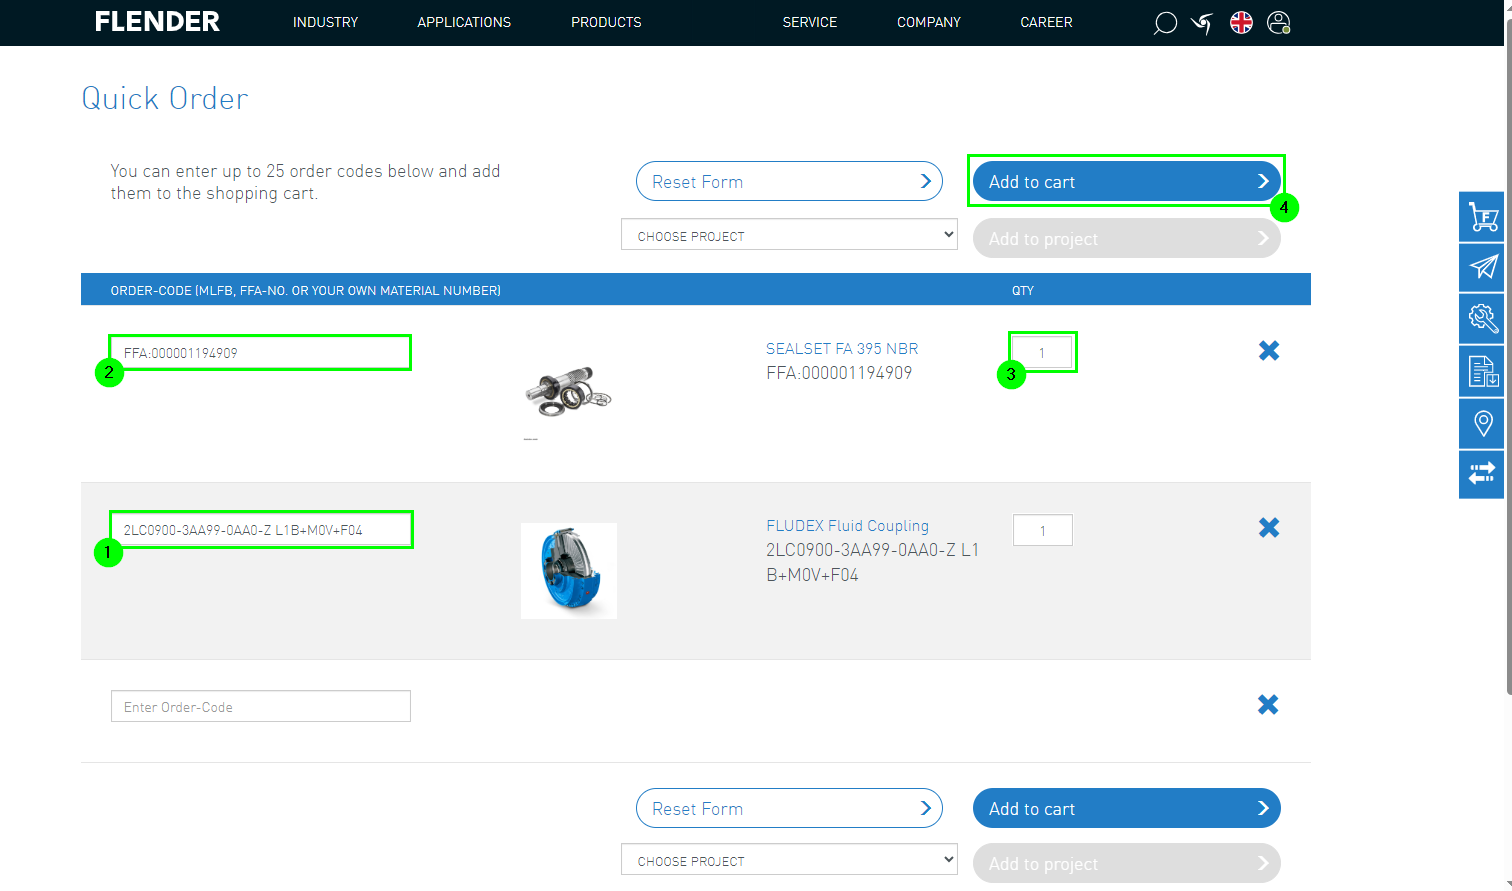
Then the corresponding numbers can be entered in the input field:
1. Either MLFB numbers (1) or FFA numbers (2) can be entered.
2. Specify the correct quantity (3)
3. The order form can be added to the shopping cart (4)
2. Configuration of FLENDER Products
When you should use the configuration:
Unknown material numbers or designations
Looking for a custom-fit product
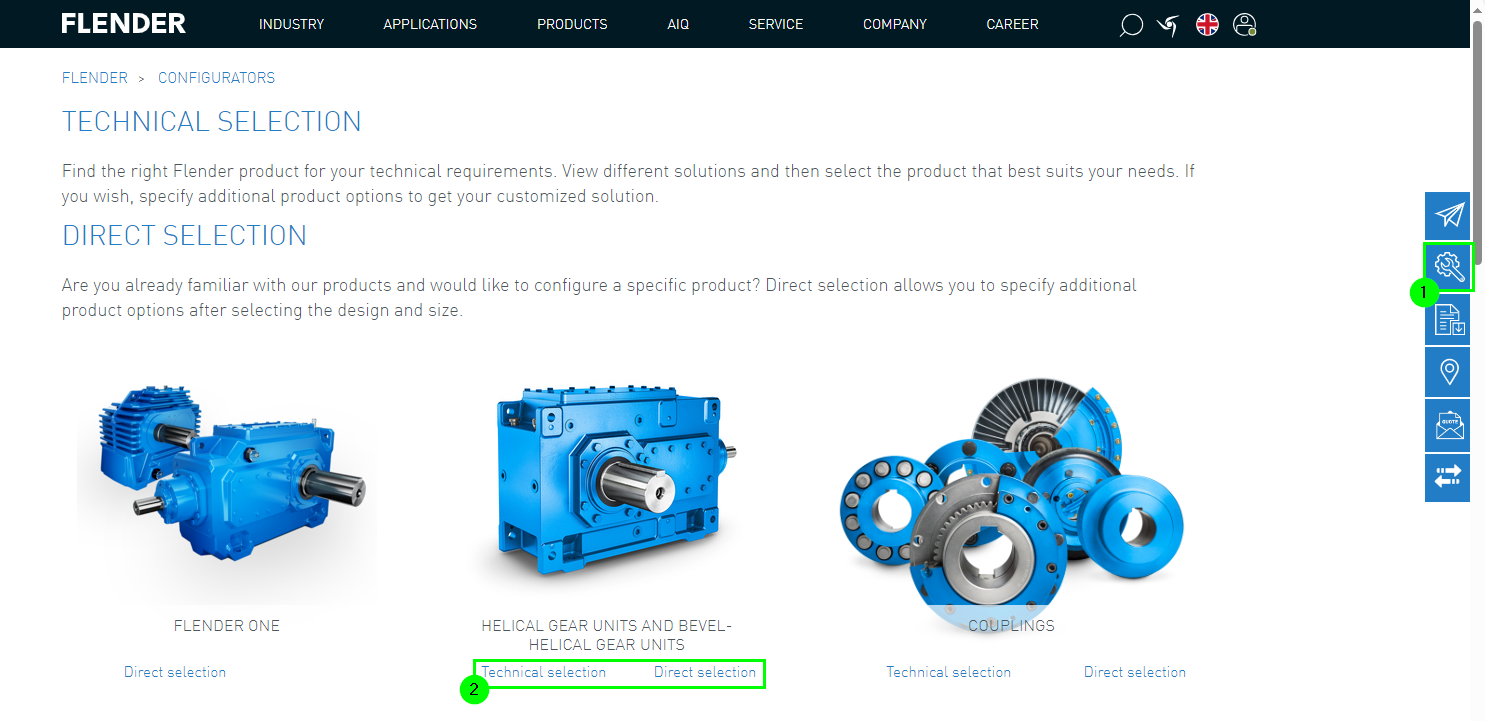
The configurators can be accessed via the sidebar (1).
Here you can distinguish between direct selection and configuration (2).
Then all parameters must be entered (1) and the configuration can be completed (2).
After that, the configured product can be added to the cart (3).
3. Ordering using Customer Material Numbers
When you should use ordering with customer material numbers:
Previously exchanged customer material numbers with Flender
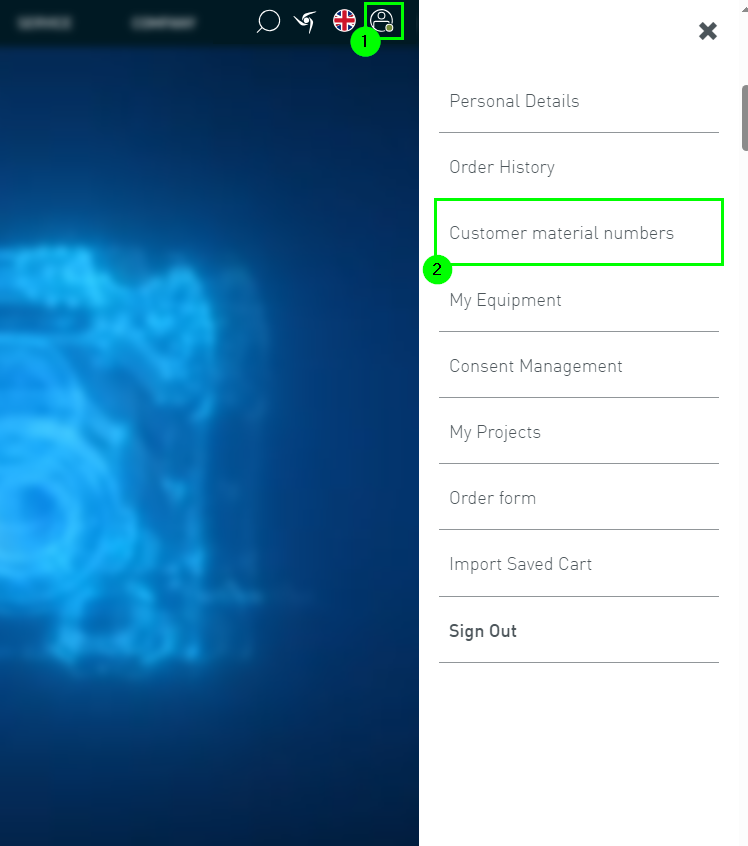
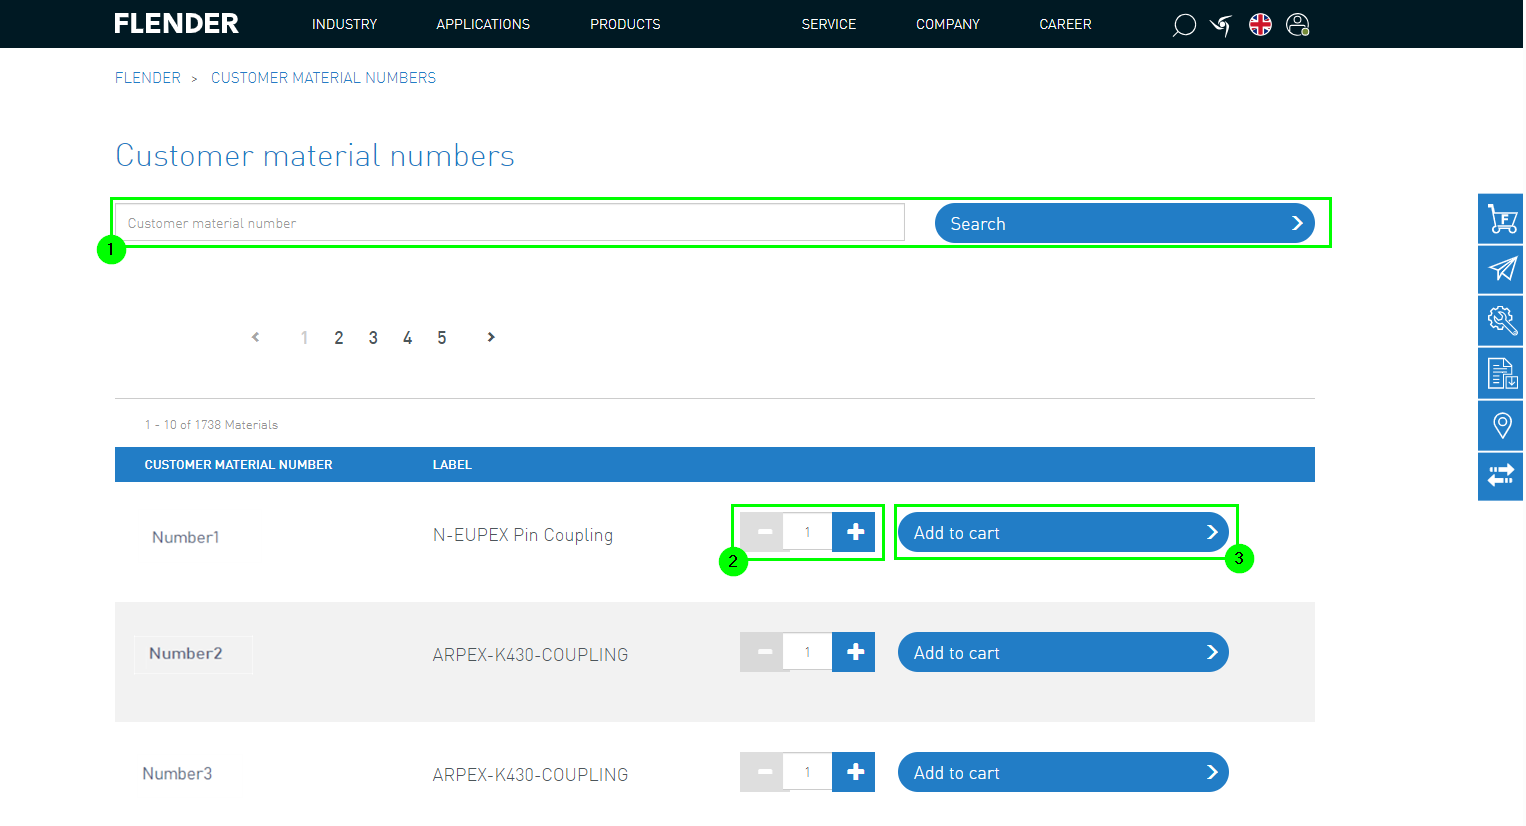
The ordering option can be accessed via the user menu (1) and selecting customer material numbers (2).
Further procedure:
Search for the agreed customer material number using the search function (1)
The search results are displayed in the lower list
Select the product and specify the desired quantity (2)
Add the product to the shopping cart (3)
4. Order import saved shopping cart
When should you use ordering with saved shopping carts:
Material numbers (MLFB / FFA numbers) are known
You can access the ordering option via the user menu under “Import saved shopping cart” (1).
Afterwards, you can upload the desired products in the specified format. To do this, enter the corresponding SKU number and the quantity.
Now you can upload the file. To do this, select the file (2) and click on “Import” (3).
After the import, the saved shopping cart can be viewed here (4).
Within the saved shopping carts, there are additional functions such as restore (5), edit (6), or delete (7).
After selecting the “Restore” (5) button, you will be taken to the shopping cart where you can complete your order (8).
5. Ordering using the search function & PDP
Ordering using the search function
When should you use ordering with saved shopping carts:
Material numbers (MLFB/ConfigID) are already known
To use the ordering option, you must first access the search function. This is located in the header menu (1).
Next, you can enter the desired MLFB or ConfigID (2) and open the product details page (3).
The product can then be added to the shopping cart (4) and subsequently ordered.
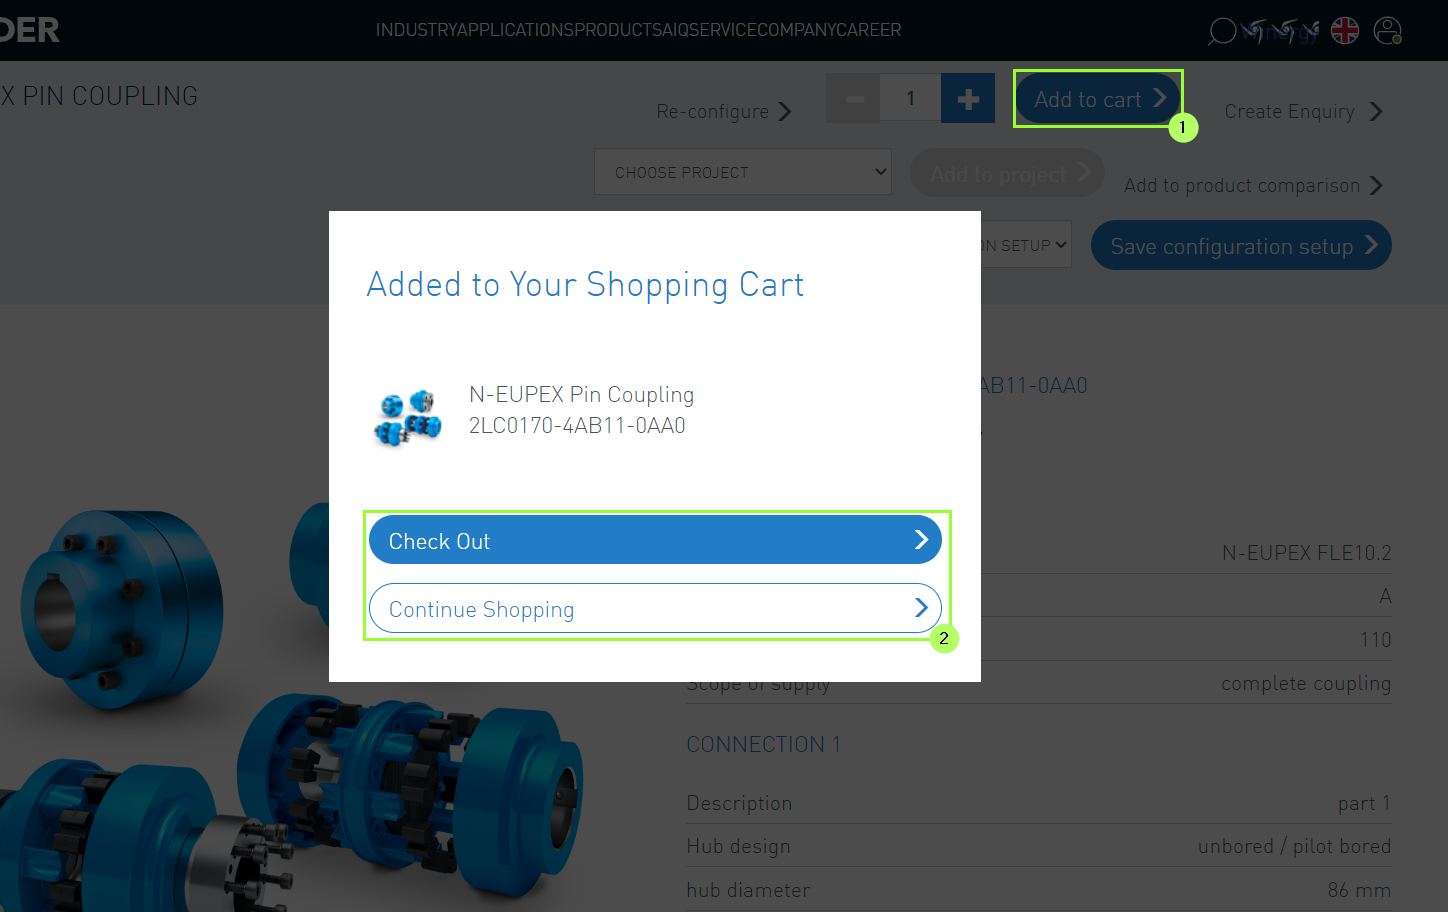
1. Adding Products to the Cart
If the access authorization is present, it is possible to order FLENDER products through the Flender Mall.
After a product is selected or configured, it can be added to the cart (1).
Then the following options are available (2):
Order
Continue Shopping
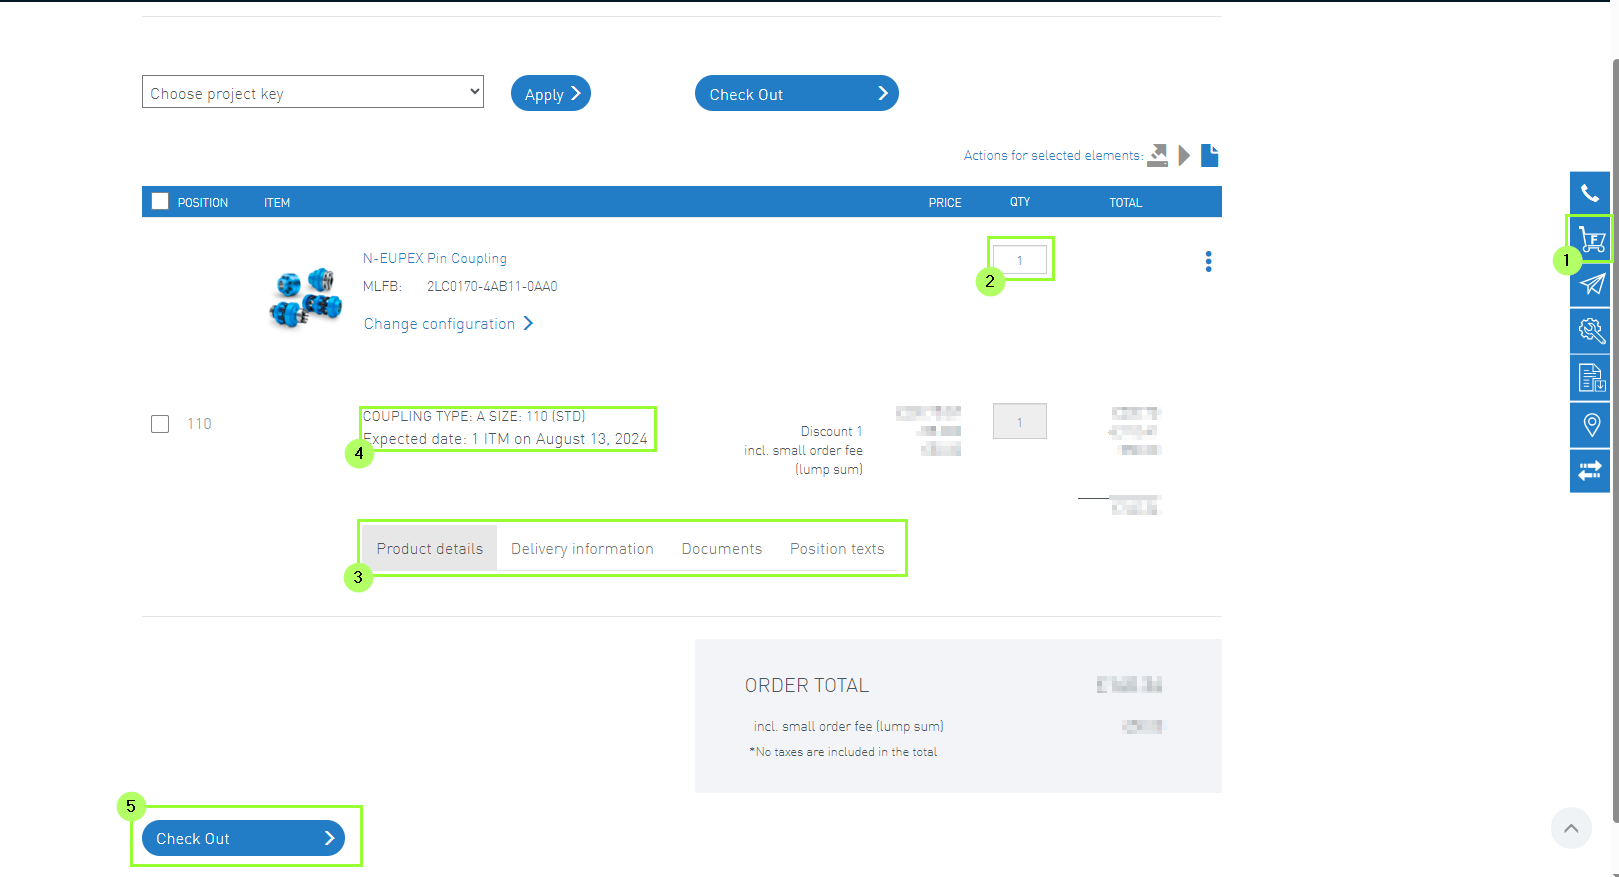
2. Cart
The cart can be found in the corresponding tab of the sidebar(1).
At the beginning, the correct quantity should be selected (2).
Here, additional product and order-specific information (3), such as delivery time (4), can also be viewed.
Then you can reach the Check Out (5).
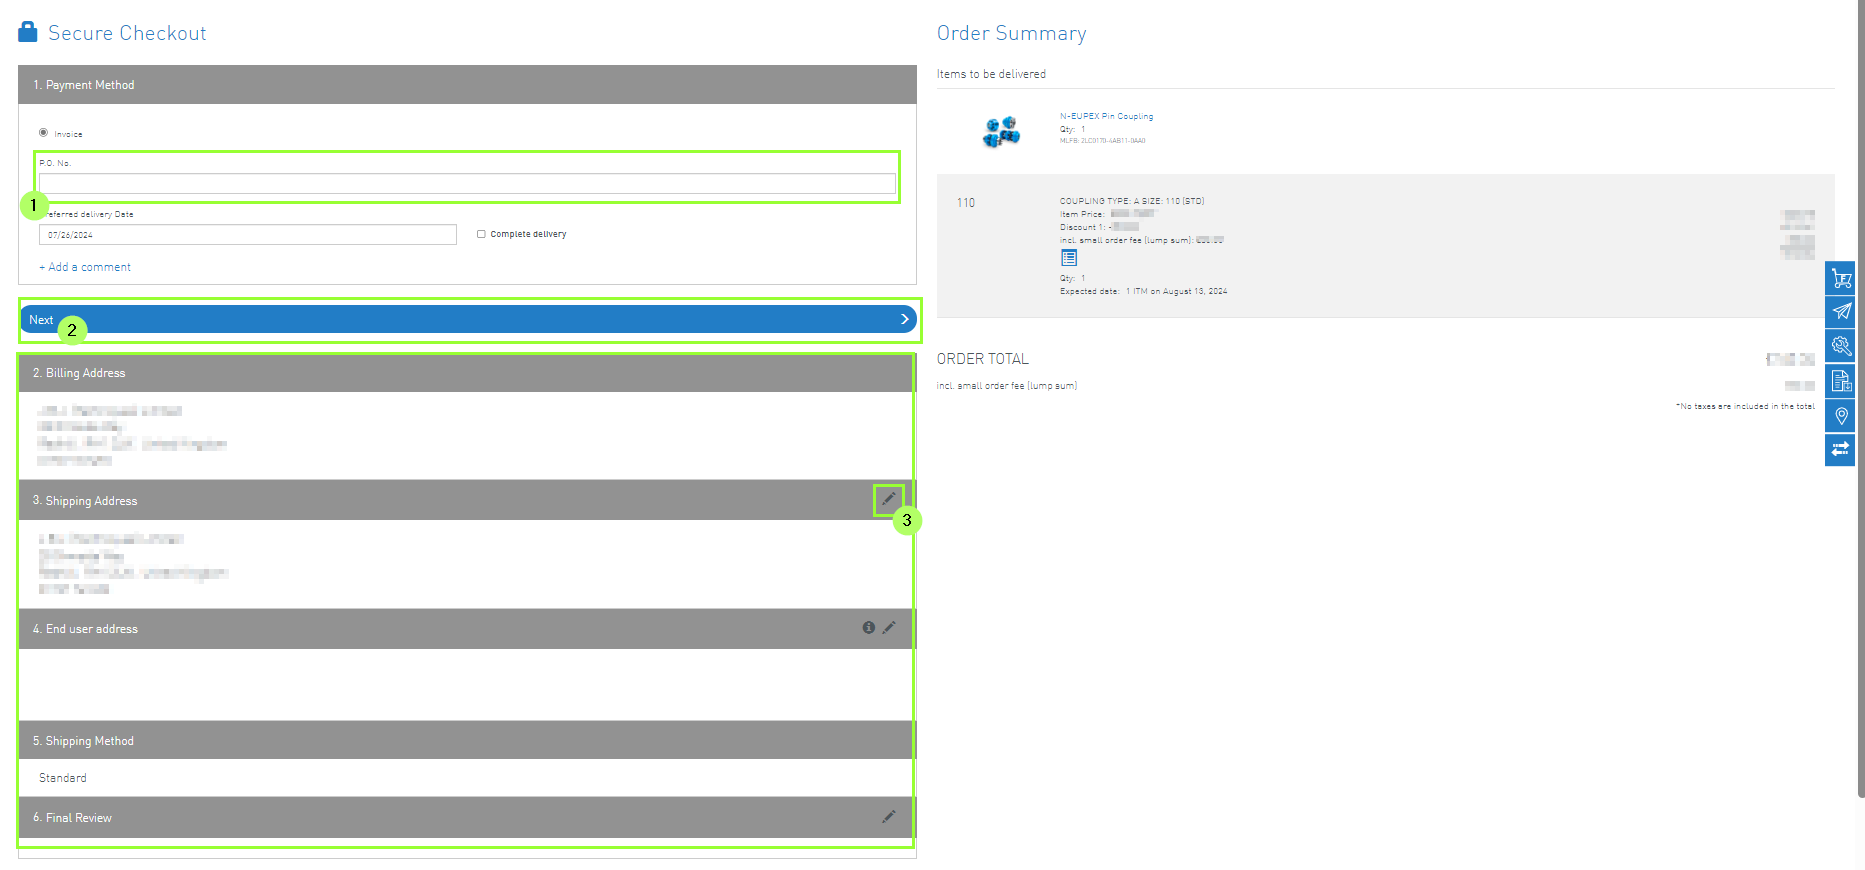
3. Check Out
The following steps are required for secure checkout:
(1) Enter the order number.
(2) Enter your desired data.
(3) Any changes can be made using the pen.
Then the order can be completed.
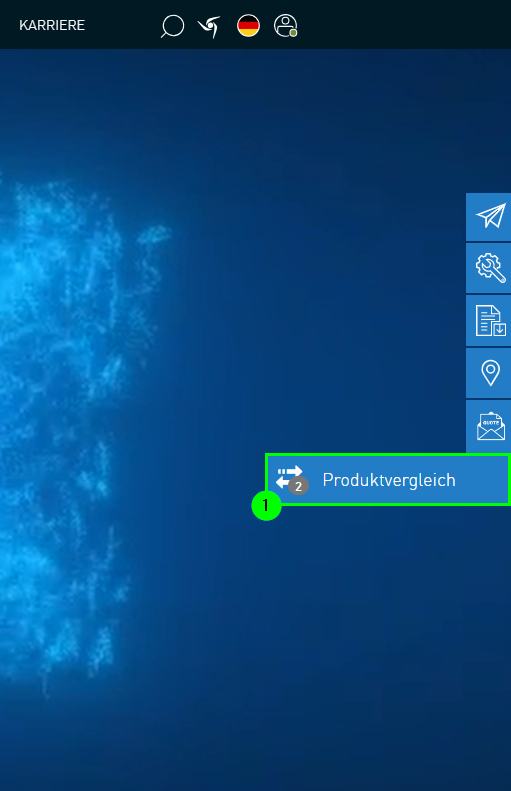
If you want to compare two or more products, you can use the Product Comparison Feature on our website.
1. Accessing Product Comparison
You can access the "Product Comparison" via the sidebar on the right side (1). This will take you directly to the comparison page.
The small number next to the icon in the sidebar indicates that in this example, two items have been added to the product comparison.
2. Adding Products to Product Comparison
There are 2 ways to add Flender products to the product comparison.
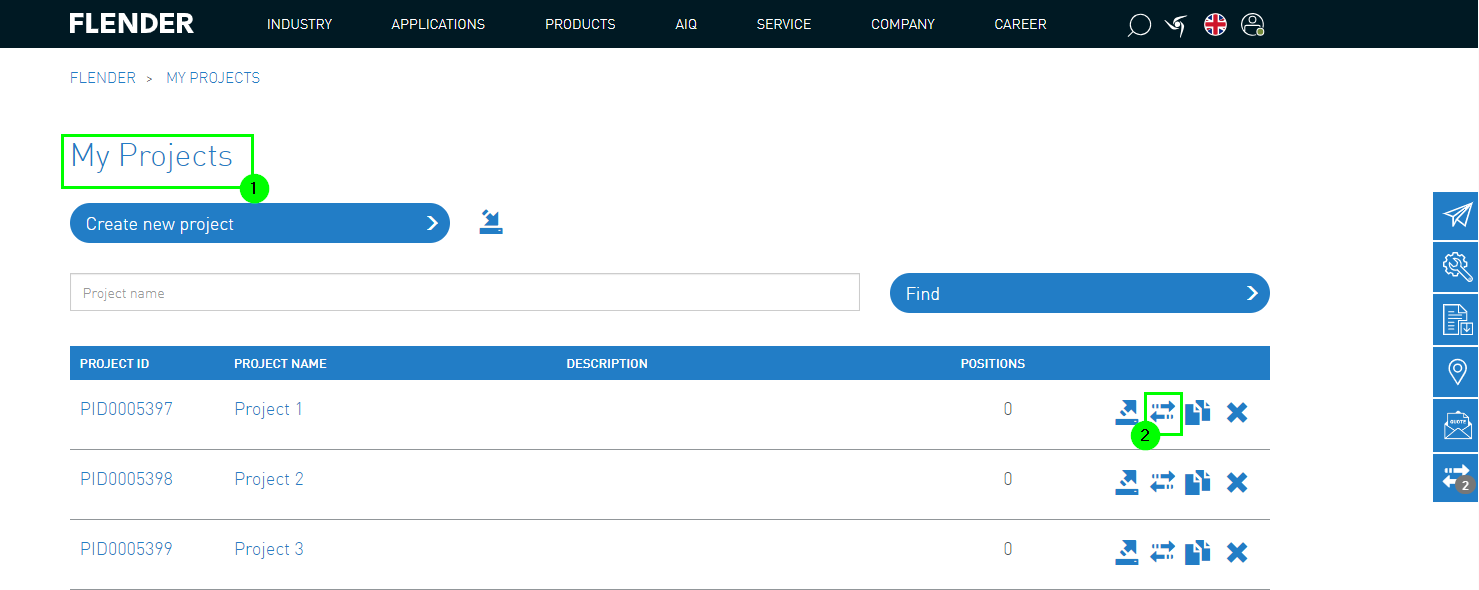
1. Method: My Projects
(1) Access My Projects via the user menu
(2) Add projects or individual products to the product comparison
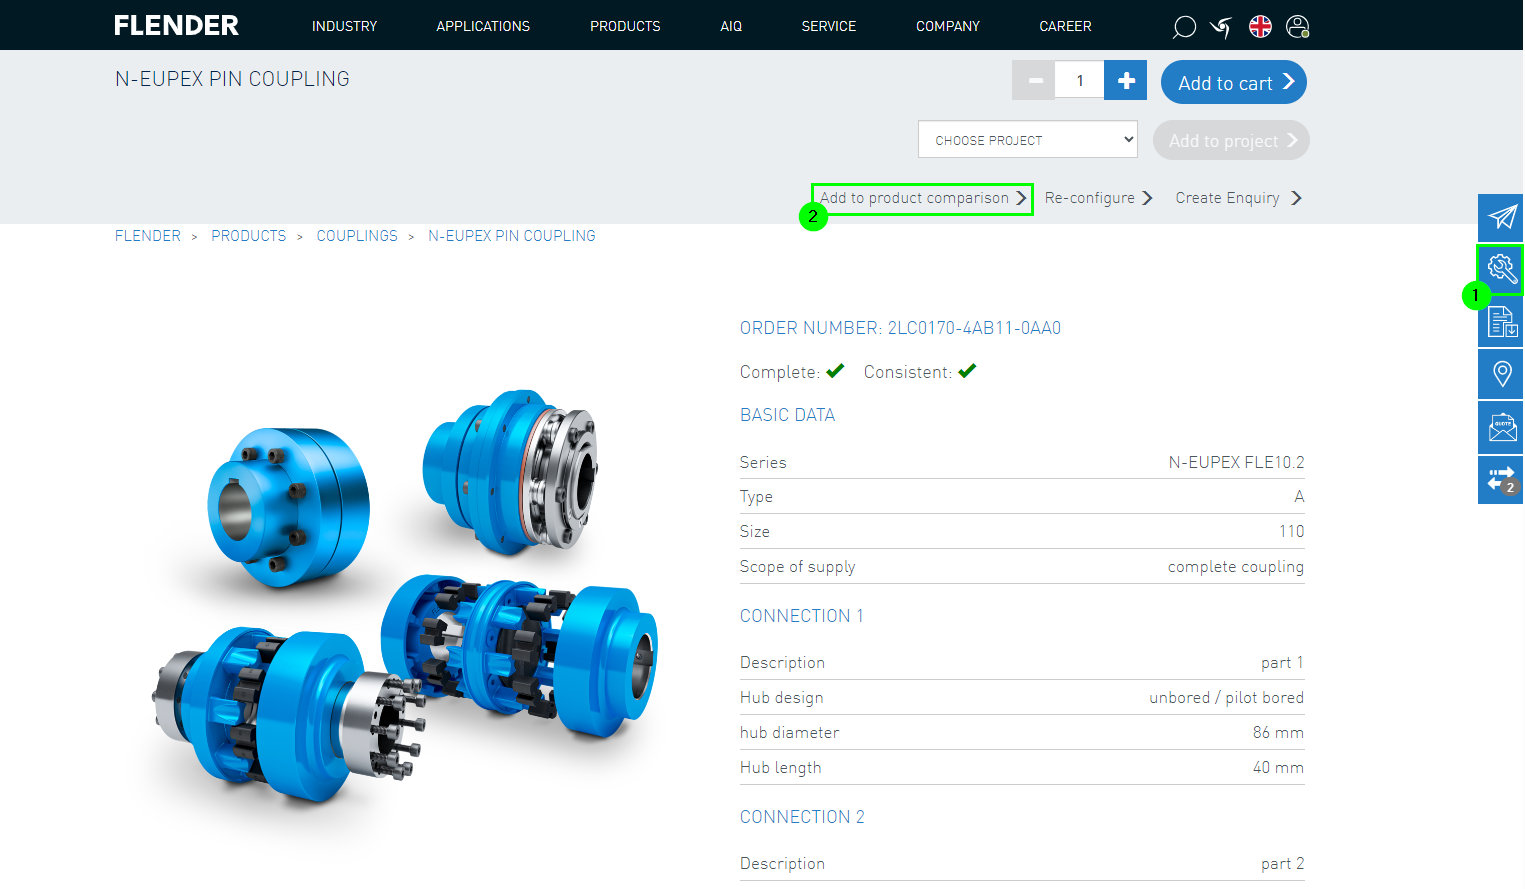
2. Method: Configuration
(1) Configure the desired product
(2) Add the configured product to the product comparison
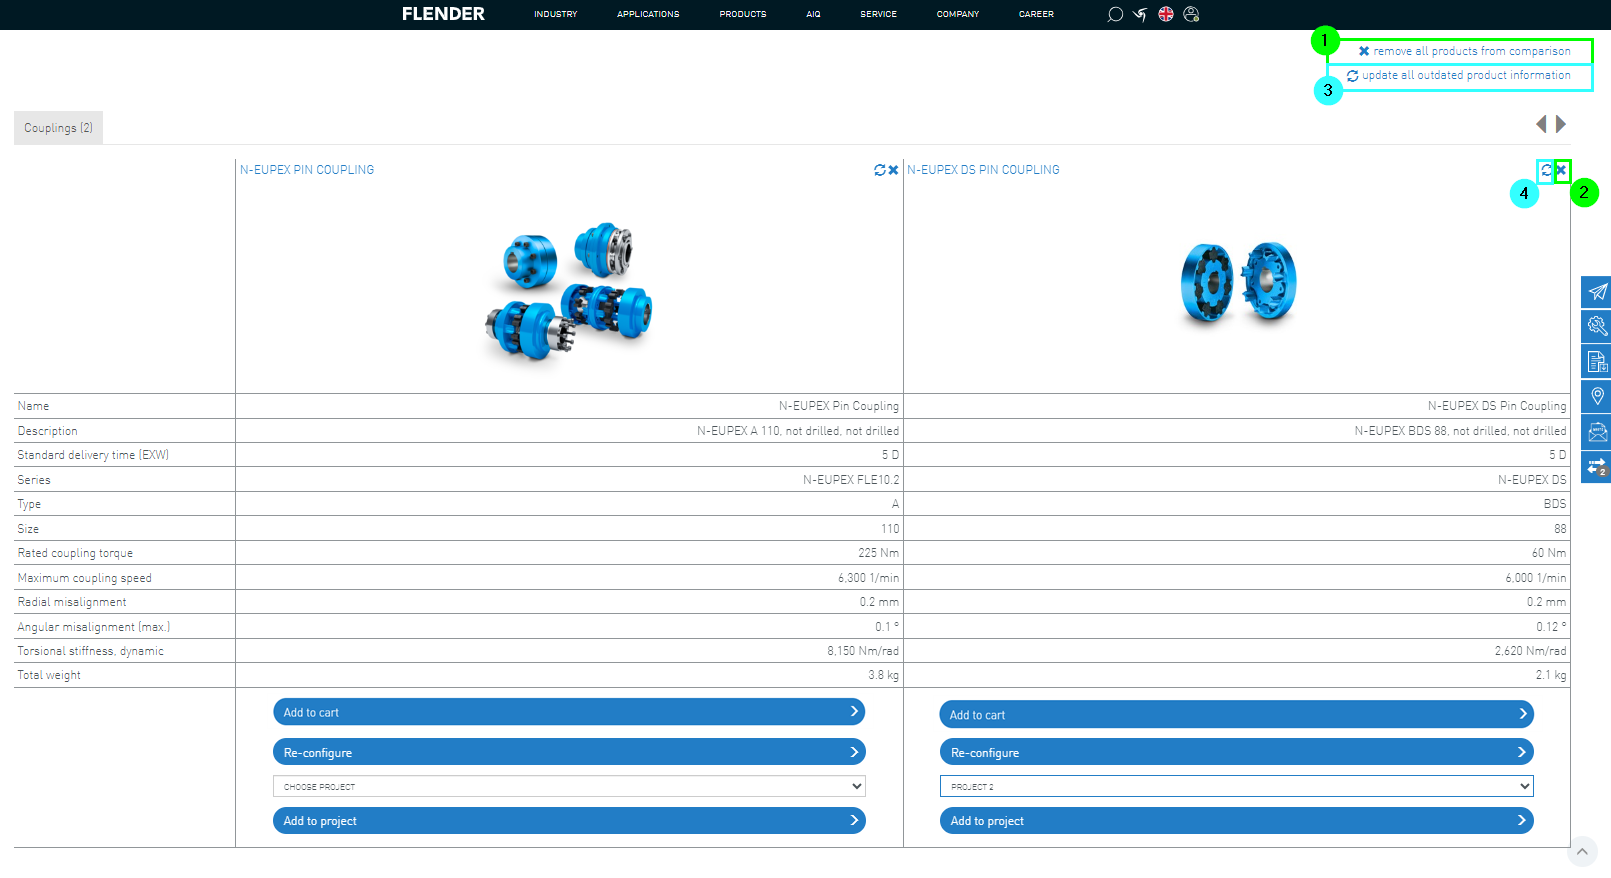
3. View of Product Comparison
Once you have added all products either via "My Projects" or the configurator for comparison,
you can access the "Product Comparison" via the right sidebar (see Chapter 1. Access Product Comparison).
In the product comparison, the data of the added products is compared and displayed.
The products remain in the "Product Comparison" until you actively remove them.
Removing products from the product comparison:
Remove all products via the X-symbol (1)
Remove individual products from the product comparison via the X-symbol within the position (2)
Updating the product comparison:
If a product remains in the product comparison for a long time, the displayed information may be outdated.
To stay up-to-date, you can either update the entire product comparison (3) or individual products (4).
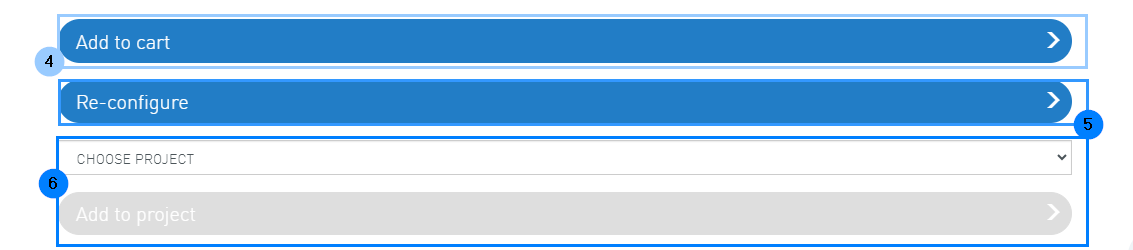
After comparing individual products, they can either be added to the cart (4), reconfigured (5)
or assigned to a project (6).
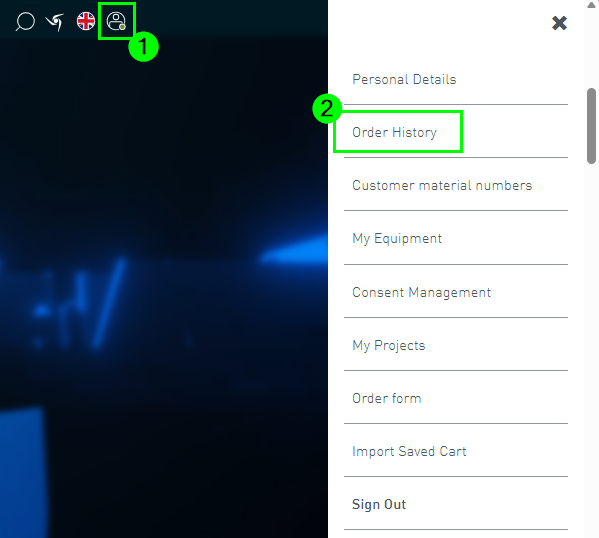
The order overview provides an overview of orders, order details, and delivery information.
To check the current status of existing orders and view details of previous orders, there is the order overview.
To do this, select the order overview (2) from the user menu (1).
The order overview includes all your orders with Flender in the last 365 days or the last 1000 orders.
It does not matter how the order was placed with Flender (via Flender Mall, Mail2EDI, email, or similar).
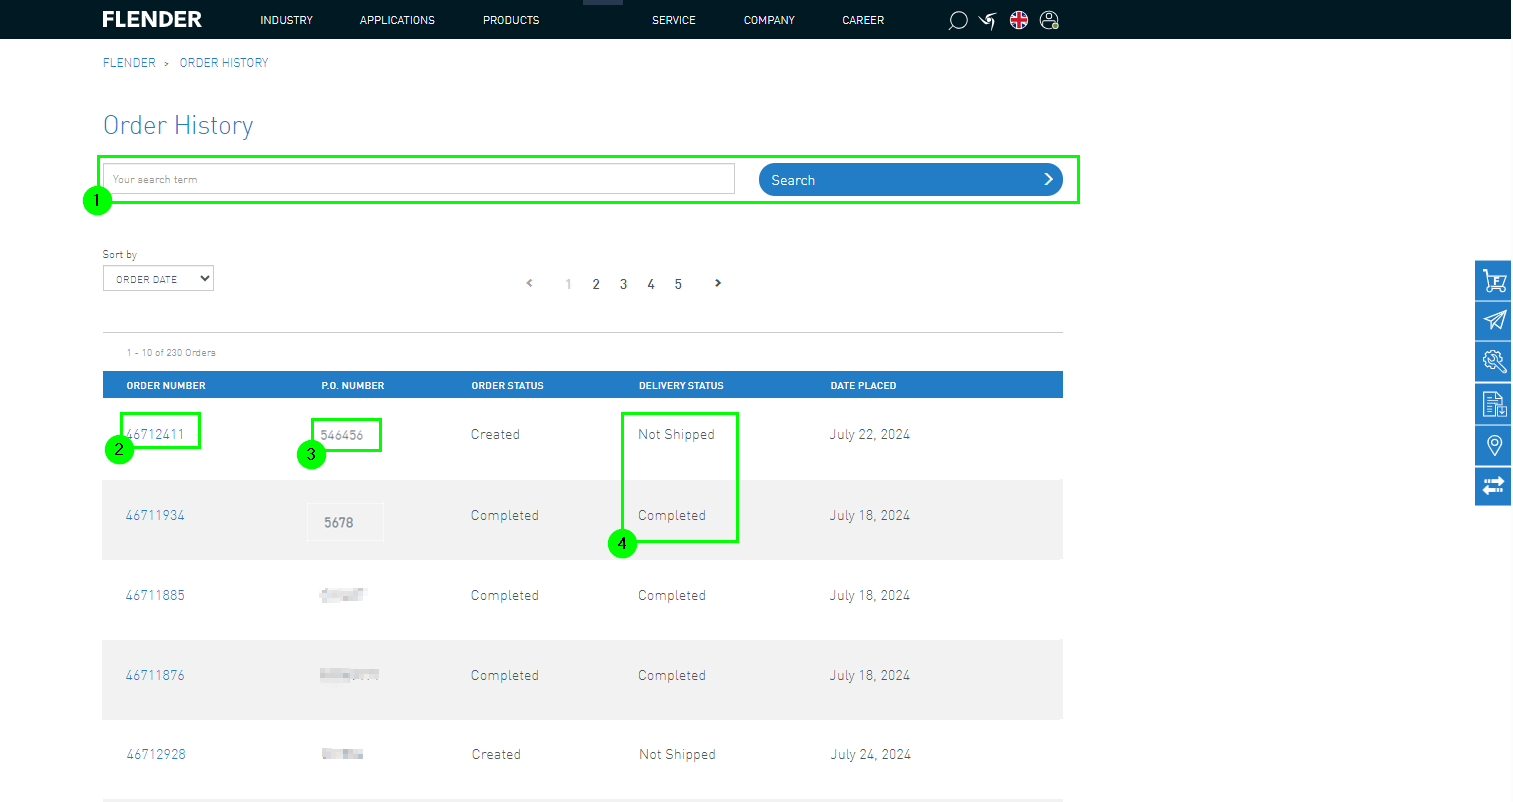
1. View Order Overview
The order overview offers a search function (1) to find orders specifically.
In addition, the Flender order number (2), the PO number (3), and the delivery status (4) are displayed.
2. Order Details
To view the details of an order, click on the order number within the order overview (2).
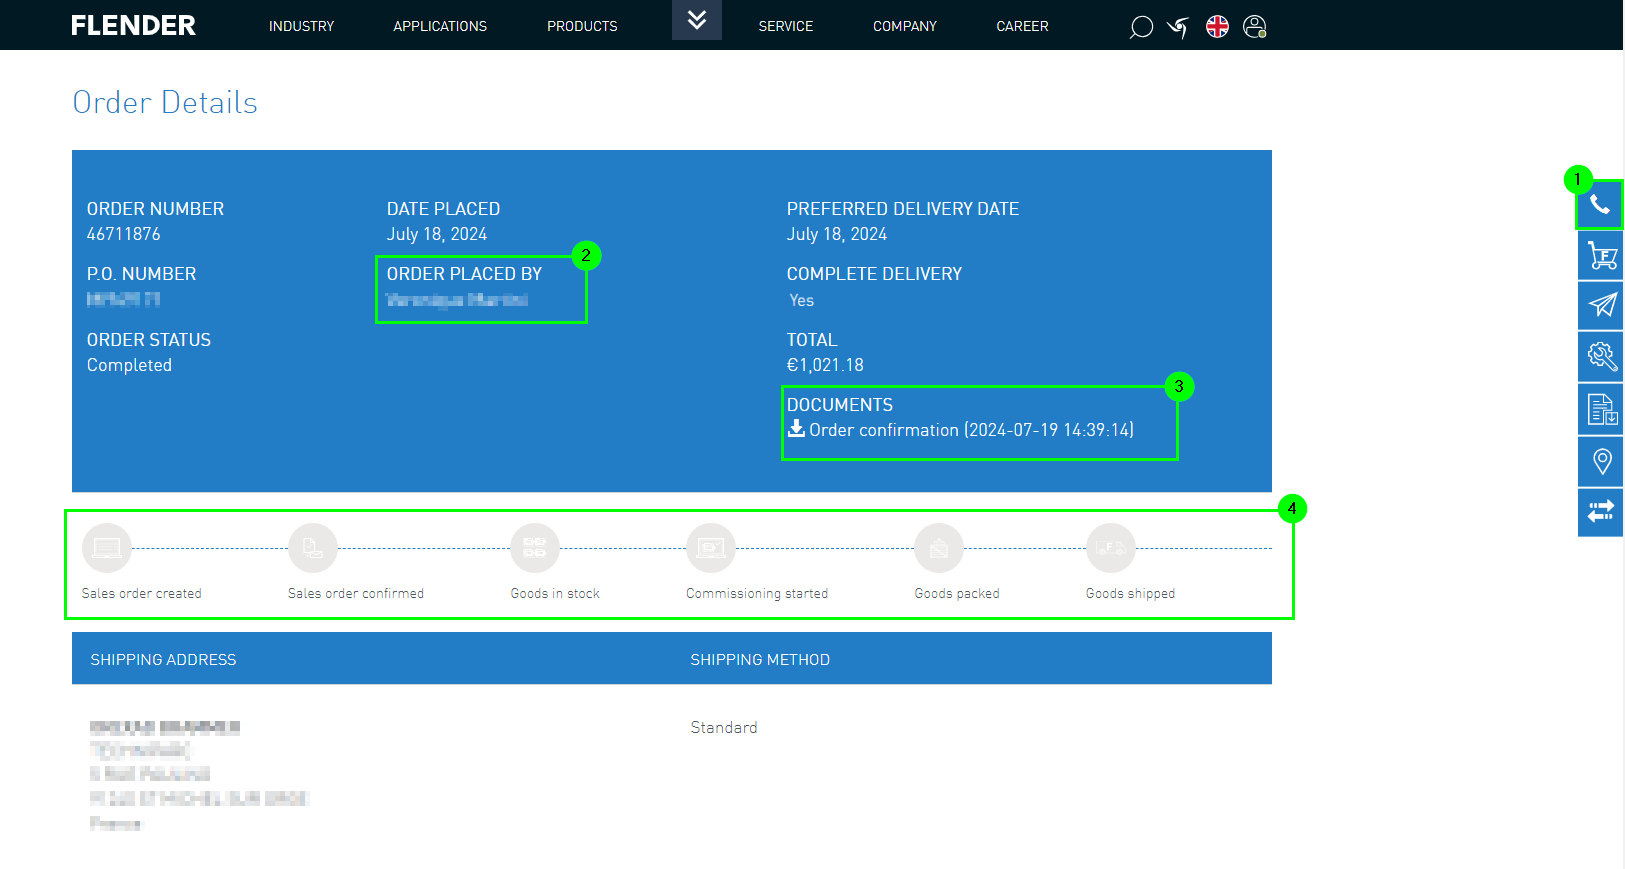
2.1 Header Data
From the header data, you can obtain the following information:
To see your assigned FLENDER contact person, click on the phone button (1).
The client's order submitter is also displayed (2).
You have the option to download order-related documents (3).
Furthermore, the current status of the order is displayed (4).
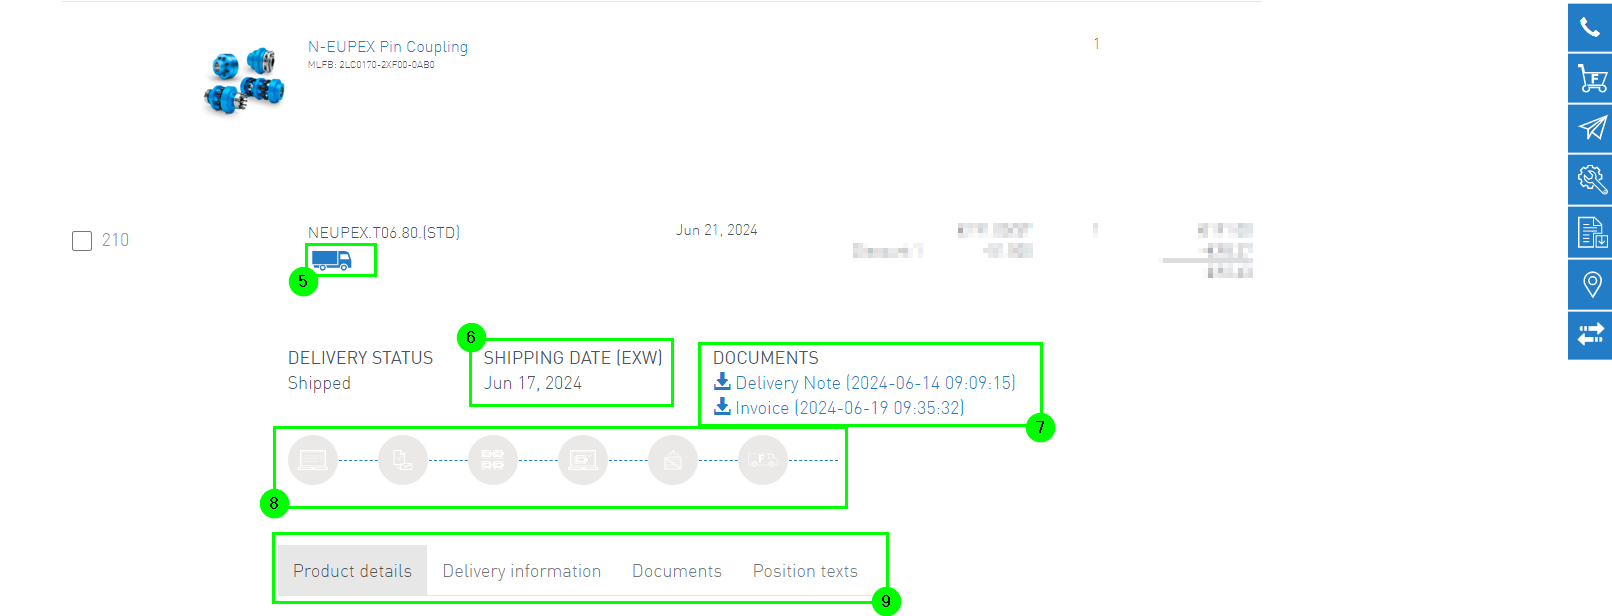
2.2 Item Data
The following data is displayed in the item data:
Delivery tracking is possible under the truck symbol (5)
For completed orders, the delivery date is noted (6)
Further documents, for completed orders, such as the delivery note or invoice, can be downloaded
View of the order status
Further details of the item can be displayed (or minimized) by clicking on the functions below the progress display (10).
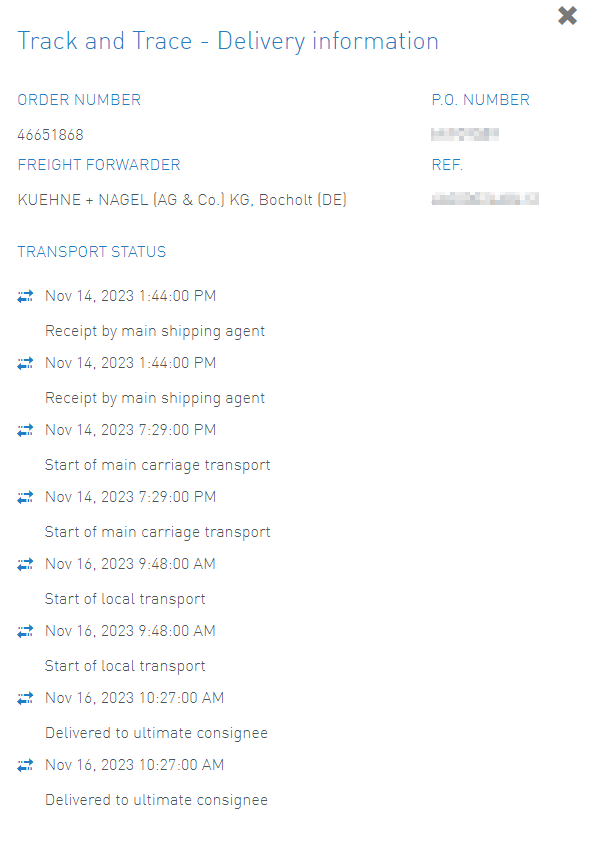
3. Delivery Information and Tracking
By clicking on the truck symbol, a pop-up window will appear.
You can track the individual stages of the delivery here
1. Accessing the Configuration Interface
1.1. Accessing the Configuration Interface - Sidebar
The configuration function can be accessed through the sidebar (1) of the Flender Mall.
You can then choose between direct selection and individual configuration (2).
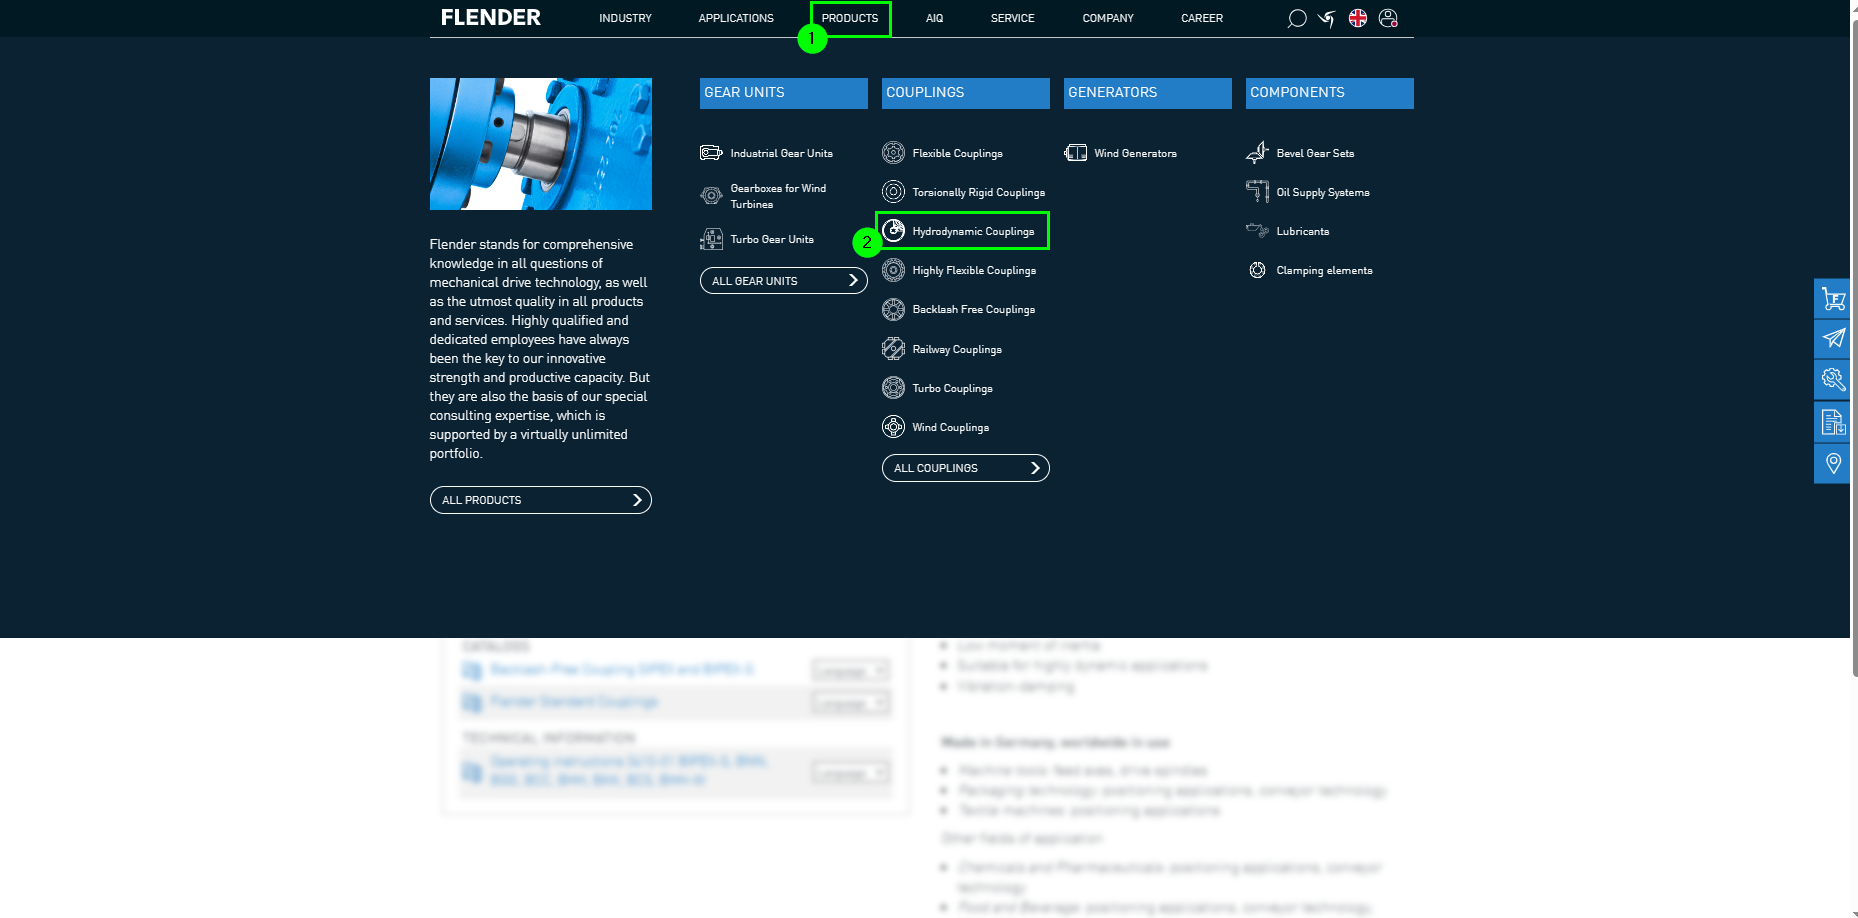
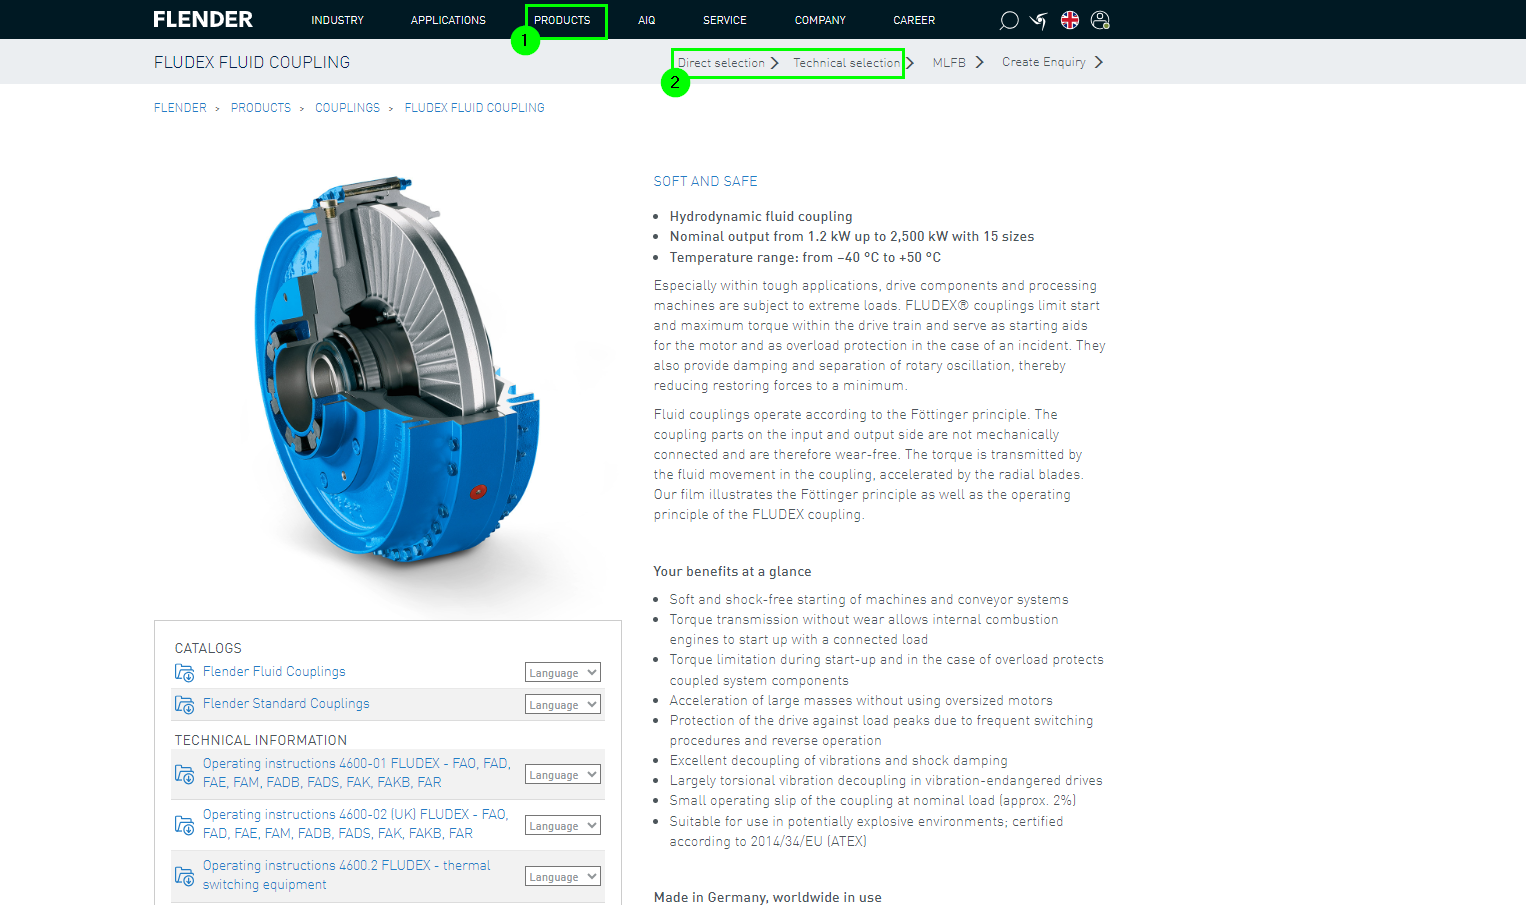
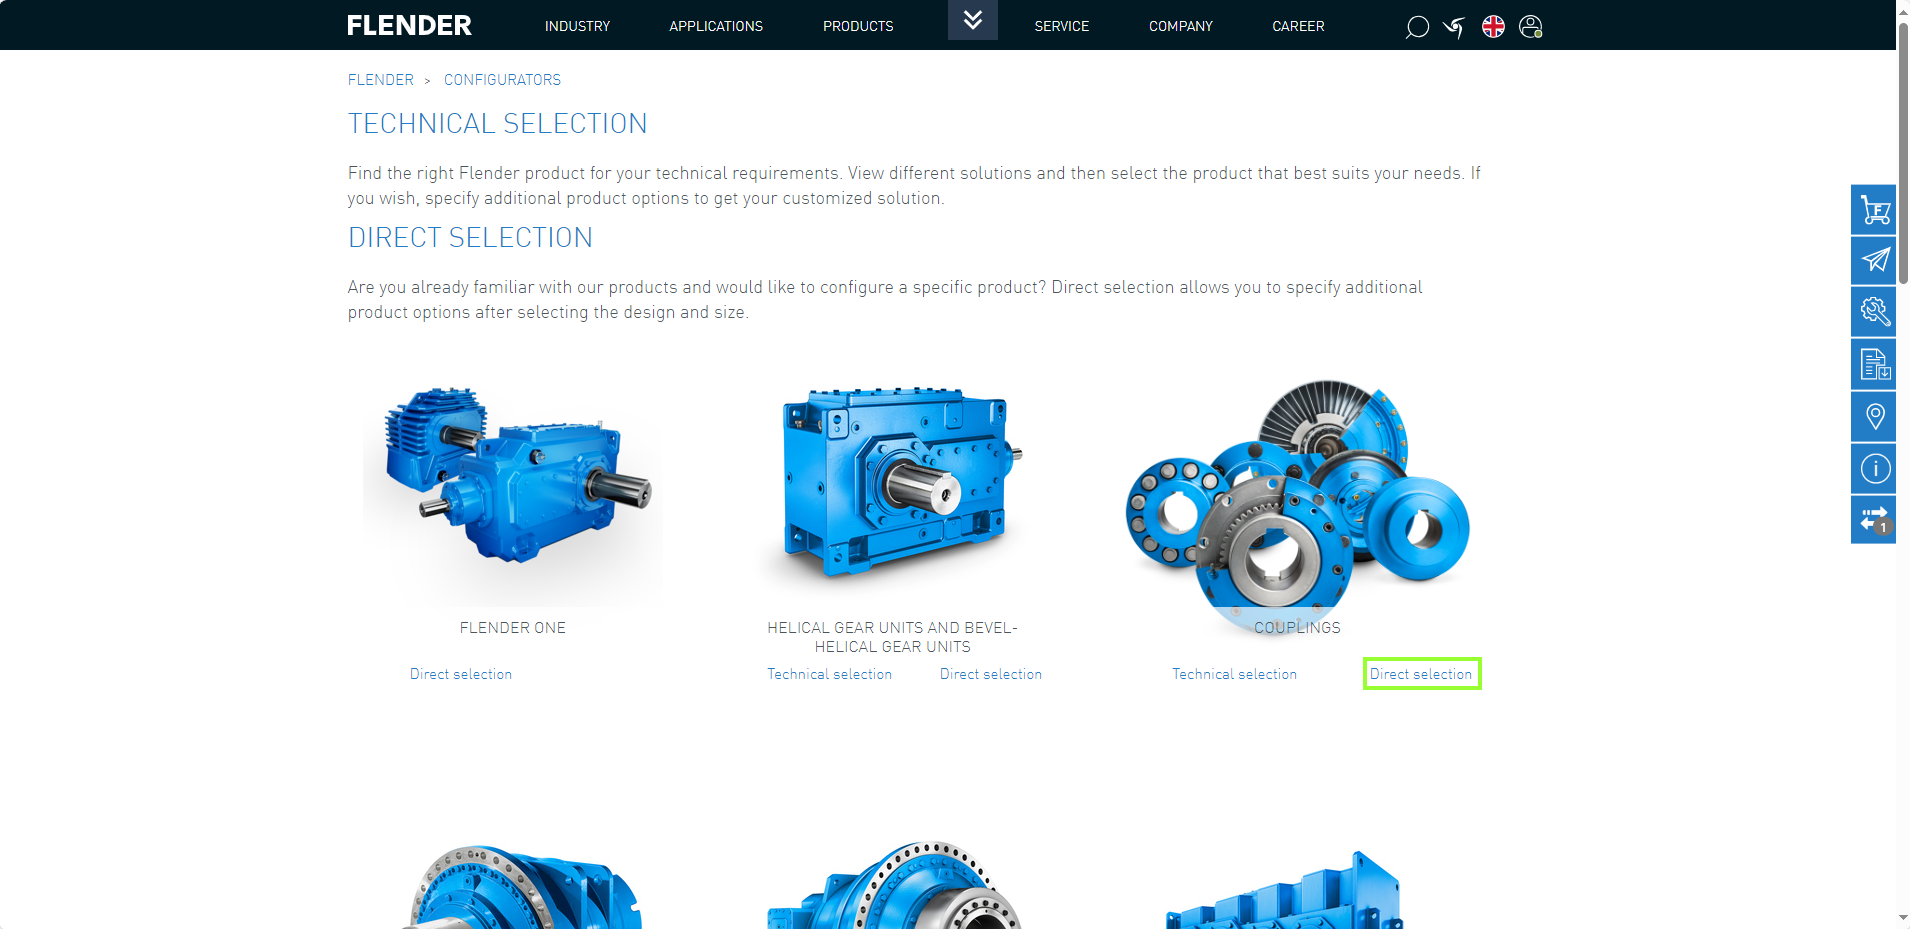
1.2. Accessing the Configuration Interface - Products
Accessing the configuration interface can also be done through the product interface of the Flender products.
To achieve this, it is necessary to click on the product navigation in the header (1).
After that, the desired product can be selected (2).
Then you reach the product overview (1). Here you can also choose between direct selection and configuration (2).
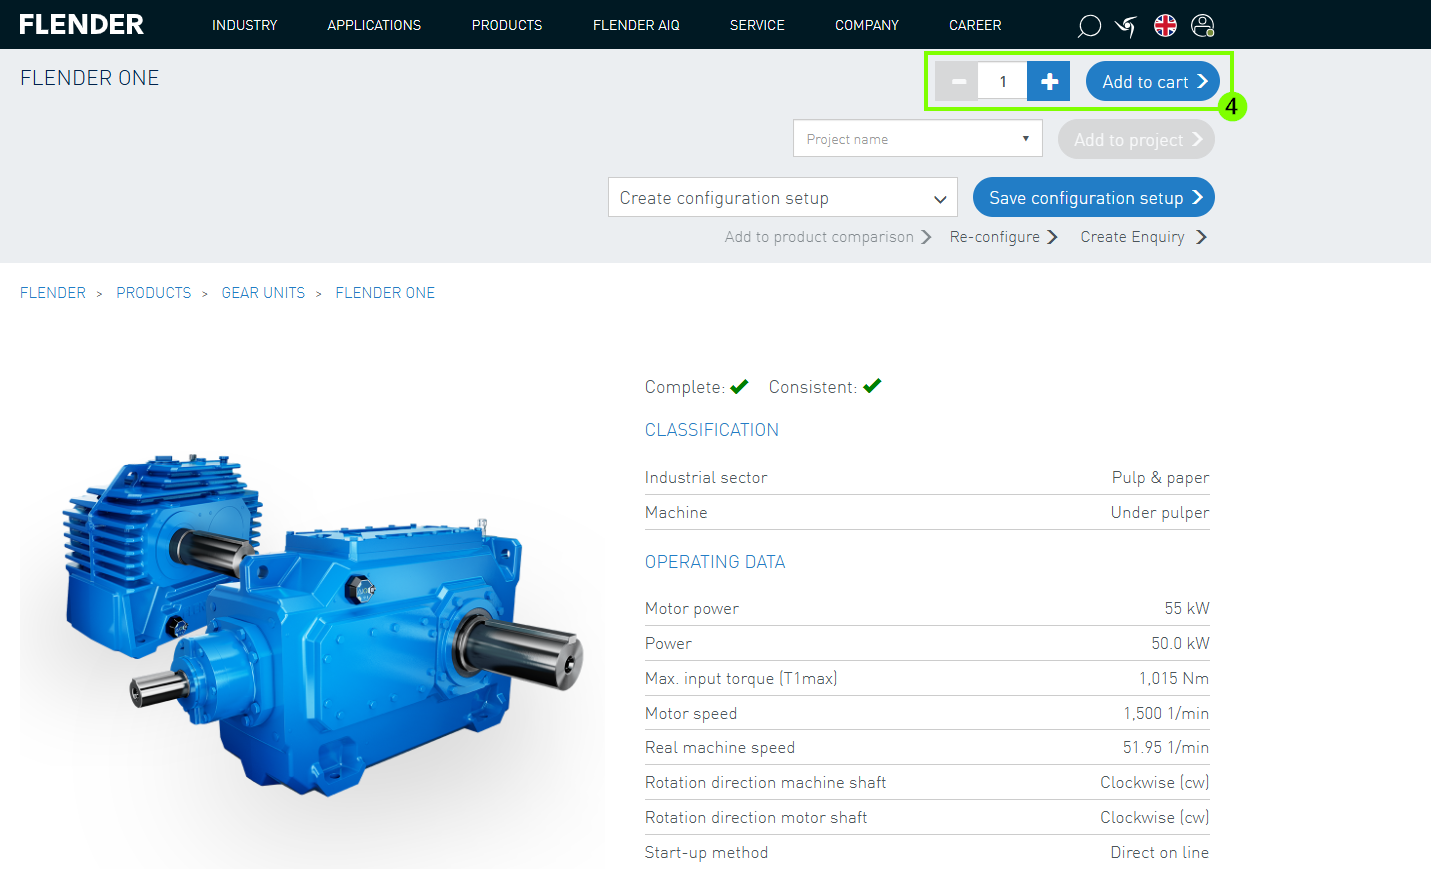
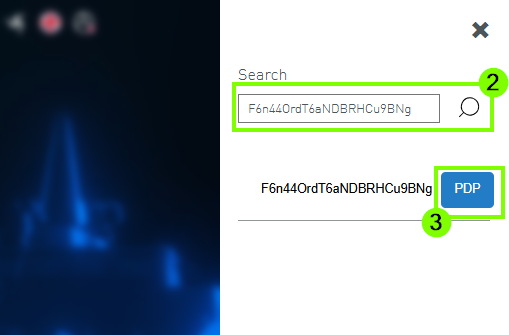
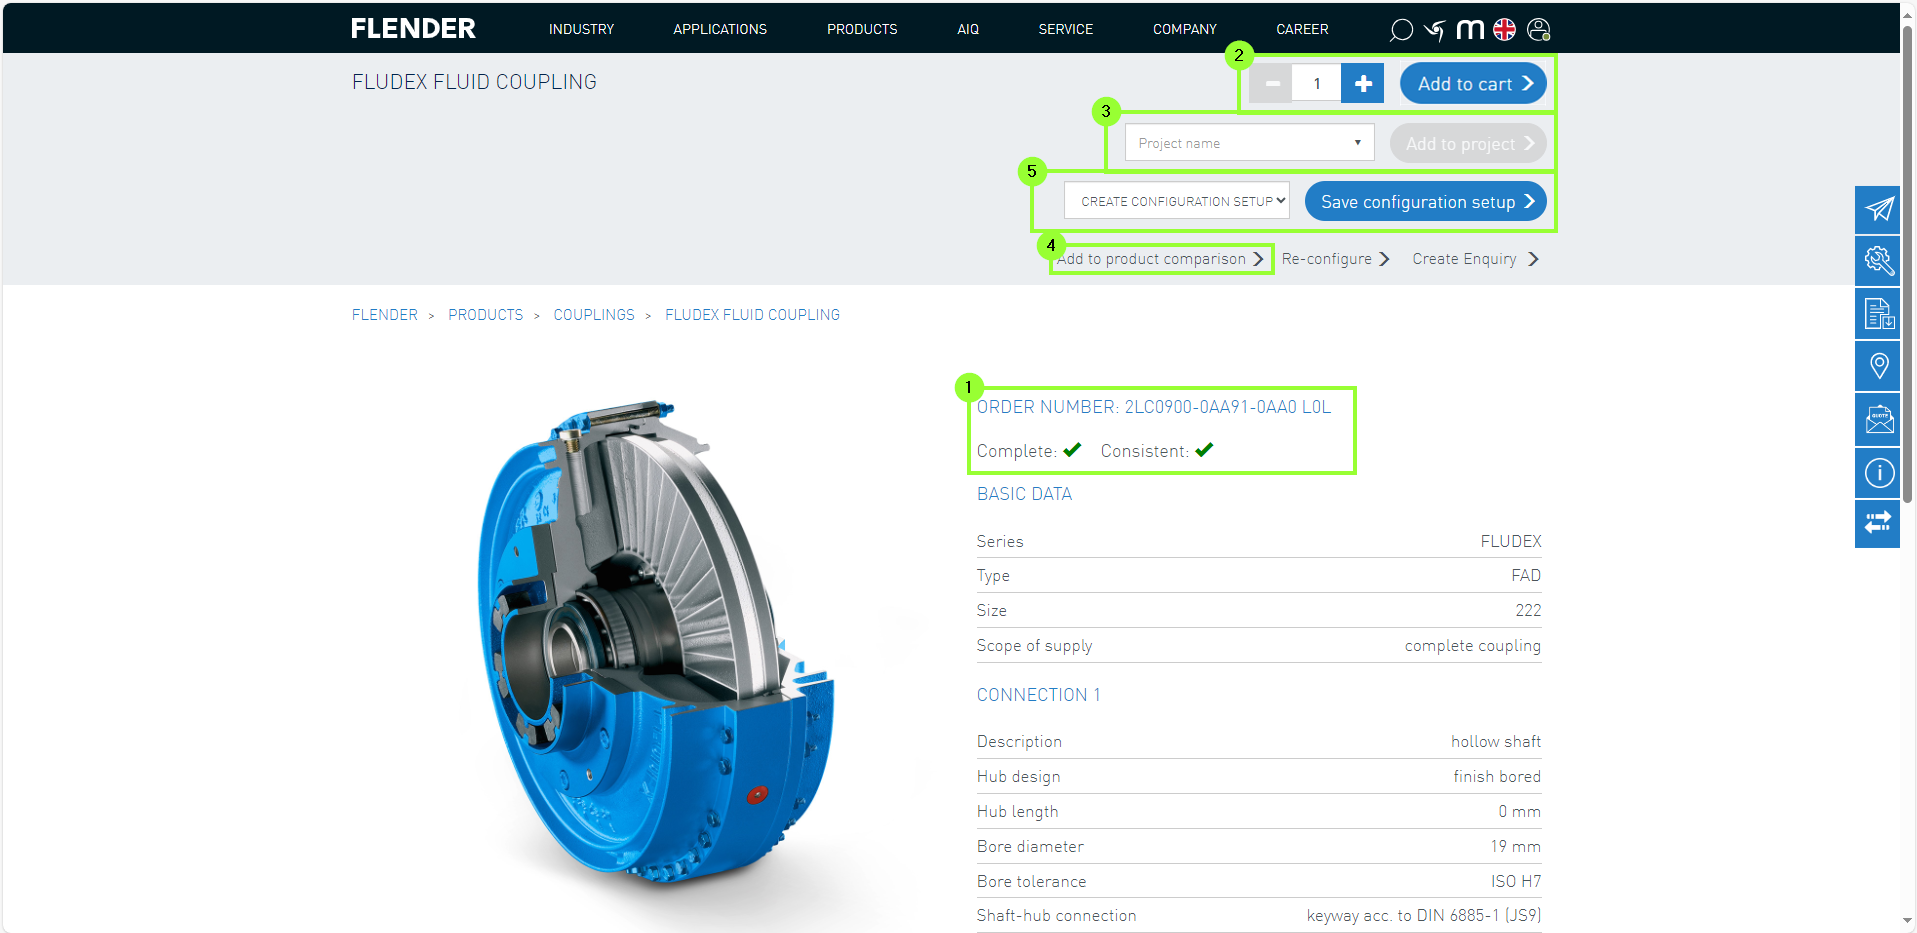
If the MLFB or ConfigID is known, the product details can be accessed directly via the search function. To do this, open the search function (1) and enter the desired MLFB / ConfigID (2). In the next step, the product detail page (PDP) can be opened (3).
After successful login, functions such as "Add to product comparison" or "Reconfiguration" are available (4). Alternatively, the product can be added directly to the shopping cart (5).
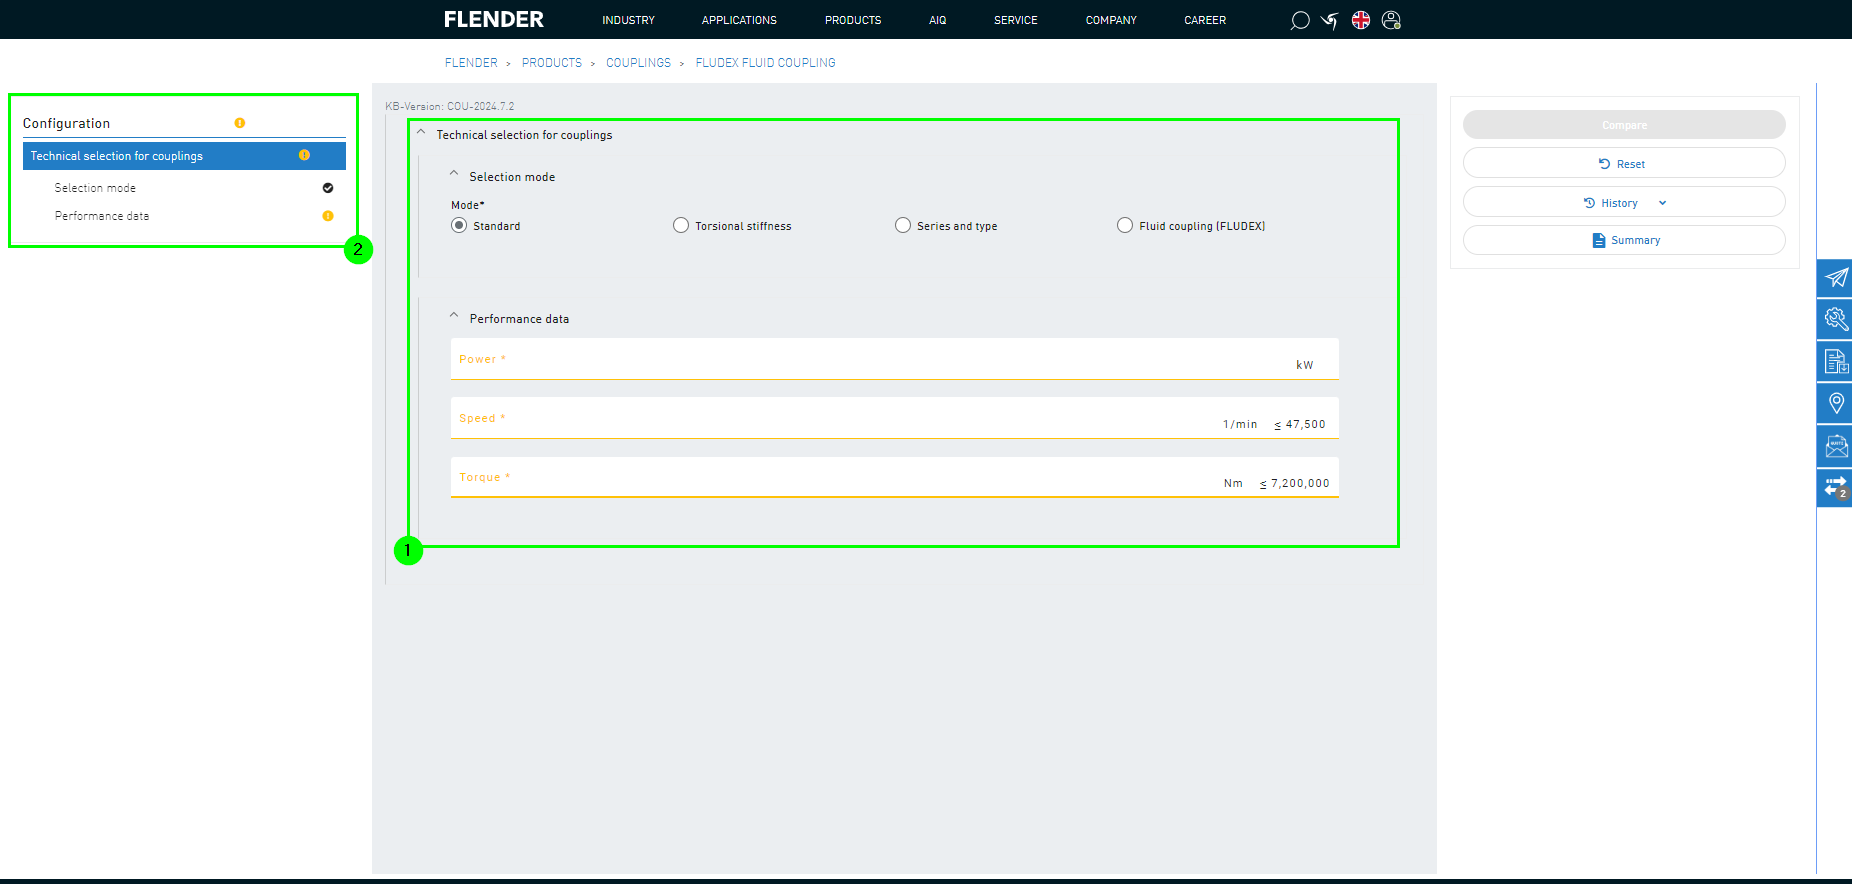
2. Configuring
Regardless of whether you choose direct selection or configuration, you will arrive at the same shown user interface.
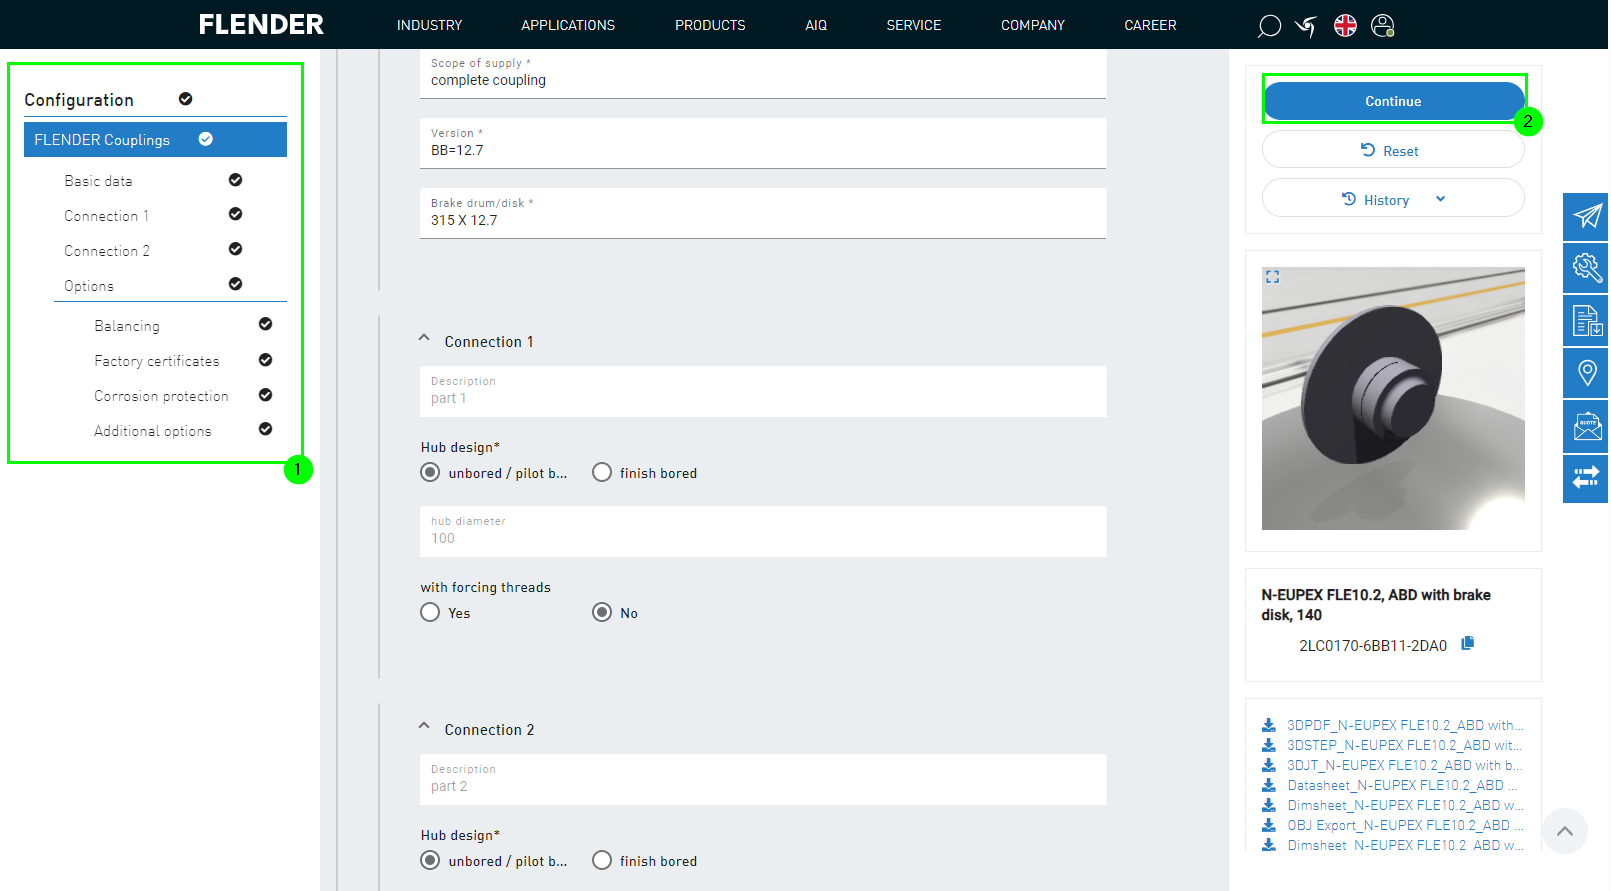
In the configuration view, all parameters and variables need to be entered (1).
If orange exclamation marks appear in the configuration overview, the configuration is incomplete (2).
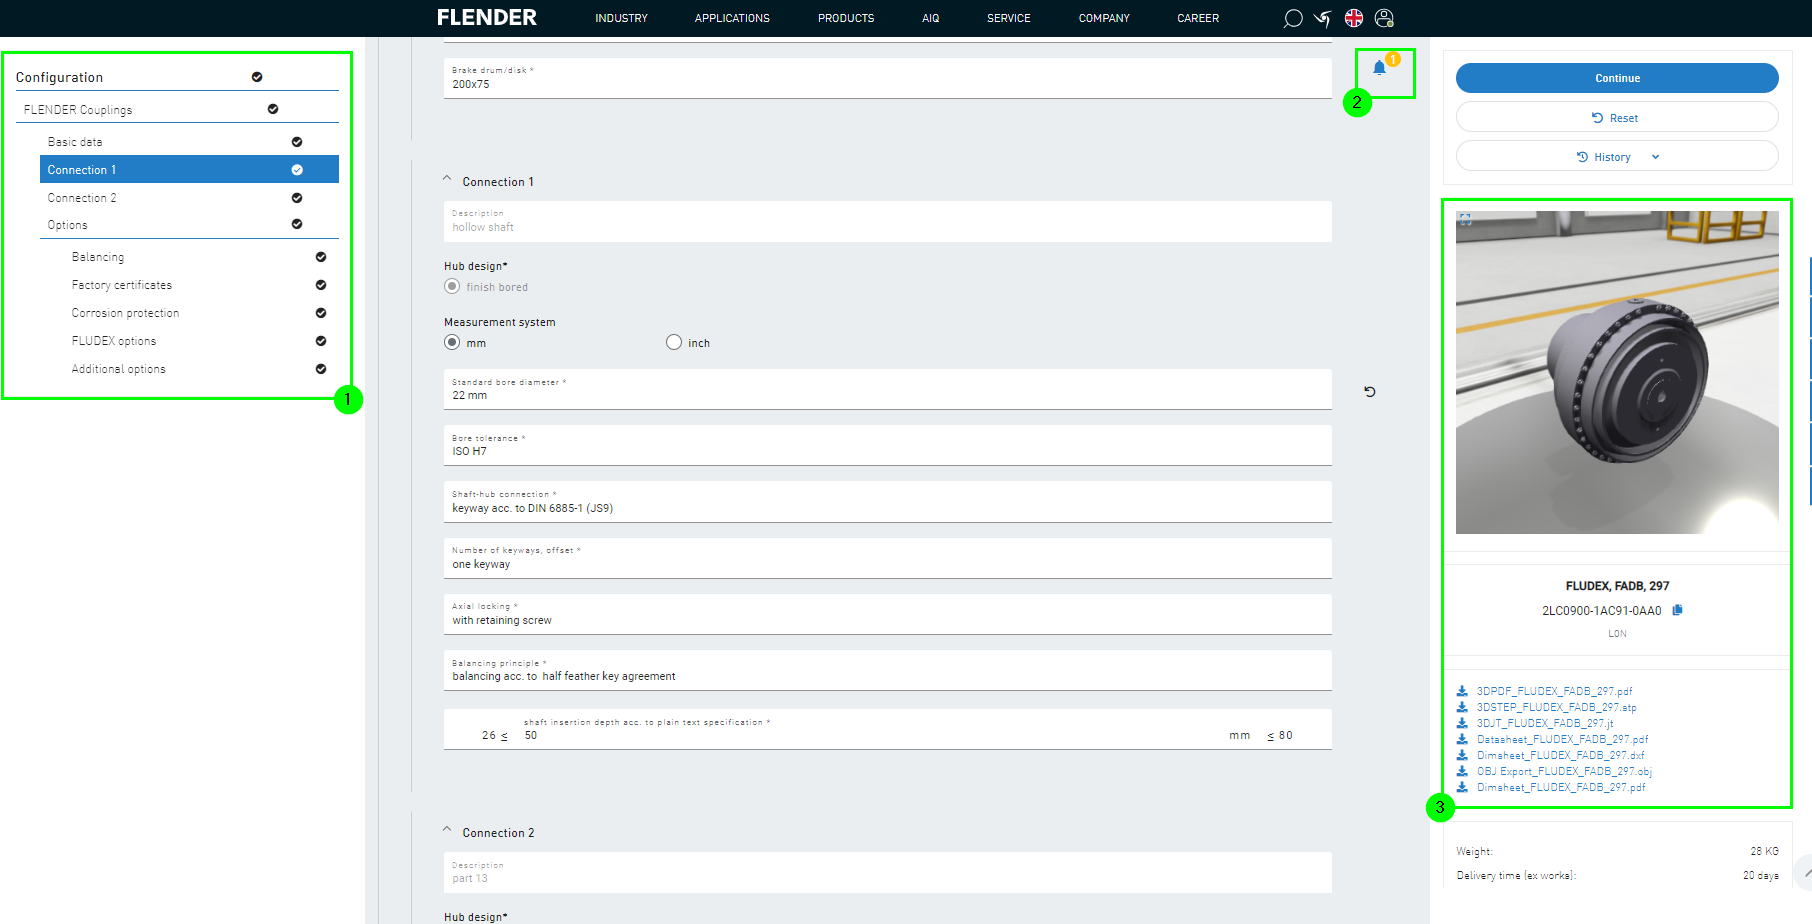
When all values are complete, this is visualized by black check marks (1).
Important notes are symbolized with the announcement icon (2).
On the right side, additional documents are available for download, or the configured product can be displayed in a 3D view.
Click "Continue" to perform further actions.
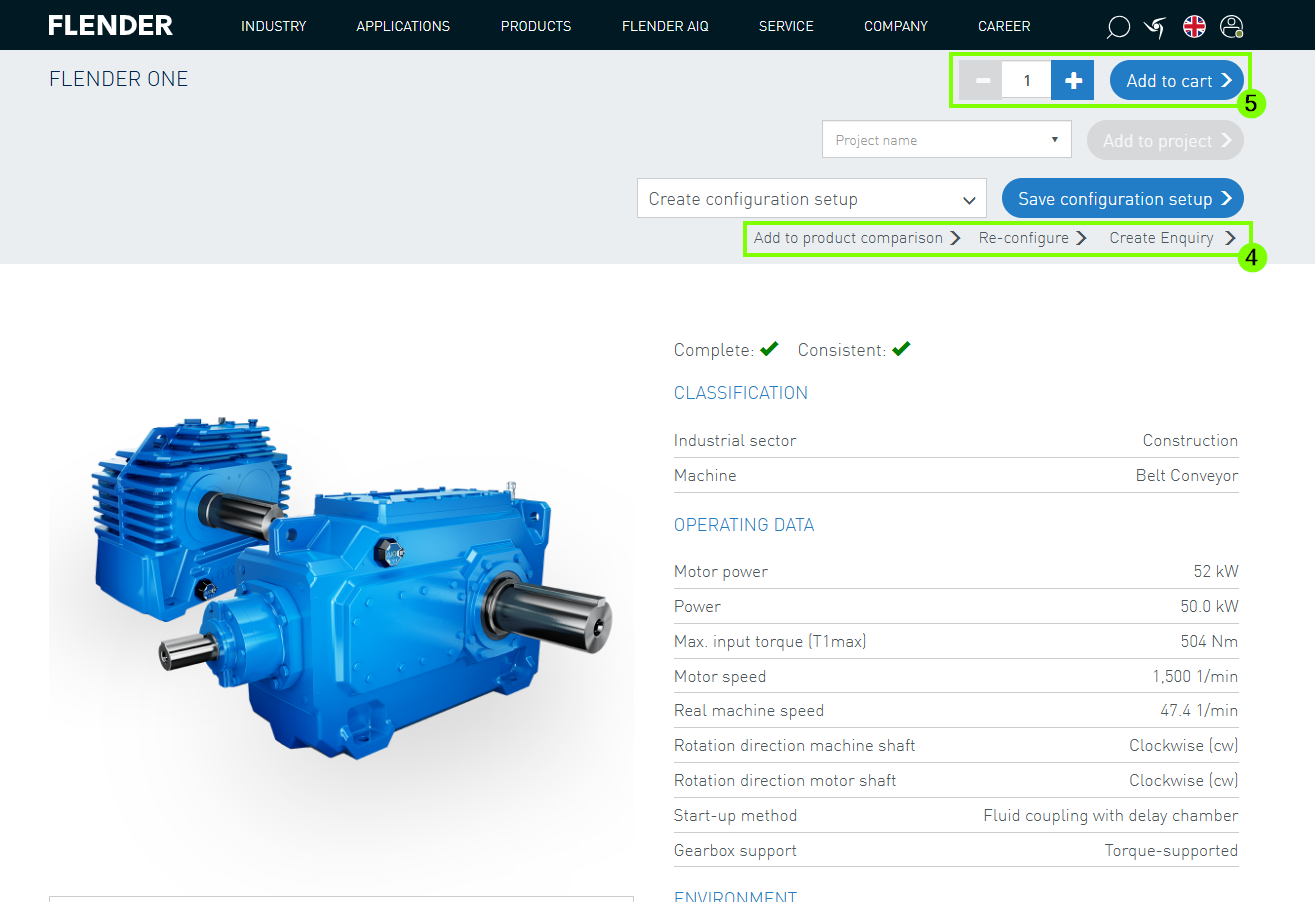
You will then reach the following user interface:
Special attention should be paid to whether the configuration is complete and consistent (1).
On the right side, the essential parameters of the product are visible.
Additionally, product-related documents can be downloaded there.
There is also the option to add the configured product to the cart (2), add it to a project after selection (3), or compare it with other products (4).
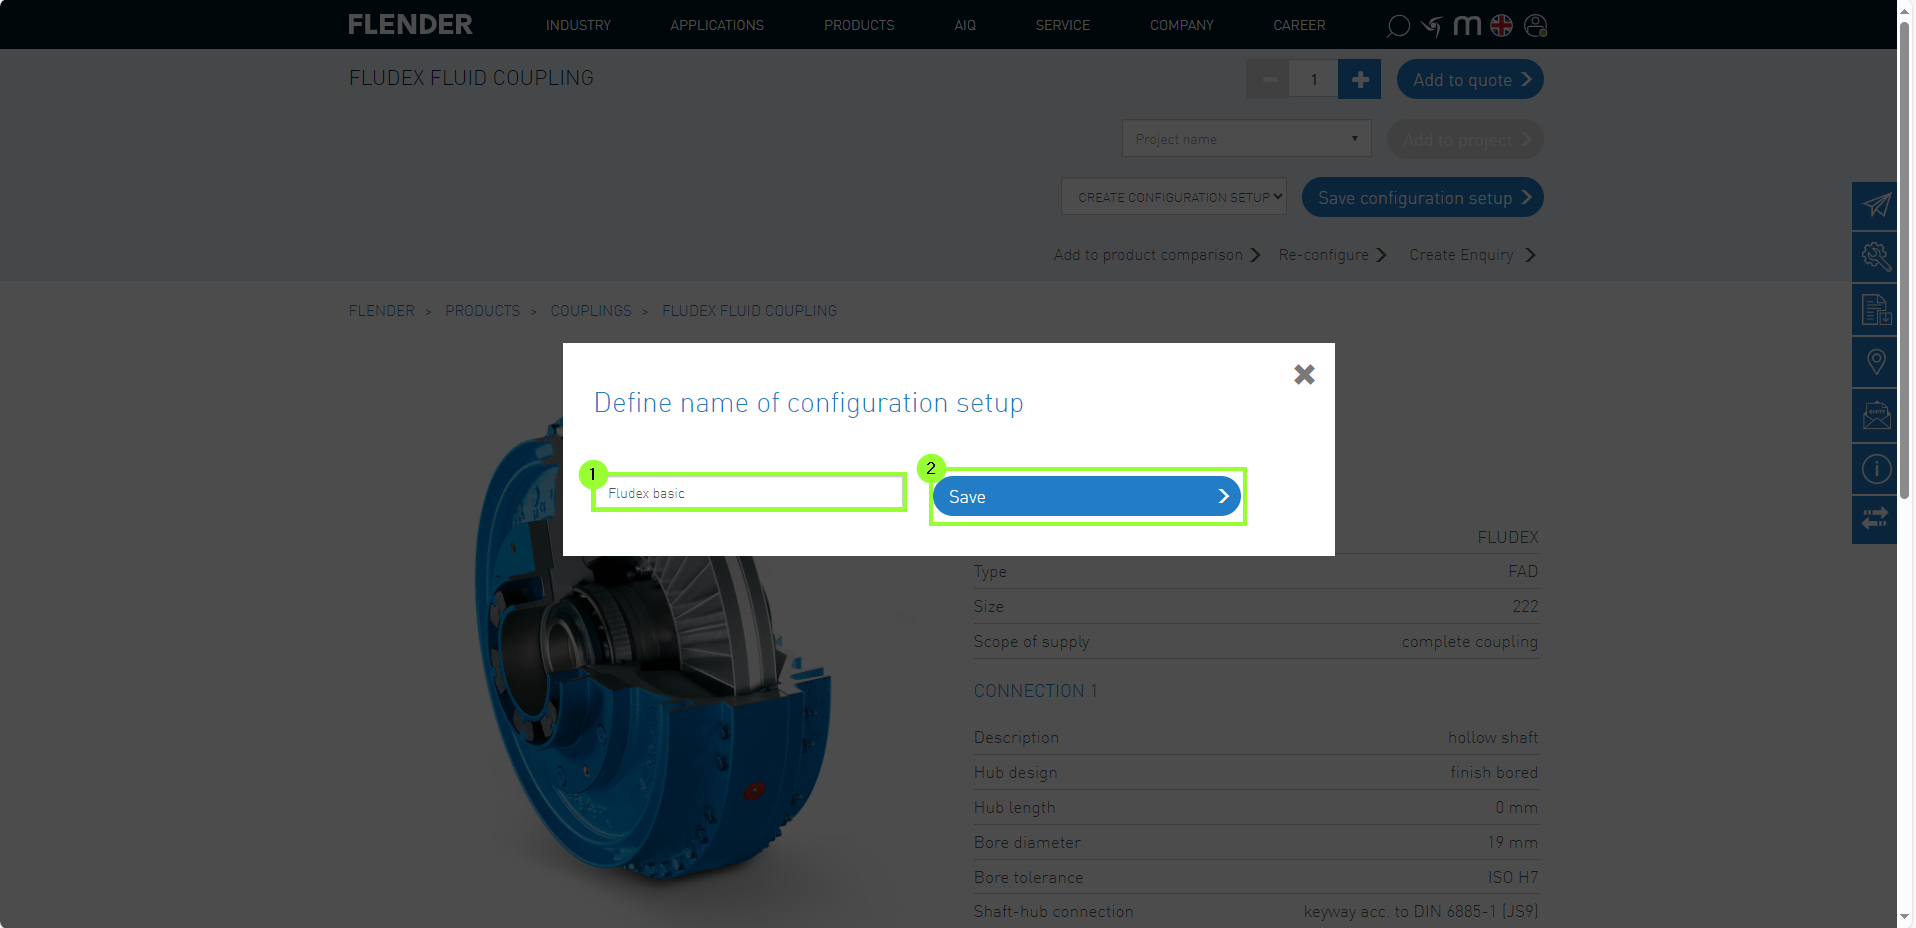
Additionally, it is possible to save the current configuration variant (5).
In the following menu, a freely selectable designation can be entered (1). This will be saved in the customer data by selecting "Save" (2).
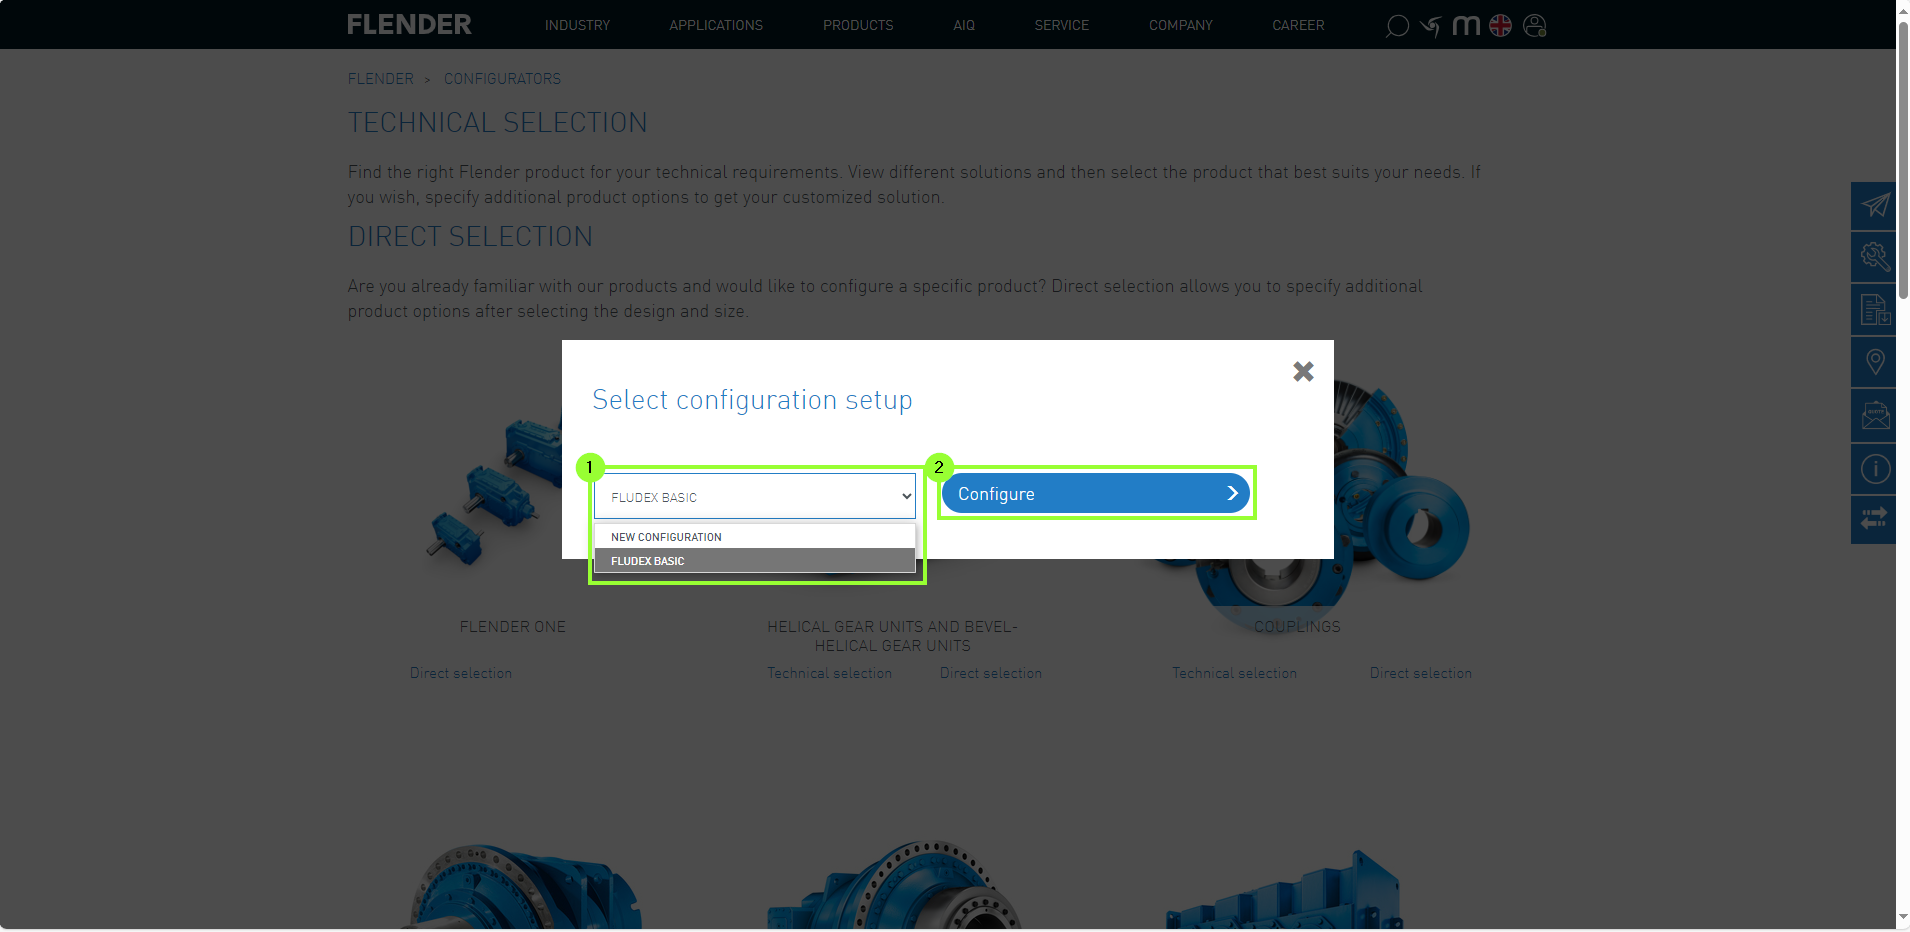
3. Accessing Saved Configuration Variants
Saved configurations can be opened via direct selection to start with the saved configuration.
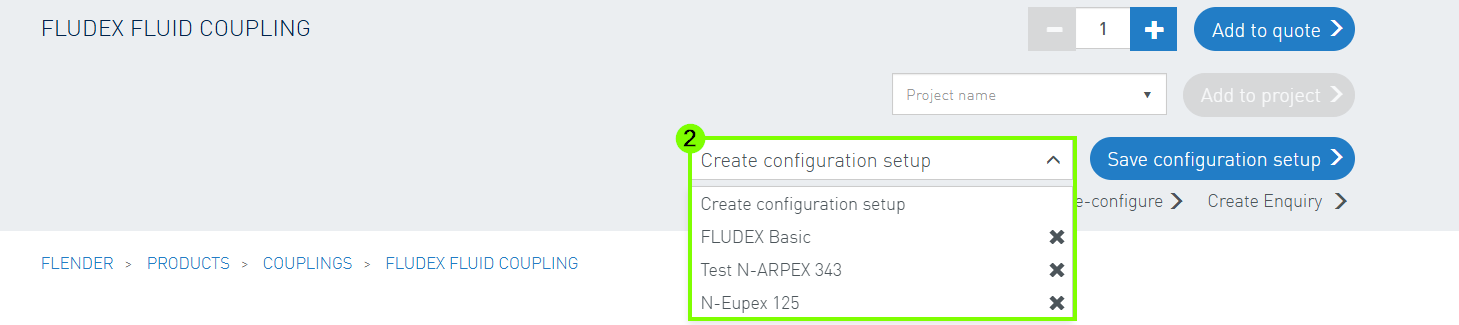
The desired variant can be selected from the dropdown menu (1) and then switched to the configurator by clicking “Configure” (2).
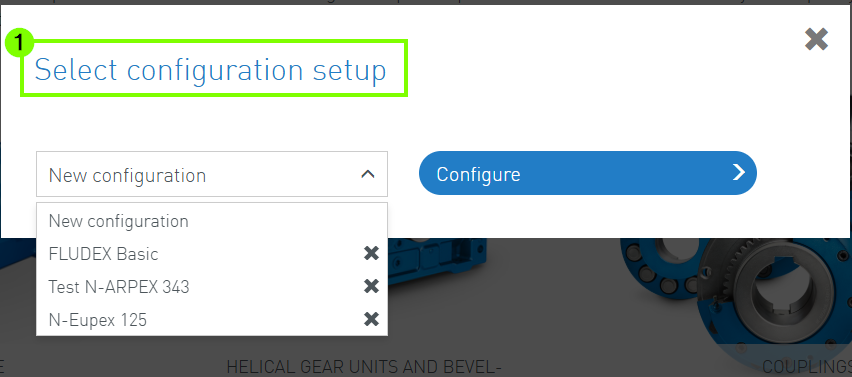
4. Deleting configuration variants
If a saved variant is no longer needed, it can easily be removed by clicking the "X" icon (1). Afterwards, confirmation of the deletion is required (2).
A variant can be deleted either directly when creating a new configuration (1) or when saving a configuration (2).
My Projects is a feature that allows you to collect a list of products without adding them directly to the cart.
A major advantage of My Projects is that you can efficently collaborate with your colleagues.
By default, projects are visible to all your colleagues. You have the option to create your own private projects that are accessible only to you.
To access this feature, navigate to the "My Projects" menu item after clicking on the user menu.
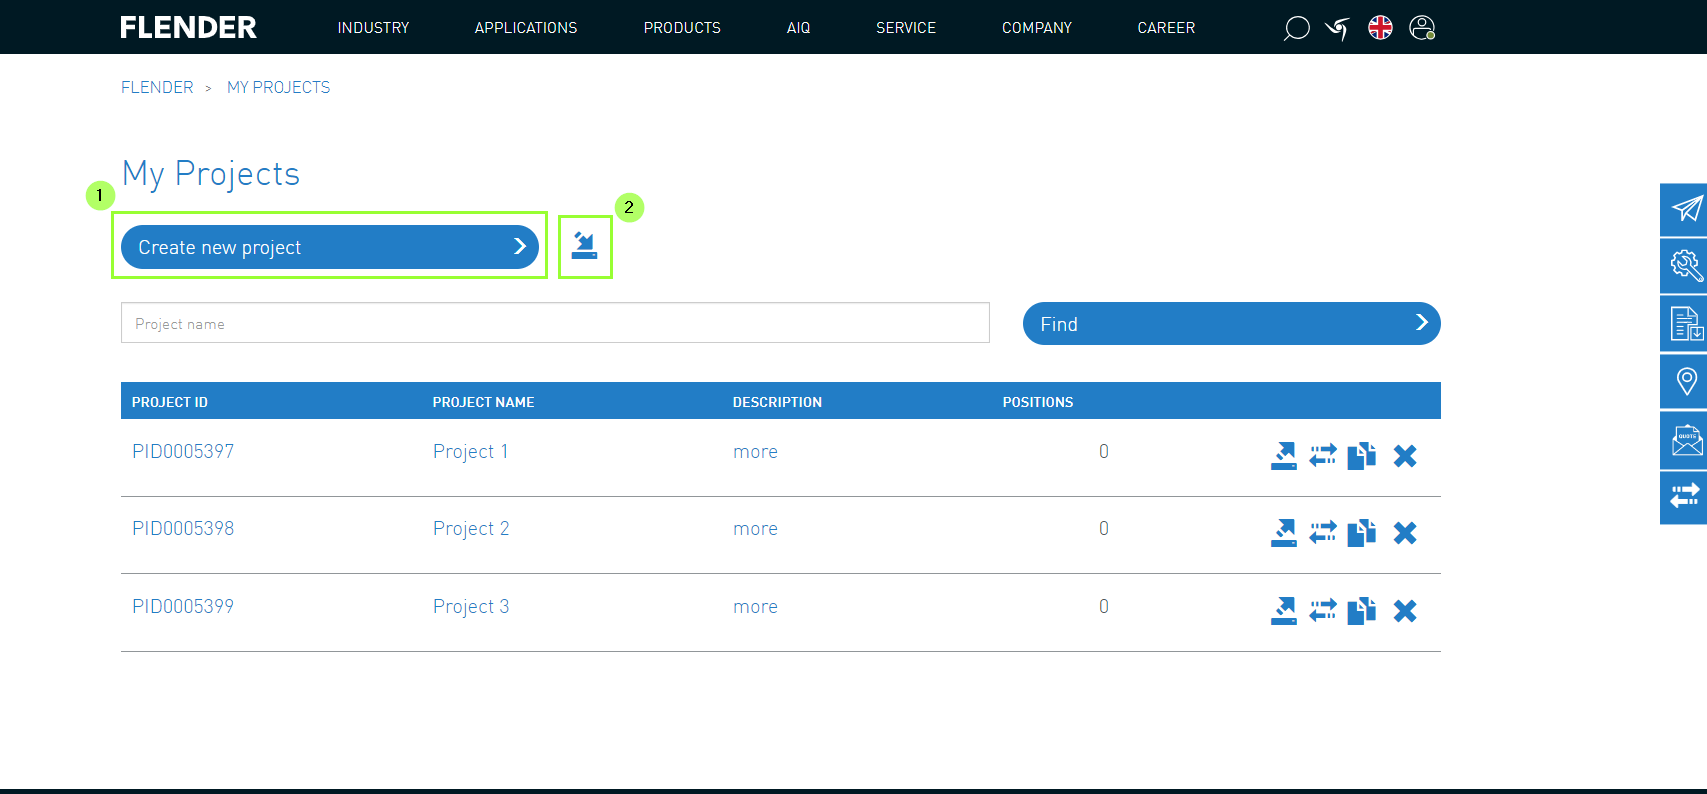
1. Project Creation
When creating new projects, there are two different options available.
Manual creation (1)
Import of existing projects (text file with CSV, XLS, XLSX extension) (2)
2. Add Products to Project
Procedure: Adding products to the project
Select/configure Flender product
Select project (1)
Add product to project (2)
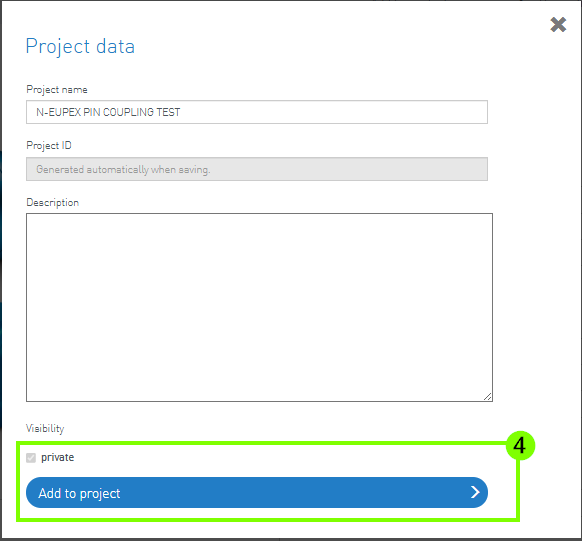
Alternatively, a new project can be created via the product details page (3).
To do this, enter the required data and save the project (4).
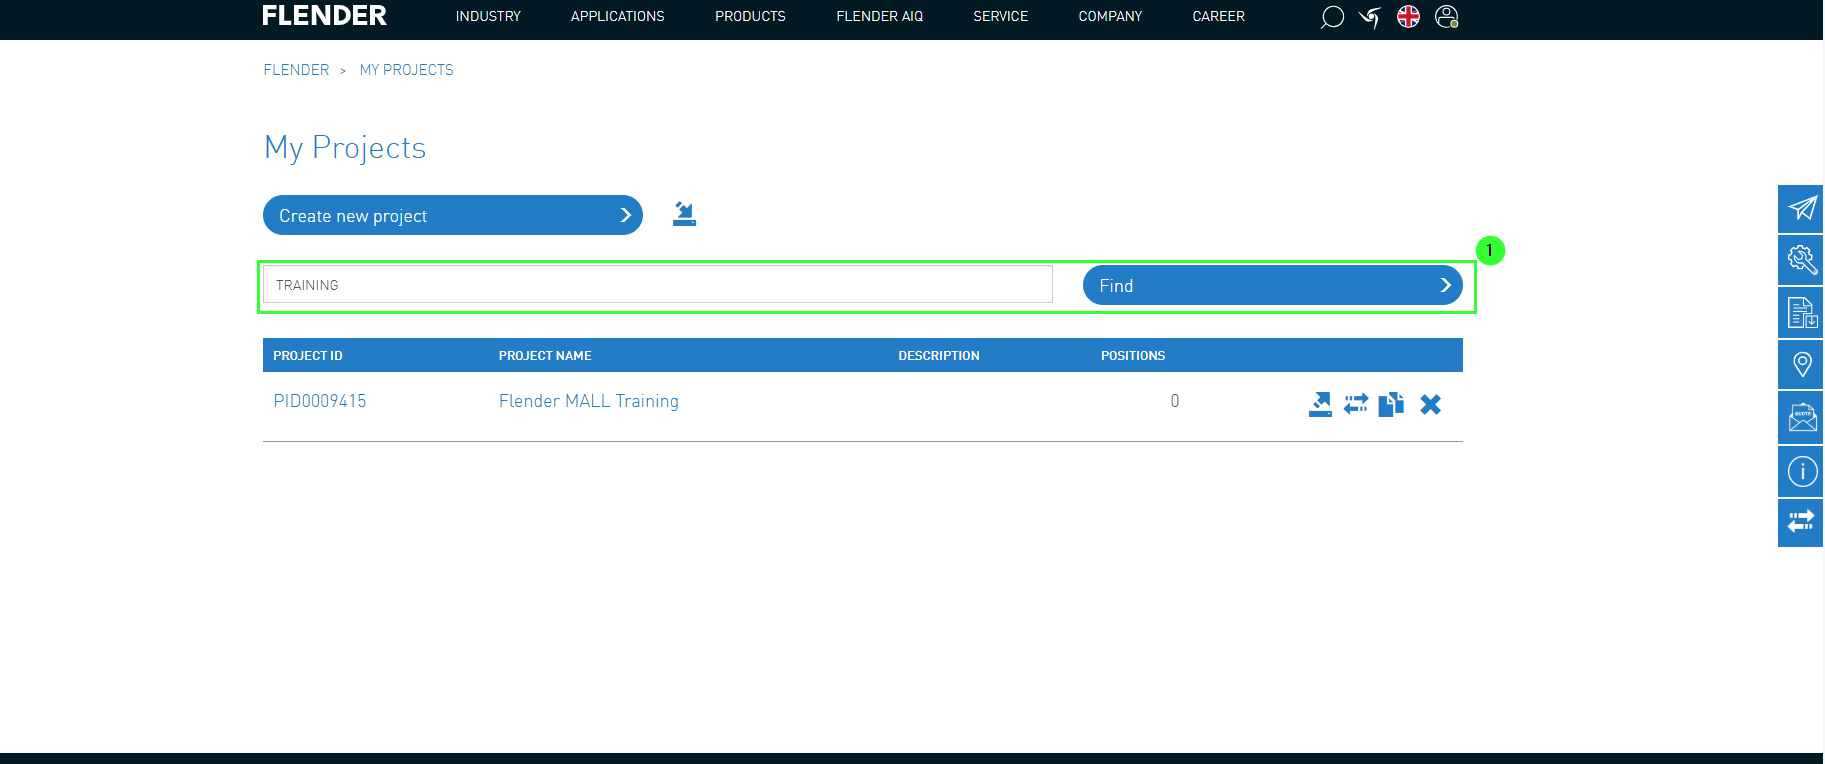
Already created projects are listed here (1) alphabetically and can be quickly found using the search function.
3. Project Content
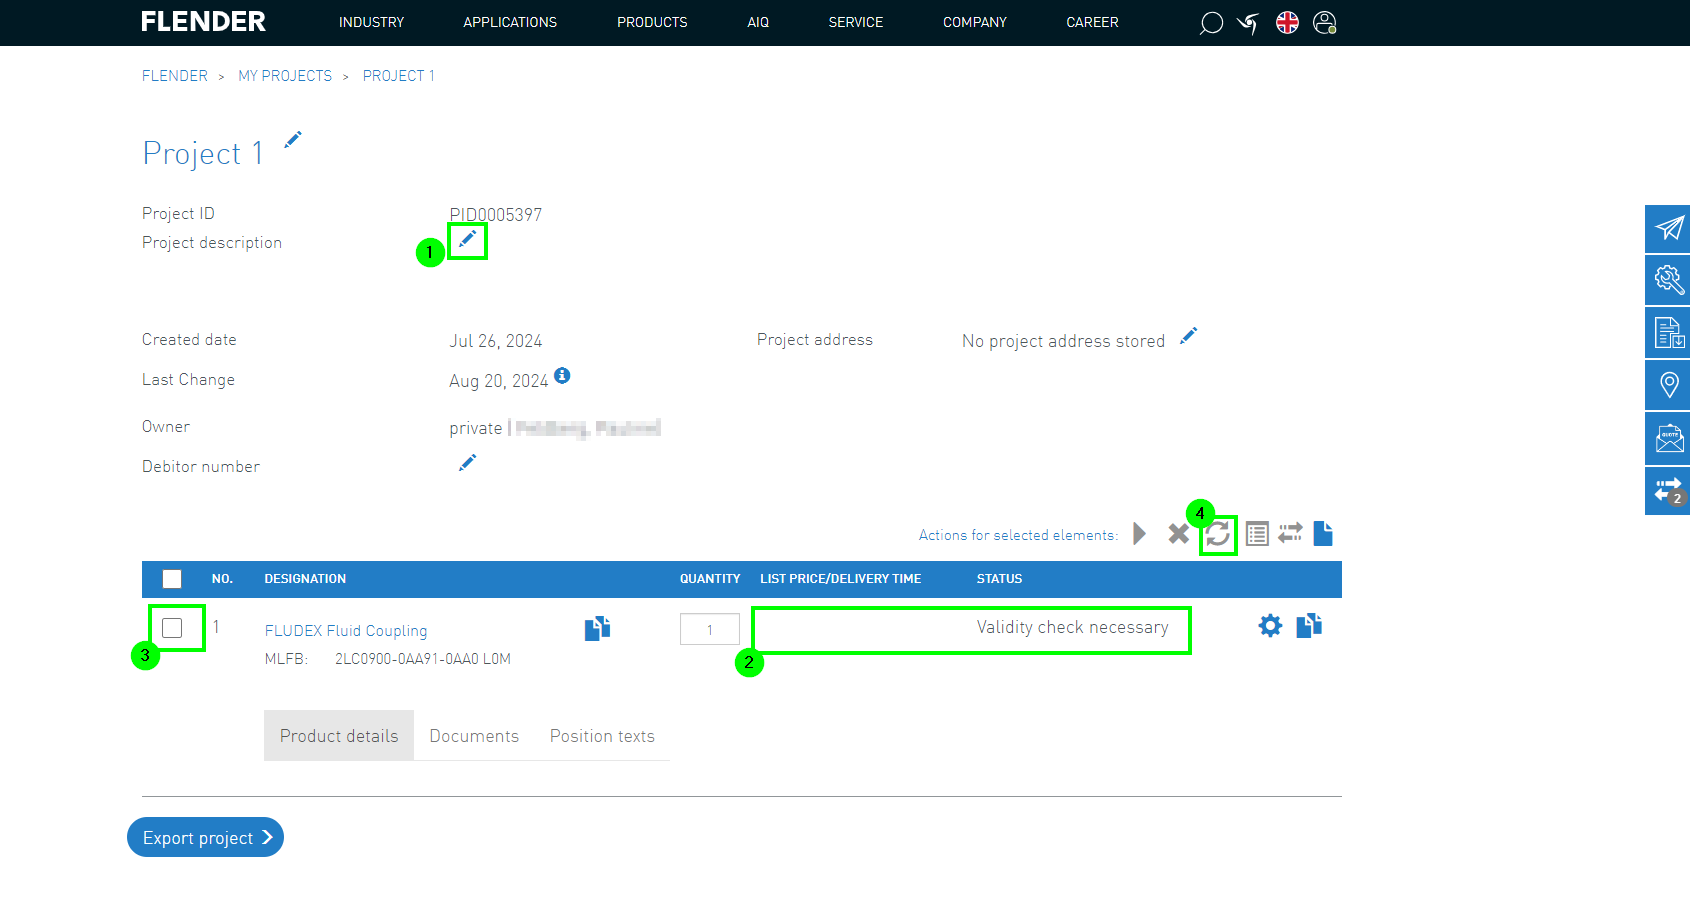
By clicking on individual projects within the project list, the content of the project can be displayed and, if necessary, edited using the pencil icon (1).
However, it is important to note that the product configuration must be validated when the project is called up. It is therefore necessary to check the status (2).
To do this, the individual items of the project must be selected (3) and then updated (4).
Additionally, the product details for each item are displayed.
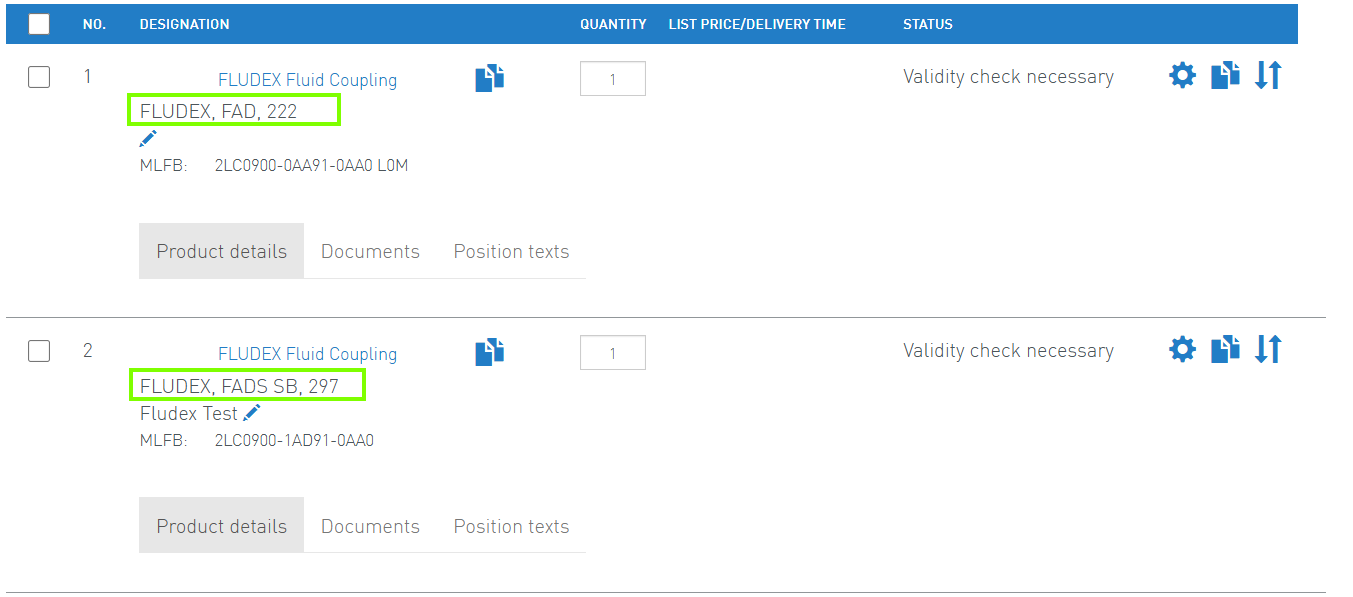
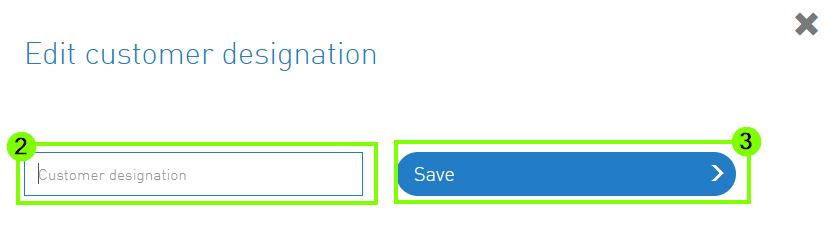
In addition, individual or supplementary information and designations can be added to the products. To do this, first select the pencil icon (1), then enter the desired text (2), and finally save (3).
4. Project Export
After a project has been created on the Flender Mall, it is also possible to export it.
The following steps need to be completed:
(1) Click on the "Export Button"
(2) Select the desired format
(3) Export to Downloads
Additional features of My Projects are:
(4) Add to product comparison
(5) Clone projects
After the selected projects have been exported, the downloaded document is available. An example of a downloaded XLS document can be found in the next image. Here, the MLFB numbers or, for FlenderOne gear units, the ConfigID are specified.
My Equipment offers you a comprehensive platform for managing your Flender products. Here are some of the main features available to you:
Management of purchased Flender products
Retrieving order data for equipment
Access to spare parts lists
Adding spare parts to My Projects or the cart
Downloading drawings
To use the features of My Equipment, specific access permissions are required. If you are interested in using "My Equipment" but do not see this option in your user menu, please do not hesitate to contact us via the contact form.
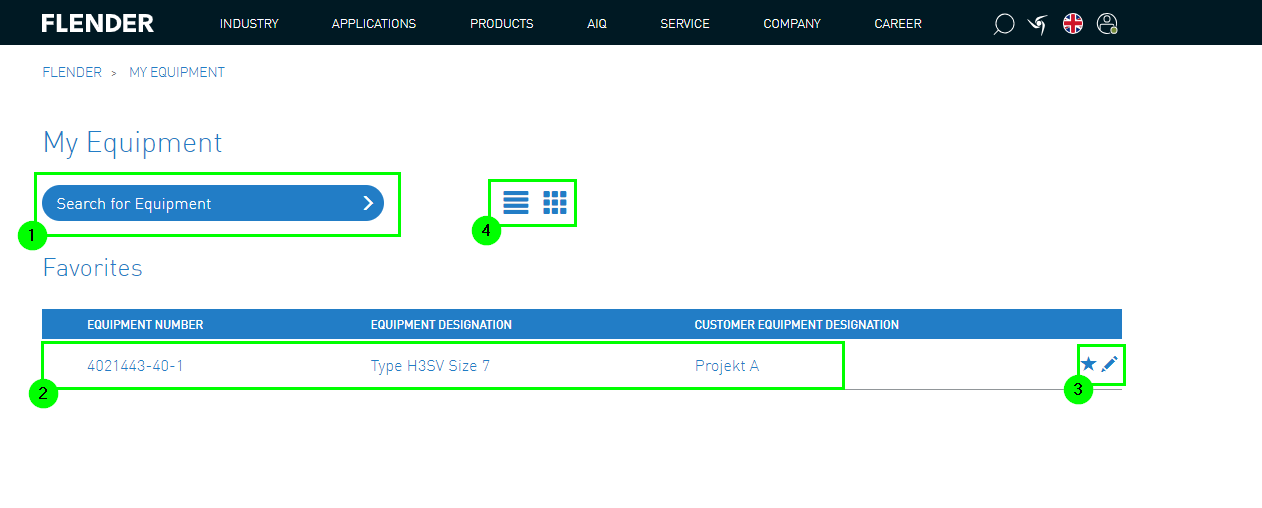
1. Equipment List
Under the user menu "My Equipment", you will be redirected to the equipment list.
There, you can search for various spare part numbers (1).
The displayed equipment list contains all numbers marked as favorites and the following information (2):
Equipment number
Equipment description
Description of the customer device
The description of the customer device can be changed using the pencil icon.
Additionally, by removing the star icon, the equipment can be removed from favorites (3)
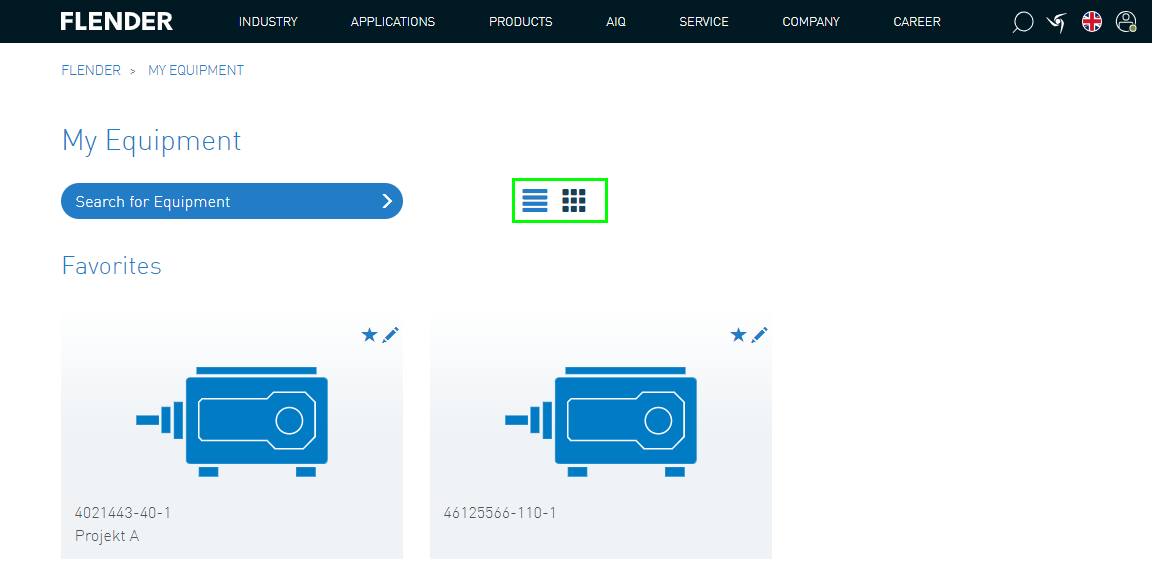
There are two ways to display the equipment list (4).
In addition to the list view, the various equipment can also be displayed as separate tiles:
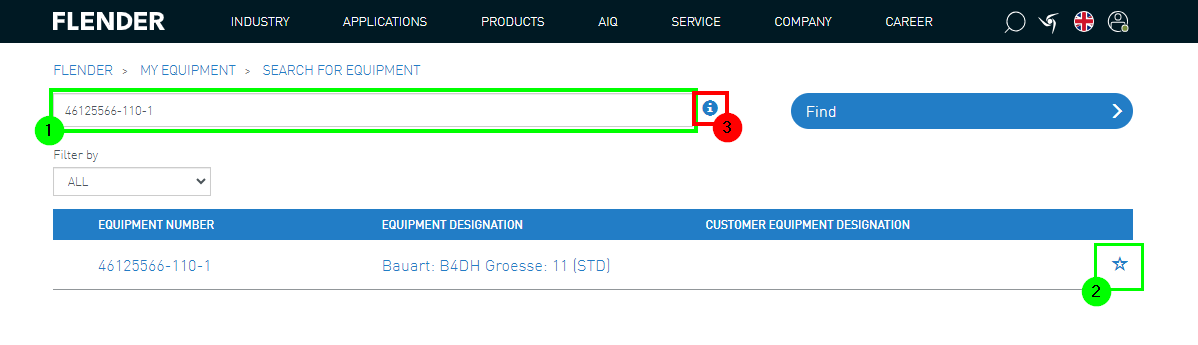
2. Equipment Search
In the search bar, you can then enter the corresponding equipment number (1).
The equipment will then appear in the list, where it can be saved as a favorite in the equipment list using the star icon (2).
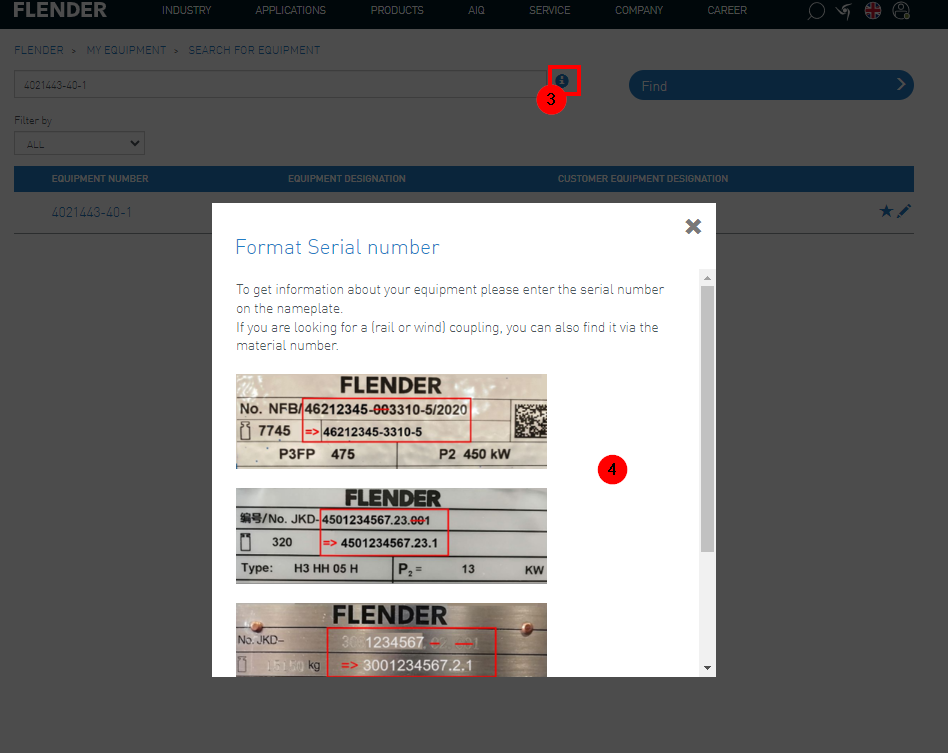
For more information, you can click on the info button (3).
Helpful information will then be provided here.
By entering the serial number, all equipment numbers will be displayed (4).
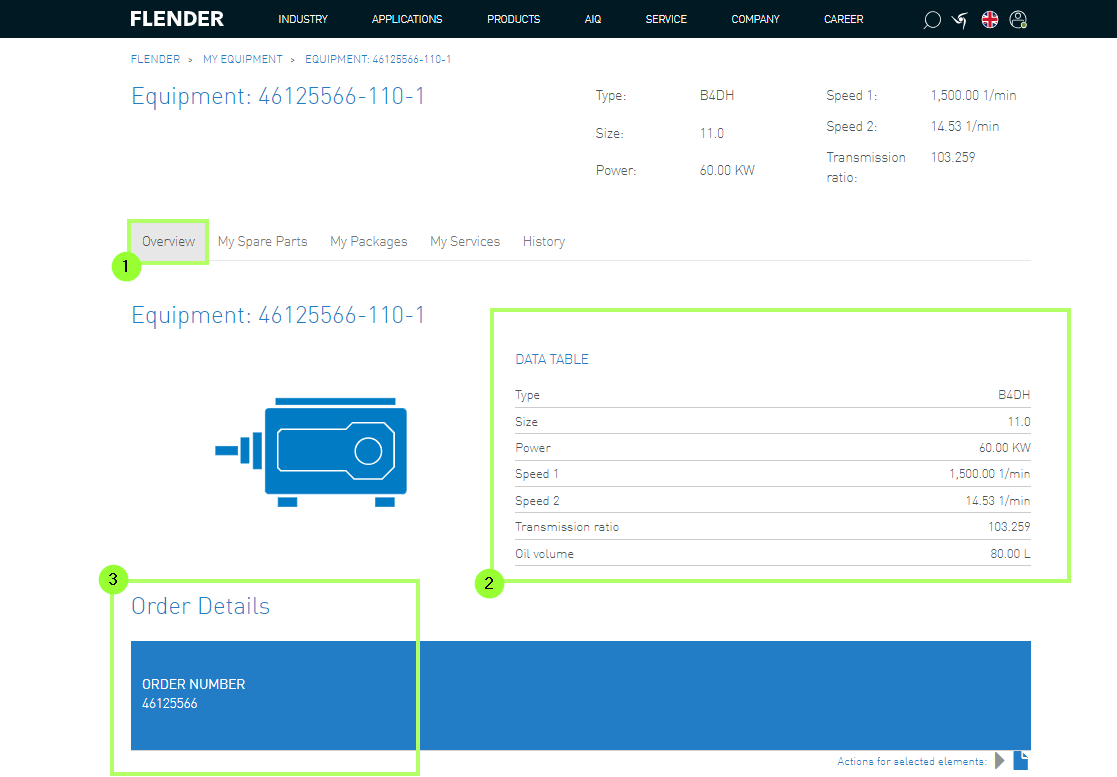
3. Equipment Details
By clicking on the equipment number in the search result or in the favorites list, you can retrieve the order details.
The details consist of 3information areas:
3.1 Equipment - Overview
In the overview (1), the essential product information is displayed (2).
Additionally, order details such as the order number (3) are visible.
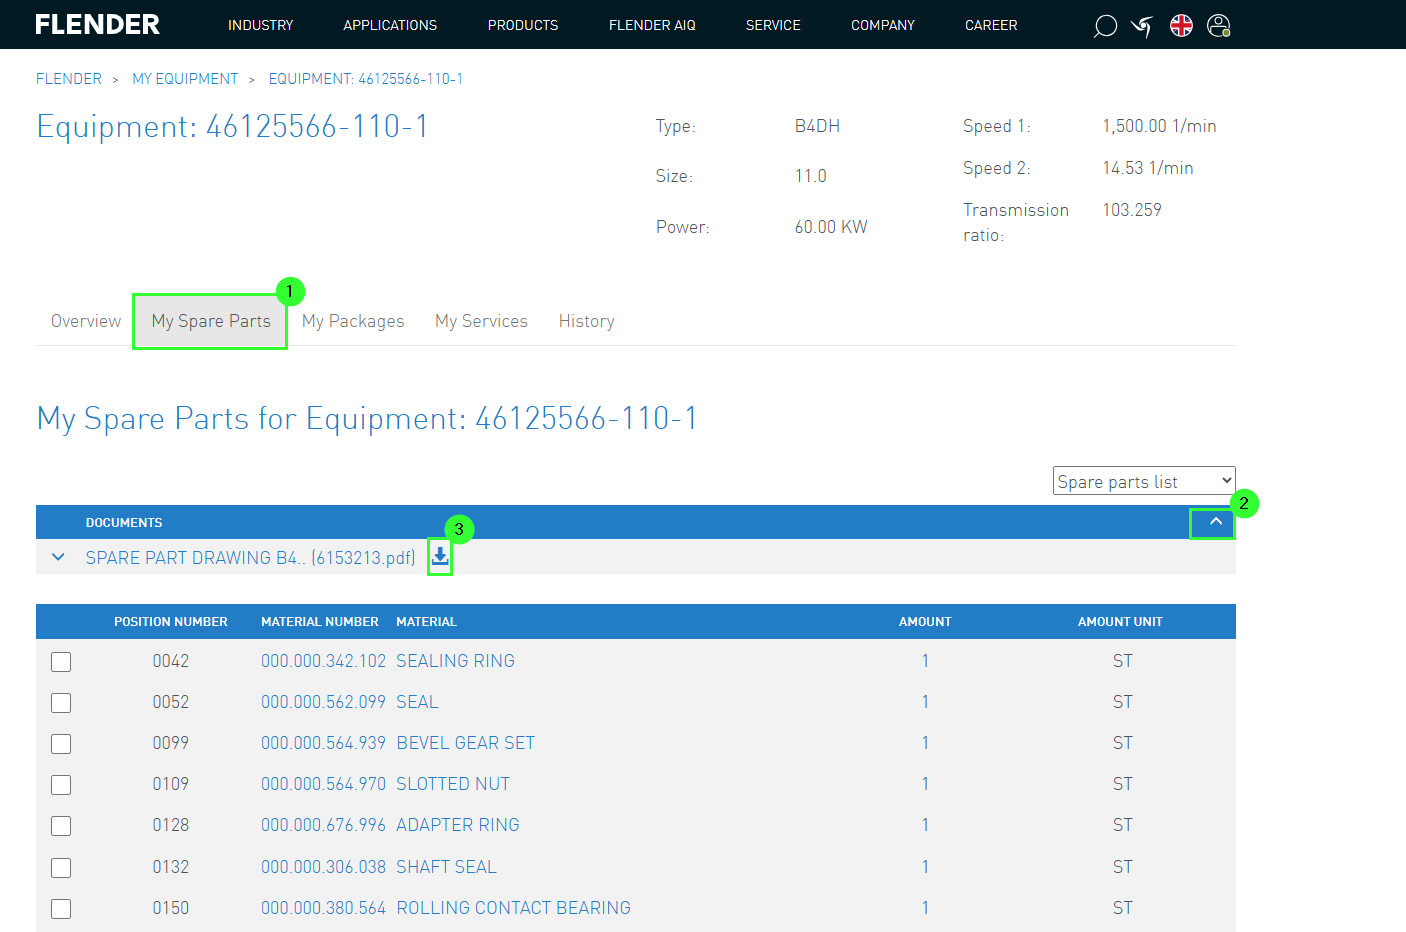
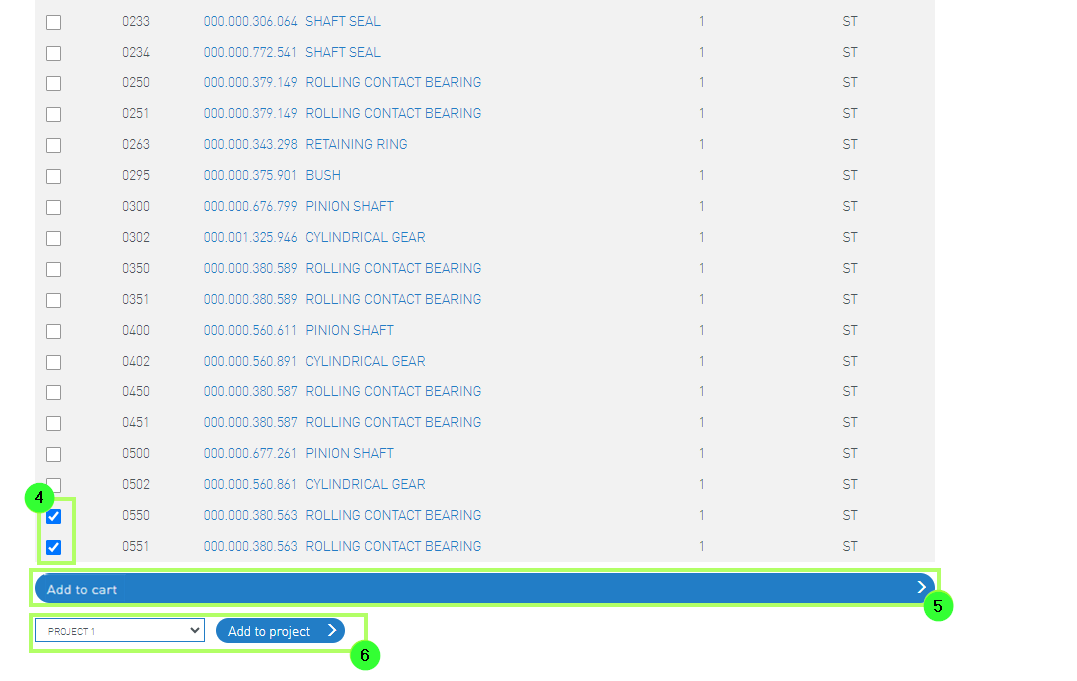
3.2. Equipment - My Spare Parts
All spare parts for the Flender product are listed here (1).
Under the arrow (2), the documents for the spare parts can be downloaded (3)
You can select the desired parts (4) and either add them to the cart (5) or add them to your selected project in "My Projects" (6).
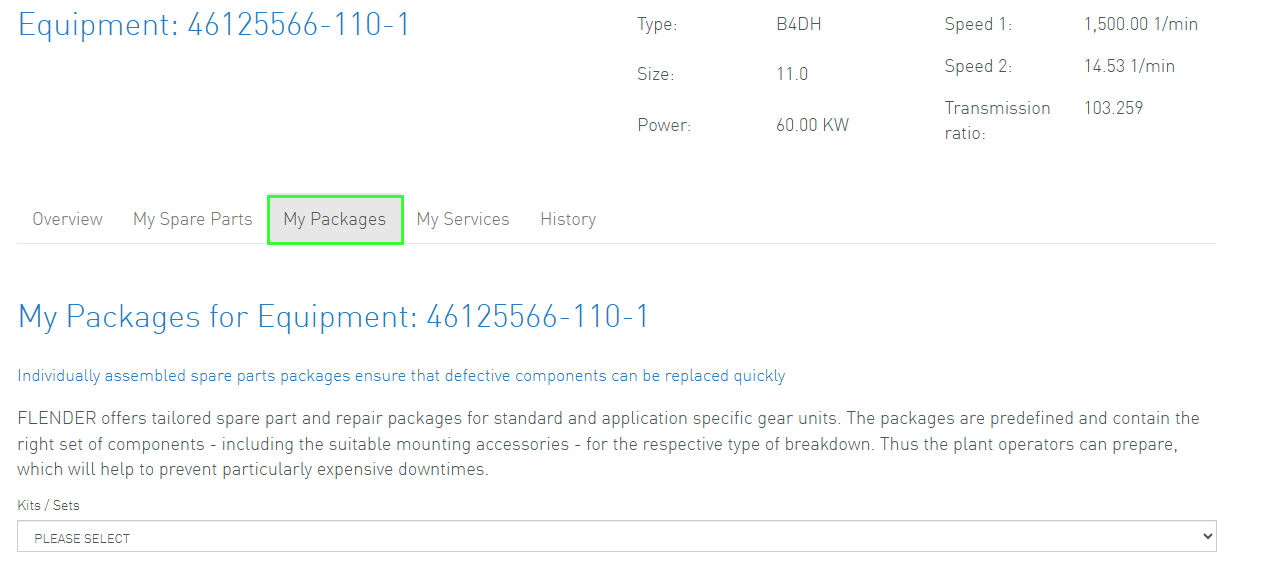
3.3. Equipment - My Packages
Through My Packages, customers can order repair packages.
The offered packages contain the corresponding spare parts to enable customers to quickly prepare